1. Marigold Petal Halo with Cream Ribbon Rim
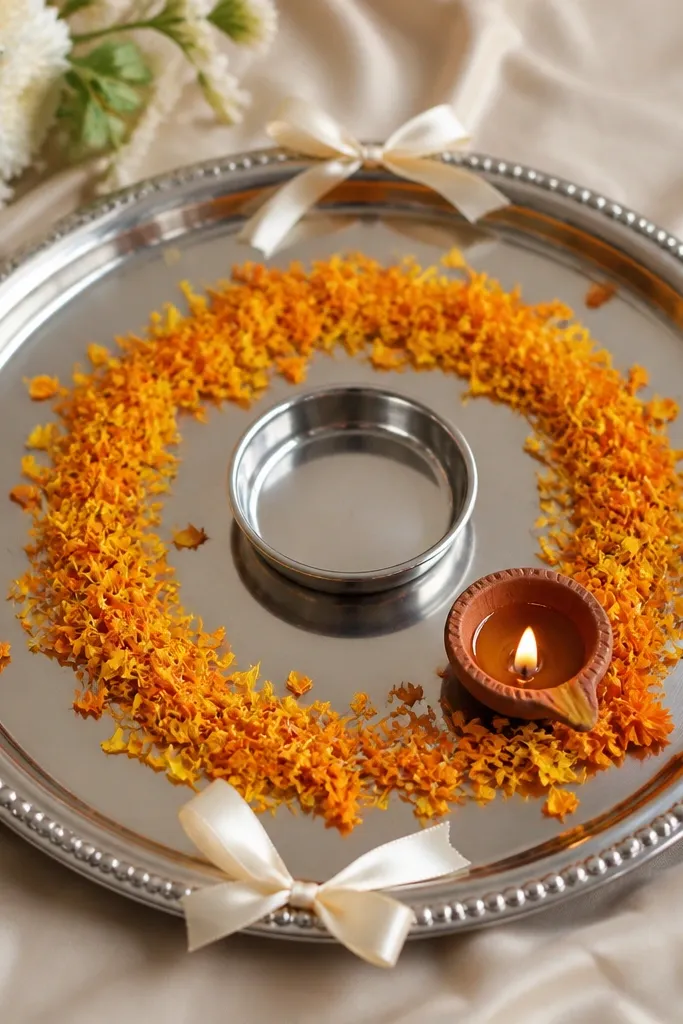
This setup works because the petals create a soft, organic border while the cream ribbon gives a clean, photo-friendly line on the rim. The marigold orange pops against steel and also makes yellow haldi look deeper instead of flat. I used this when the function was indoors with warm bulbs, and the cream ribbon kept the tray from turning too monochrome. It flatters most skin tones because the warm orange sits against the skin without looking harsh, and the cream keeps the overall palette bright. The styling principle is a halo shape - you're guiding the eye from the diya to the center bowl in a circle.
Start by laying a thin sheet of white or cream tissue paper on the tray base, then place your center bowl down so you know the working area. Build the halo by scattering marigold petals in a ring about 2 to 3 inches away from the bowl edge. Cut cream satin ribbon into 4 equal lengths of around 6 inches each, then tie them into small loops and secure the loops with double-sided tape under the rim. Finally, place the diya near one gap in the halo and add a tiny petal cluster at the diya base so it looks intentionally placed, not dropped.
Try thisIf your petals look dry, mist them lightly with a spray bottle so they look fuller in photos.
Common mistakeDon't pile petals too close to the bowl rim - it makes the arrangement look messy and can block a clean view of the haldi.
2. Yellow Velvet Strip Base with Tiny Flower Clusters
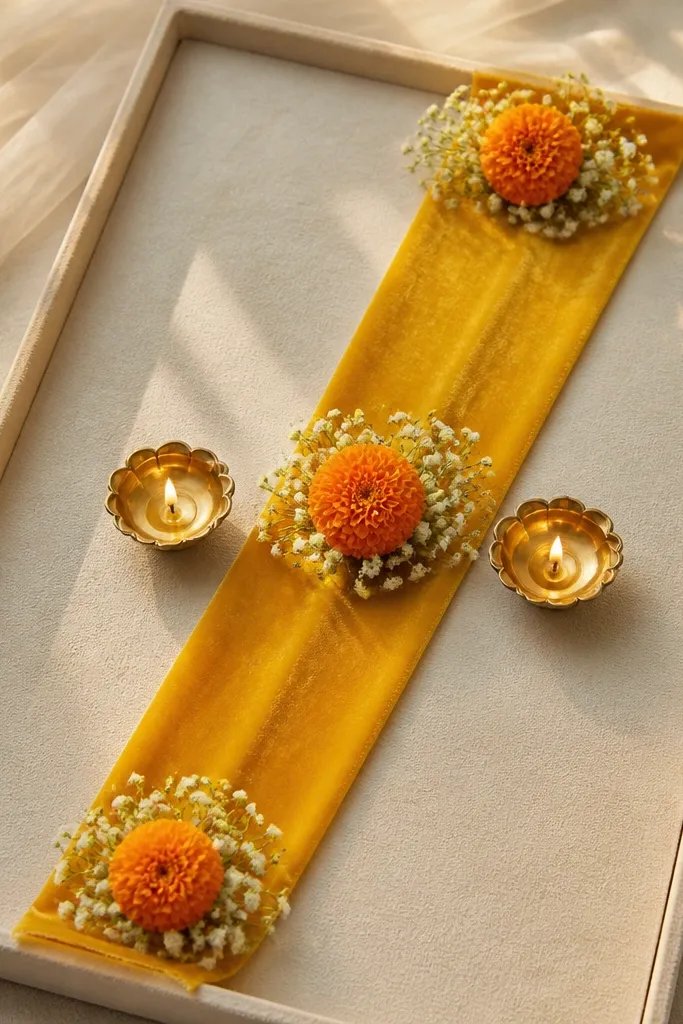
Velvet is the secret when you want depth without extra bulk. The yellow velvet strip catches light in a way that makes the whole tray look richer, and it hides small unevenness on the tray surface. Baby's breath adds tiny white points that read cleanly in close-ups, and marigold gives the warm anchor so it still feels like haldi. This looks best when you have a slightly busy tray already, because the strip gives a strong base line. It flatters anyone's outfit too - the velvet tone harmonizes with mustard, pastel yellow, and even deep green sarees.
Start by cutting a yellow velvet strip about 4 inches wide and the length of your tray, then place it diagonally so it frames the center bowl. Secure the strip with a few small glue dots or tape spots under the velvet edges. Make three clusters: each cluster has 4 to 6 baby's breath stems and 3 to 4 marigold petals, tied loosely with thin thread. Place one cluster near the top rim, one right beside the center bowl, and one near the bottom rim. Set diyas at the left and right of the center bowl, then tuck 1 or 2 petals under each diya base for stability.
Try thisUse velvet with a matte finish; it photographs better than shiny satin when indoor lighting is dim.
Common mistakeAvoid using too many flower types - the tray will start looking like a random bouquet instead of a planned haldi setup.
3. Fresh Mango Leaf Corner Frames
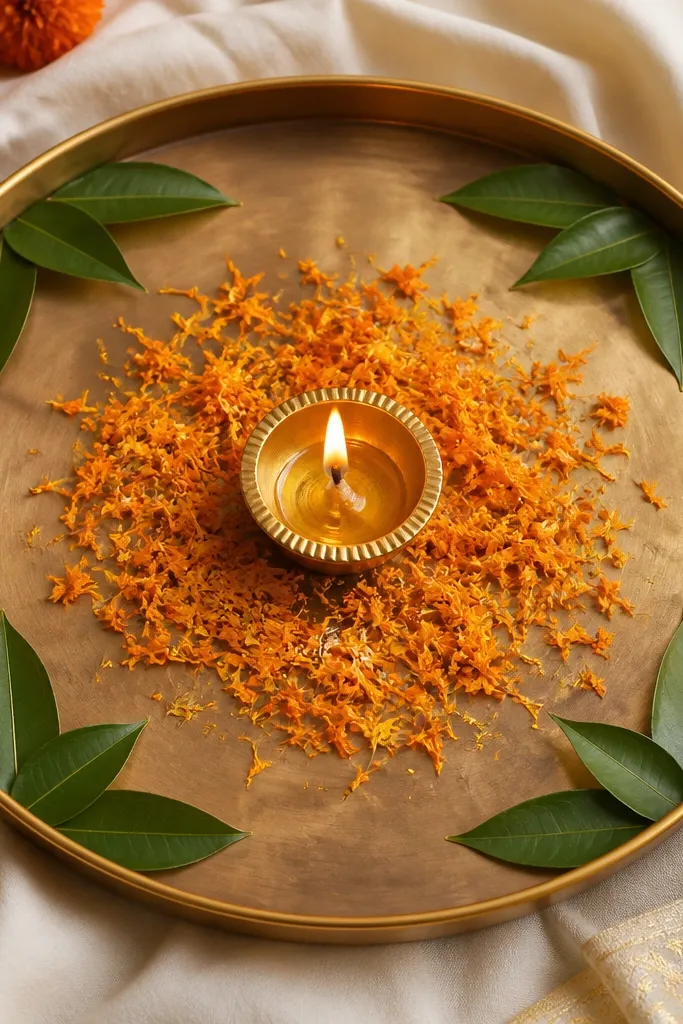
Mango leaves instantly read traditional without needing heavy garlands. The corner-frame layout gives structure, so even a minimal arrangement looks designed. Marigold petals in the middle keep the color joyful, and the diya in the center stays the focal point. This works beautifully for people who want a haldi tray that feels grounded and not too "decor heavy." It flatters deeper outfits like navy and emerald because the mango green adds contrast. The styling principle here is framing - you're building a border that guides the viewer's eye inward.
Start by soaking 4 mango leaves briefly in room-temperature water so they bend without snapping. Create two pairs of leaf brackets: fold each leaf so it forms a V shape, then tuck the V ends into the corners of the tray using tape under the leaf base. Scatter marigold petals in the center area, leaving a clear 2-inch circle around your diya placement. If you have a thin gold border ribbon, run a 1-inch strip of it around the bowl base or tie it lightly around the bowl handle area. Place the diya in the center and add one extra petal cluster right in front of the leaf frame so the arrangement feels anchored.
Try thisIf mango leaves look too wet, pat them dry with a paper towel before placing - it prevents sliding.
Common mistakeDon't place leaves directly on top of haldi powder - it stains and looks uneven.
4. Rose + Marigold Double-Stack Center Bowl
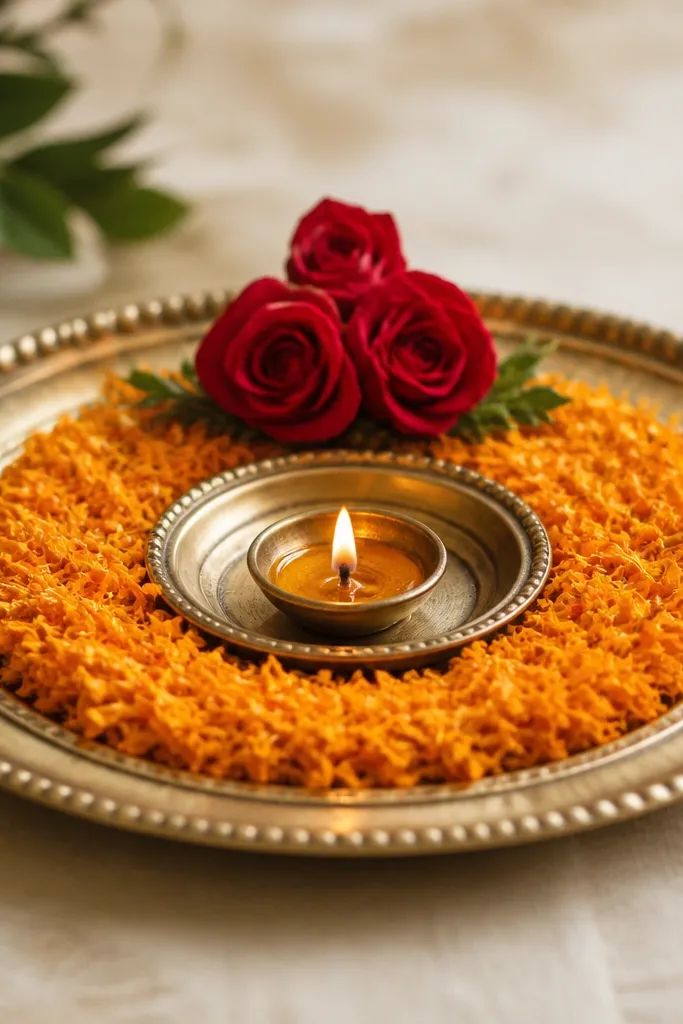
This setup is for when you want the haldi tray to look romantic and upscale without buying expensive decor. Roses add a soft blush and break the monotone yellow-orange palette. The marigold petal ring keeps it traditional, so it still reads haldi, not just wedding florals. This flatters light and medium skin tones because the rose color looks clean against warm yellows. It also looks great for women's haldi functions where the outfit is pastel - the rose tones echo that softness. The styling principle is layering at the center - you're creating depth behind the diya.
Start by placing a thin layer of petals around the bowl base, leaving a clean space in front where the diya will sit. Add a small rose cluster behind the diya - choose 6 to 8 mini rose heads so the height stays controlled. Place two single rose buds on the left and right of the bowl rim so the center doesn't look empty from the sides. Use double-sided tape to anchor rose stems under the marigold petals so they don't shift. Finally, scatter a few petals around the outer edge of the center ring, not the whole tray, so the arrangement stays focused.
Try thisPick mini roses over large bloom heads; they fit the tray scale and don't overpower the haldi bowl.
Common mistakeDon't put the rose cluster too low - it blocks the diya flame view and looks cluttered.
5. Gold Foil Confetti + Green Leeflets Border
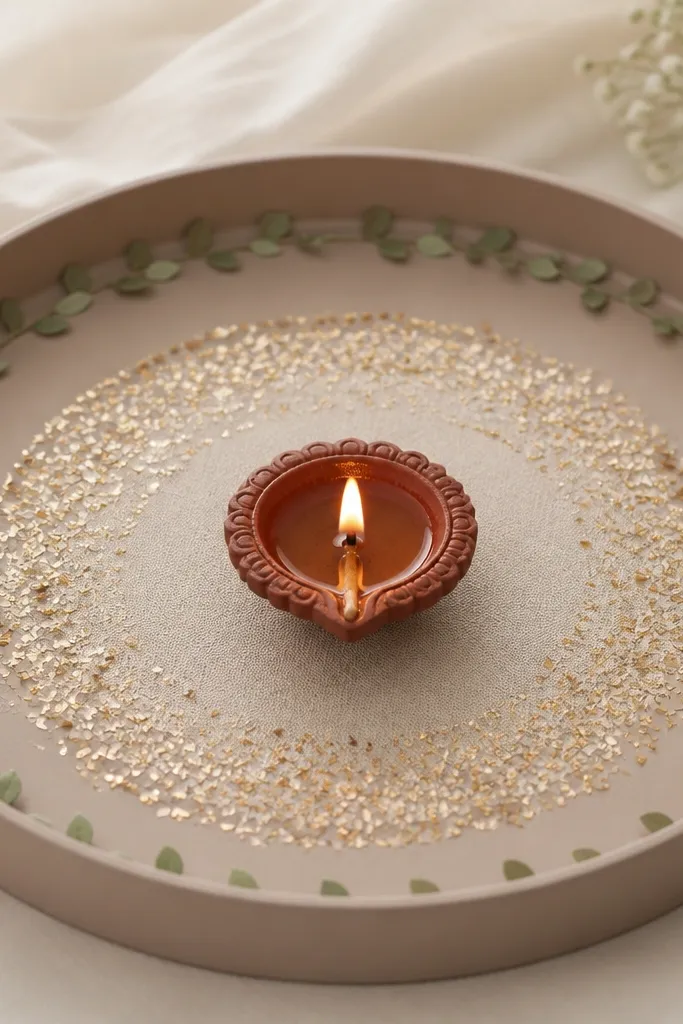
Gold foil confetti sounds extra, but it's the fastest way to make a simple tray look "event-ready" in photos. The green leaflets add a clean contrast line, and the beige base fabric stops the whole thing from looking too loud. I used this when we had a quick indoor haldi with bright overhead lights that flattened colors. Gold catches that light and gives sparkle without adding bulk. It flatters people wearing warm-toned outfits because gold ties everything together. The styling principle is controlled placement - confetti in an oval, not scattered everywhere.
Start by placing a beige cloth or jute-look runner on the tray base, cut to sit 1 inch away from the rim. Create an oval confetti area by placing a strip of tape lightly as a guide, then scatter gold foil confetti inside it. Add green leaflets along the rim: tuck them at 8 to 10 points with tape under each stem so they look evenly spaced. Place the diya in the center of the oval, then add one small marigold petal cluster on the side nearest the camera. Remove any guide tape and gently tap the tray so confetti sits flat.
Try thisUse a small makeup brush to sweep stray confetti off the rim after you set the diya.
Common mistakeSkip glittery loose powder - it looks messy and can get on the haldi items.
6. Satin Bow at Rim with Petal Spill on One Side
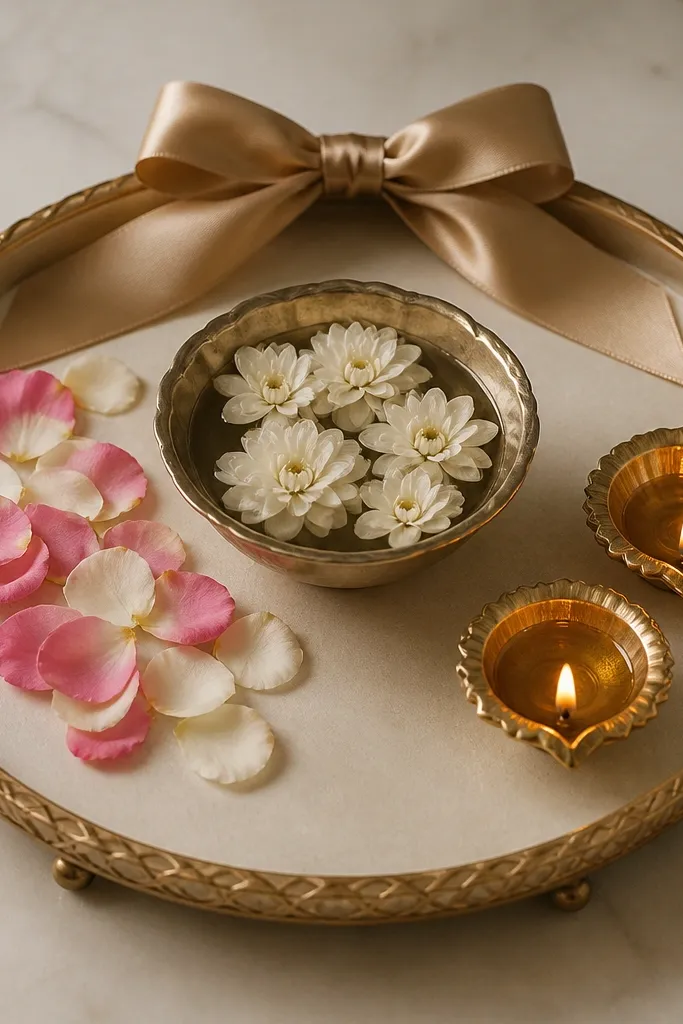
This is a great "quick but pretty" layout because it creates one strong focal point - the bow - and then adds movement with petals on only one side. The asymmetric petal spill is what makes it look styled instead of symmetrical-and-boring. It looks especially good if your tray already has multiple bowls; the bow organizes the scene. I've used it for family functions where people move the tray around for photos - the bow stays visible in most angles. It flatters darker outfits because satin light reflects and brightens the whole frame. The styling principle is asymmetry with a single anchor.
Start by tying a satin bow from a 1.5 to 2 inch wide ribbon, about 10 to 12 inches long, and anchor it at the top rim with double-sided tape under the knot. Place the center bowl slightly lower than the middle so the bow stays in the top third of the frame. Scatter marigold petals in a loose spill only on the left side of the bowl, leaving the right side cleaner. Place two diyas on the right side in a gentle arc, about 2 inches apart, and add 3 petals under each diya base. Finish by placing one tiny gold bead stem (or a single marigold head) near the spill edge so the transition looks intentional.
Try thisIf your ribbon frays, seal the cut ends with a quick pass of flame or fabric fray glue.
Common mistakeDon't spread petals evenly all around - it makes the tray look like decoration fell off.
7. Kumkum Bowl Framing with Pearl String
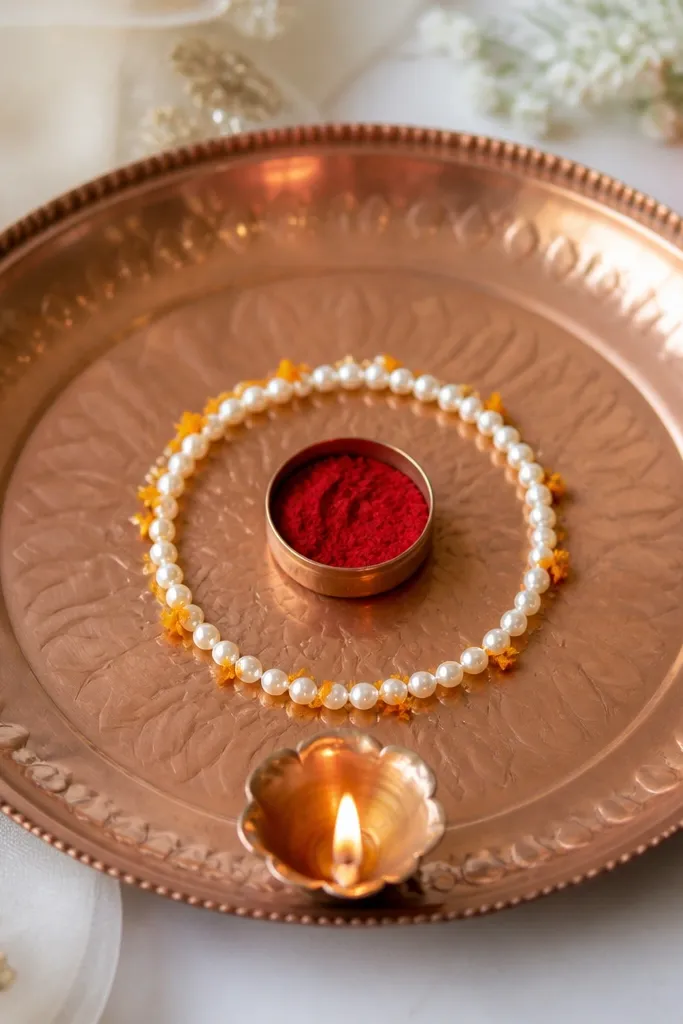
Pearl string gives a clean, luxe look and it's fast because you're repeating one element in a circle. This setup is best when you have a separate kumkum bowl or small container. The pearls make the white haldi setup feel softer and they photograph well even in warm indoor light. I used it for a haldi where the guests wore gold jewelry and the pearl line matched without looking costume-y. It flatters hands and jewelry because the pearls echo the shine of bangles. The styling principle is a geometric frame - circles read crisp on camera.
Start by wiping the tray rim dry so tape sticks. Place the kumkum bowl in the center position, then wrap a pearl string around it in a loose circle without stretching. Mark where it meets and cut the string with a little extra length. Secure the pearl string to the tray with small tape dots under the string at 4 points, then tuck 3 to 4 marigold petals between pearls at the front side. Place a diya near the bottom edge of the tray so the pearls frame the diya from above.
Try thisUse a pearl string with larger beads (around 6 to 8 mm) so it looks visible in photos, not tiny and lost.
Common mistakeAvoid using super-thin pearl thread with tiny beads - it disappears on camera.
8. Rangoli-Style Corner Stencil Mat
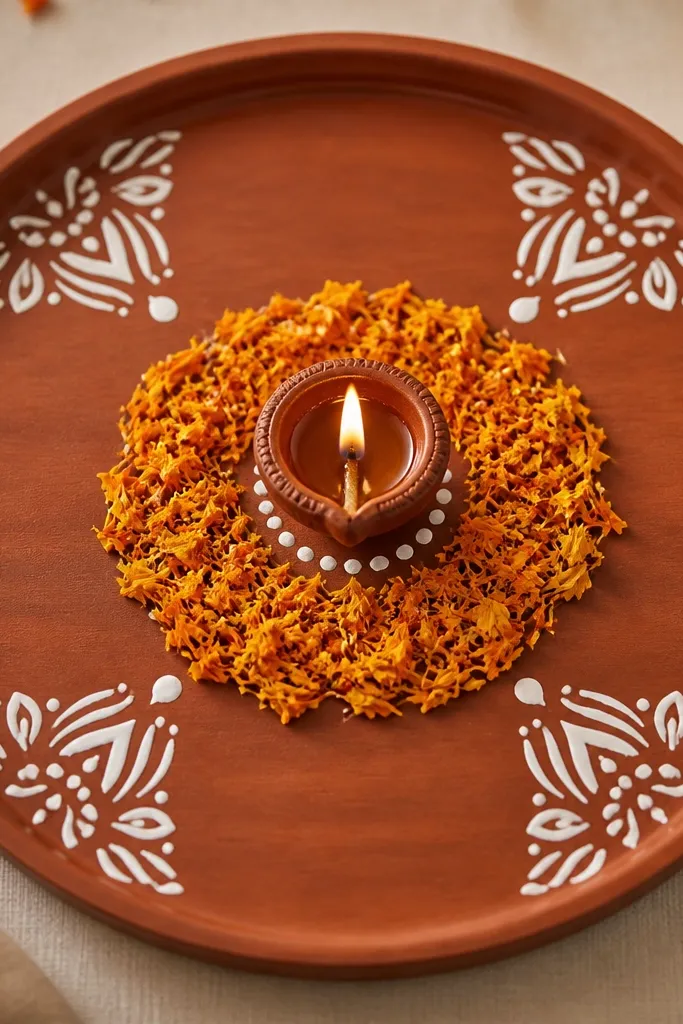
This works when you want a traditional rangoli vibe without drawing on the tray with messy powder. A stencil mat gives crisp lines that read cleanly in photos. Marigold petals bring the color and keep it festive, while the diya stays the clear focal point. I've tested this during quick daytime haldis when there's wind and powder gets everywhere - stencil-style looks neat and stays put. It flatters any outfit because the white lines act like a neutral frame. The styling principle is crisp geometry around a soft petal center.
Start by cutting a thin white chart paper or non-slip foam sheet to fit the tray base size. Use a rangoli stencil (leaf or paisley) and trace the pattern only at the four corners, then color the traced petals with yellow and orange chalk or pastel. Put the mat on the tray and place your center bowl on the empty middle area. Sprinkle marigold petals in the center, then set the diya in front of one corner pattern so the flame aligns with the decorative line. Add a small pinch of colored powder (turmeric mixed with a bit of orange) only at the diya base edge for a clean color pop.
Try thisSeal chalk lines with a light mist of hair spray from far away so they don't smudge.
Common mistakeDon't cover the whole mat in powder - it turns the stencil into a smudge.
9. Handmade Paper Flower Trio on Rim
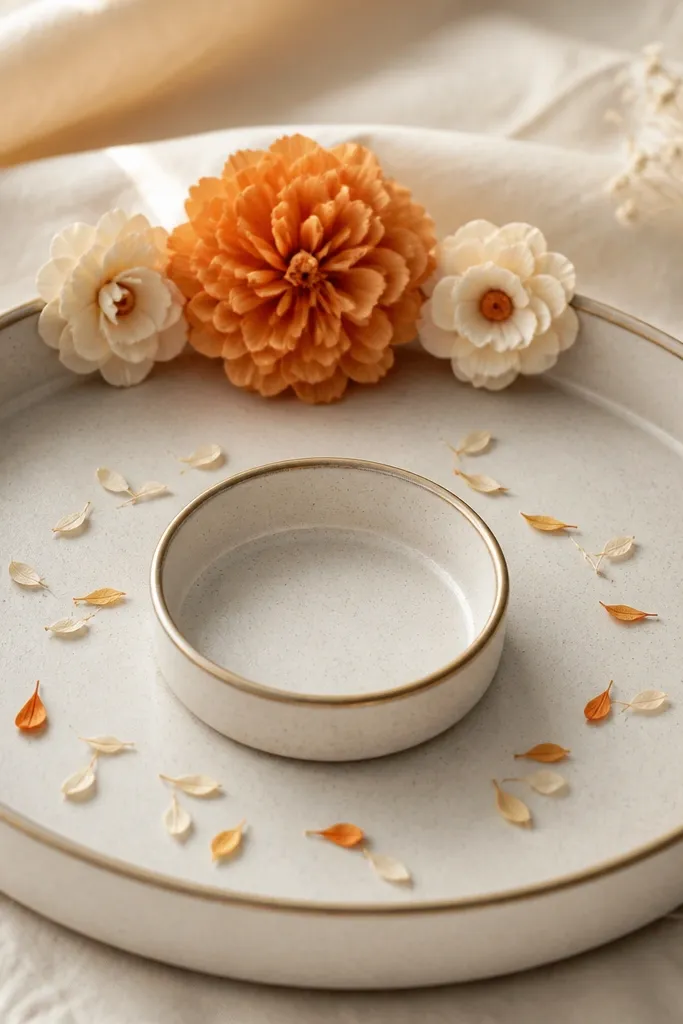
Paper flowers sound like a compromise until you place them at the rim. Rim placement keeps them from getting crushed and they look bold even when you're using a plain steel tray. The trio arrangement gives you structure: one large flower acts as the anchor, two smaller ones balance the sides. This is great for people who want something reusable for future functions. It flatters lighter outfits because cream paper flowers add brightness without glare. The styling principle is scale control - big at one side, small at two others.
Start by making or buying paper flowers with firm petals (not tissue-thin). Position the large marigold-orange flower at the top rim and secure its base with a glue dot on the underside of the tray rim. Add two cream flowers at left and right sides, each about 70% the size of the main one, and secure them with tape. Place marigold petals in a small oval around the center bowl so the tray doesn't look empty. Put the diya near the bottom center and tuck one petal under the diya base so it feels connected to the flowers.
Try thisUse matte paper finishes; shiny paper looks plasticky under flash.
Common mistakeDon't stack paper flowers too close to the center - they block the view of the haldi bowl.
10. Terracotta Base Mat with Marigold Bow Tie
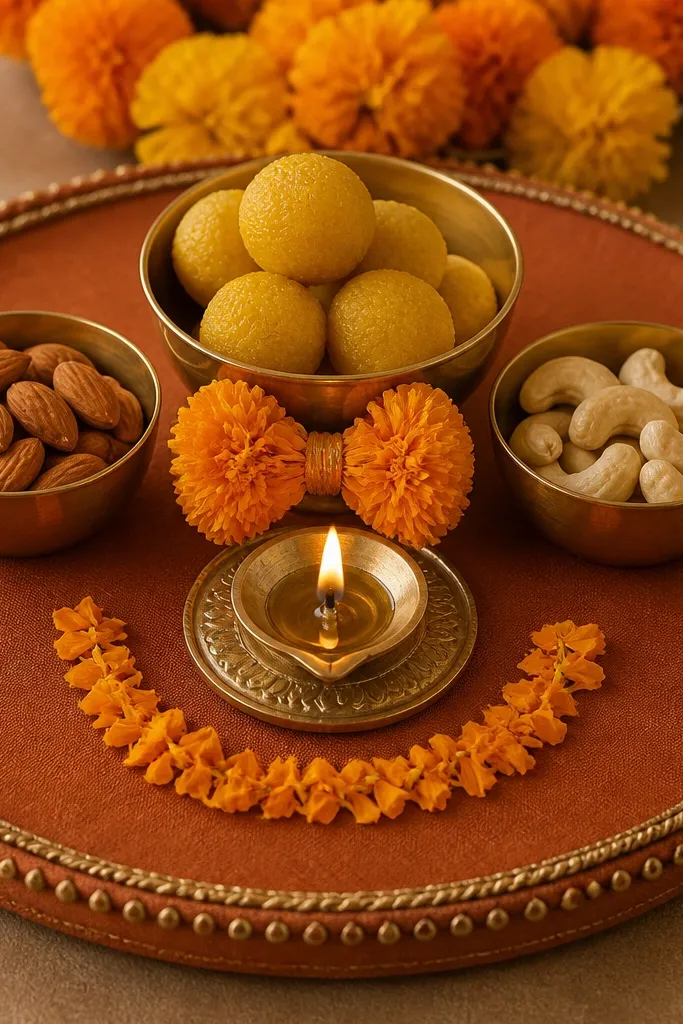
Terracotta cloth gives you instant warmth and it's a trick I rely on when the haldi color looks too yellow under indoor lights. The marigold bow adds a traditional element, and because it sits close to the bowl, it makes the setup look intentionally centered. This works well for people with olive or wheatish undertones because terracotta and marigold look natural together on camera. It also looks good with both gold and oxidized jewelry - the palette doesn't clash. The styling principle is warm base + tight petal semicircle for focus.
Start by cutting a terracotta cloth piece to cover the tray base, leaving 1 inch visible rim if your tray has a design. Tie a small marigold bow (use marigold string or a pre-made garland bow) and place it near the center bowl, securing with a tape dot on the underside. Create a tight semicircle of petals around the diya base - about 12 to 15 petals in a curved line. Place the diya slightly forward so the flame reads clearly above the petals. Add one tiny green leaf sprig behind the bow to prevent the setup from looking flat.
Try thisIf your terracotta cloth sheds, run a quick lint roller on it before placing.
Common mistakeAvoid a loose, wrinkled cloth - wrinkles make the whole tray look rushed.
11. Peacock Feather Accent with Minimal Petals
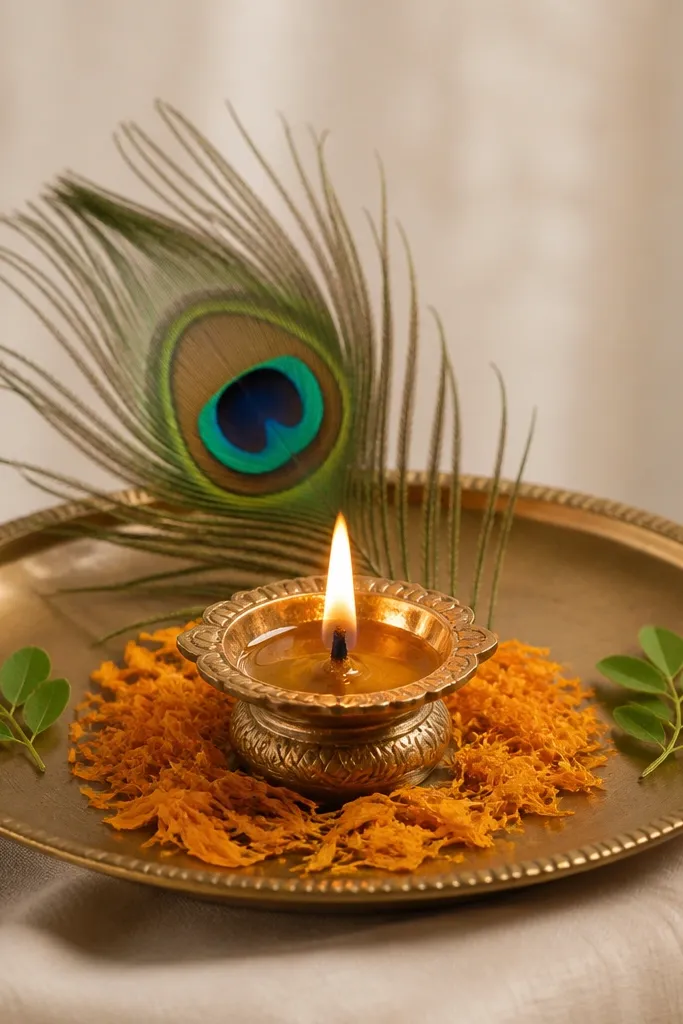
One peacock feather is enough to change the vibe from basic to "noticeable" without making it heavy. The feather adds height and direction - it points the eye toward the diya and center bowl. I've used this during evening haldi when guests wear deeper colors like maroon and charcoal, and it looks dramatic in a good way. It flatters medium to deep skin tones because the green-blue feather tones show up clearly against warm yellow. The styling principle is minimal elements with one strong vertical accent.
Start by placing the center bowl on the tray and scattering a thin ring of marigold petals around it. Lean the feather into the petal ring behind the diya so it has support and doesn't topple. Secure the feather base with a tiny tape dot on the tray surface hidden under petals. Add two green leaf sprigs at left and right of the diya base, each placed about 2 inches away from the center. Finish with 6 to 8 extra petals only in front of the diya so the feather doesn't look isolated.
Try thisChoose a feather that has a clean tip and no missing eye spots - broken feathers read messy.
Common mistakeDon't add multiple feathers - two or three looks crowded on a tray.
12. Saffron Net Fabric Draped Over Rim
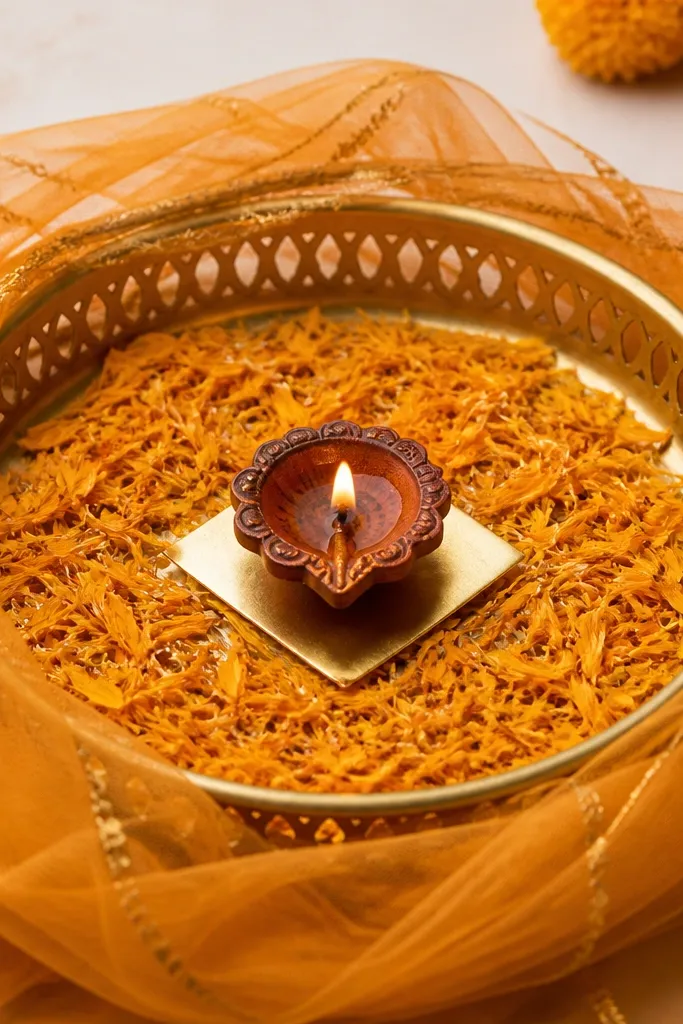
Net fabric gives movement and makes even a plain tray look styled. When you drape it only on the rim, it frames the tray without covering the important bowls. Saffron net also matches haldi's yellow range, so it looks cohesive instead of random. I used this for a rainy day indoor haldi where everything looked dull and the net brought softness. It flatters both warm and cool outfits because net is sheer and doesn't fight your outfit color. The styling principle is framing with movement - fabric drape around the outside keeps the center clean.
Start by cutting a piece of saffron net fabric about 10 inches longer than your tray diameter. Attach it to the rim at one point using double-sided tape, then drape and tuck the other side so it falls in gentle folds. Place marigold petals in the center bowl area only, leaving the rim fabric visible. Add a small gold paper strip behind the diya (a 1-inch wide strip folded in half) to catch light. Finally, place the diya in the center and adjust the net folds so they don't cover the bowl opening.
Try thisSteam the net for 10 seconds if it's creased - it drapes better.
Common mistakeAvoid draping net across the center - it blocks the haldi bowl and looks cluttered.
13. Coconut Shell Candle Holder with Marigold Edges
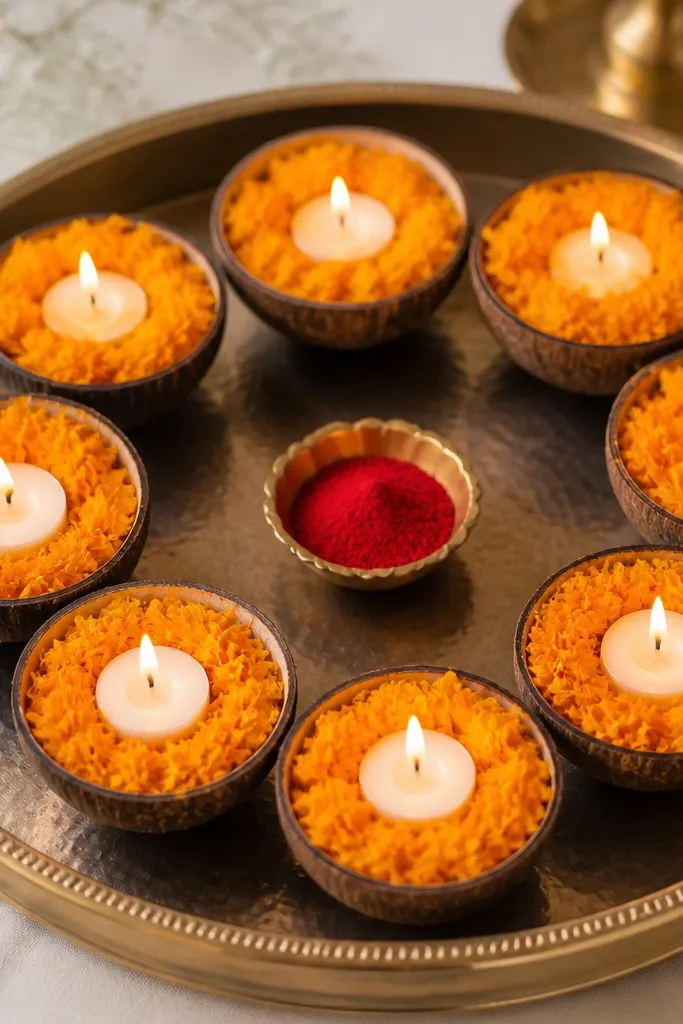
This setup looks handmade and grounded, and it's surprisingly fast if you already have coconut shells. The shells add texture - a matte, earthy look that makes the tray feel personal. Marigold edges make the shells look festive instead of plain. I used this when the tray decor budget was tight but we still wanted something that looks intentional up close. It flatters people wearing earthy sarees and also looks good with gold jewelry because the shell texture balances shine. The styling principle is texture layering - matte shells plus soft petals.
Start by placing your kumkum bowl in the center. Arrange 3 coconut shell holders around it in a triangle, each about 2 inches apart. Fill or line the shell rims with marigold petals - 5 to 7 petals per shell, tucked so they don't fall when moved. Place the main diya in the center between the shells if your tray has space, or keep it as a smaller diya in one shell. Finish by scattering a few petals only in the triangle gaps so the arrangement looks cohesive rather than scattered.
Try thisIf shells are uneven, set them on a folded tissue pad so they don't wobble.
Common mistakeDon't leave shells bare at the rim - bare shell edges make the tray look incomplete.
14. Green and Yellow Glass Bead Border
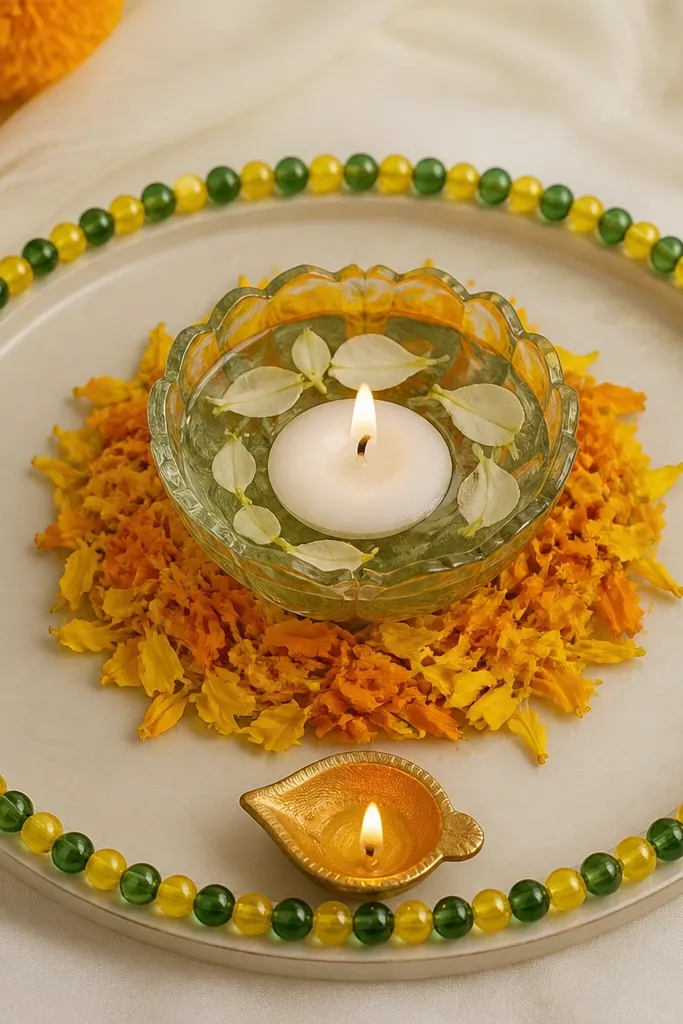
Glass bead borders make the tray look like a styled centerpiece, not a last-minute arrangement. The green-yellow mix keeps it fresh and stops the tray from going too yellow-only. I used this when the haldi venue had a dark wooden background; the beads caught light and separated the tray from the background. It flatters outfits in both warm and cool tones because green is a neutral contrast. The styling principle is a continuous line around the rim - it frames the whole tray in one clean gesture.
Start by placing a thin strip of double-sided tape around the inner rim of the tray, about 1 inch from the edge. Press green beads into the tape first at 6 to 8 points, then fill gaps with yellow beads so you get an alternating pattern. Place the center bowl in the middle and sprinkle marigold petals around it, staying inside the bead border. Set the diya at the bottom center and add 3 petals directly in front of it. Finally, tap the tray gently to settle beads - they should sit flat and not tilt.
Try thisUse beads with flat backs so they don't roll when the tray is carried.
Common mistakeAvoid a bead border too close to the bowl - it crowds the center and looks busy.
15. Pastel Yellow Tulle Veil Over Center Bowl
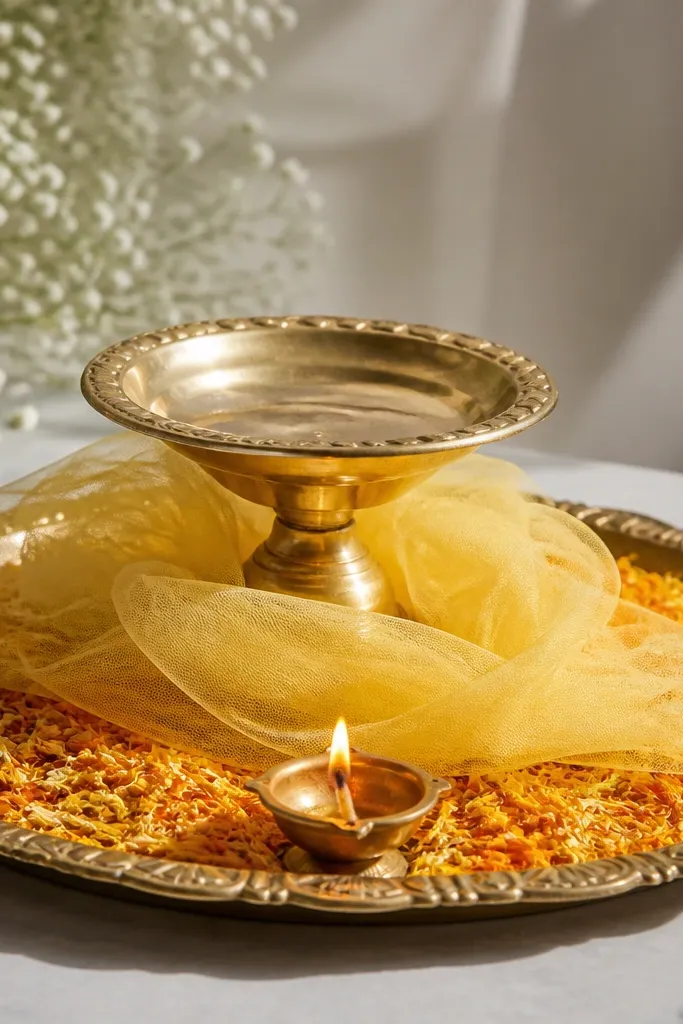
Tulle gives a soft, airy look and it hides small flaws on the bowl stand area. Pastel yellow is lighter than haldi's turmeric tone, so it makes the center look bright and clean. I've used this on trays where the bowl base looks scratched or dull, and the tulle instantly makes it presentable. It flatters fair to medium skin tones because the soft yellow reads gentle, not harsh. The styling principle is diffusion - the tulle spreads light and makes the center look smooth.
Start by cutting a circle of pastel yellow tulle about 12 inches wide. Place it over the center bowl stand so it drapes around the sides without covering the bowl opening. Secure the tulle with two tiny tape dots on the underside of the tray rim so it stays put while you decorate. Scatter marigold petals underneath the tulle folds so you see pops of orange at the edges. Place the diya in front of the bowl and add one small marigold head near the diya base to connect the center to the flame.
Try thisUse tulle that's 15-20 denier or thicker - thin tulle clings and looks wrinkly.
Common mistakeDon't pull tulle too tight - tight fabric creases and looks like a cheap gift wrap.
16. Rose Petal Confetti with Floating Diya Ring
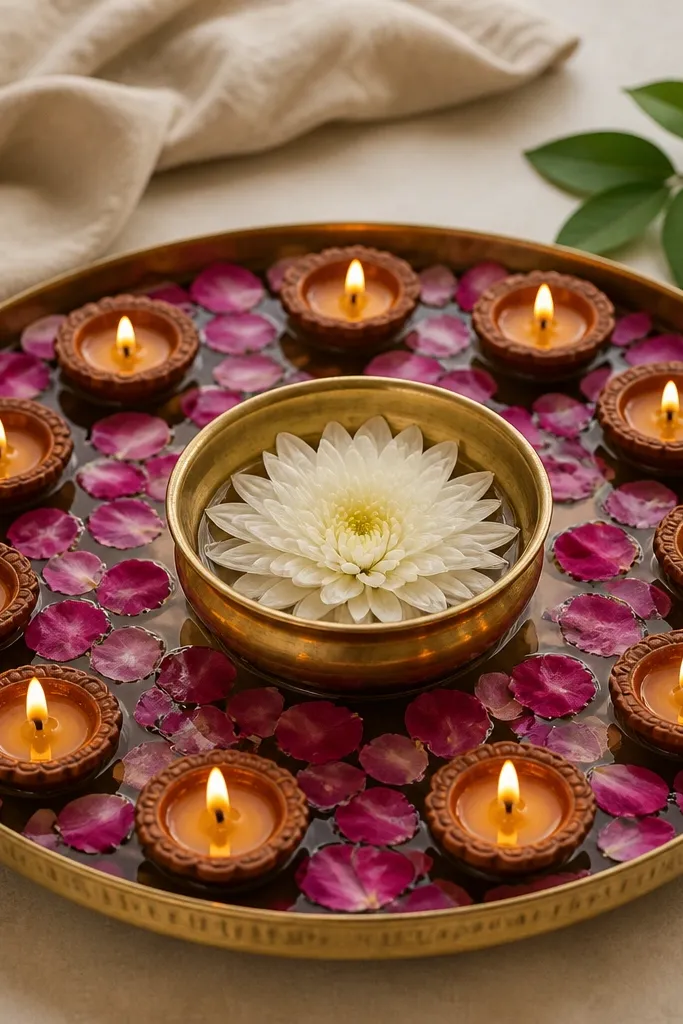
This looks like a festival scene without needing a full rangoli. Floating diyas create a circular glow that makes the center bowl feel intentional. Rose petals add a softer pink-red tone, which makes haldi look more celebratory. I used this setup outdoors at dusk; the ring glow made it look cinematic even with simple flowers. It flatters everyone because the warm flame and petal colors don't fight skin tones. The styling principle is a ring - you create a perimeter of light that frames the bowl.
Start by placing your center bowl in the middle and sprinkling a small layer of rose petals around it, leaving a clear path for diyas. Arrange 6 to 8 diyas in a ring around the bowl, keeping equal spacing. Fill gaps between diyas with rose petals so the ring looks continuous, not separate. Add a single green leaf sprig on one side of the ring to break the circle with a natural accent. If petals are moving, put a tiny dab of ghee on the tray surface under each diya so the base grips.
Try thisUse smaller diyas for the ring - large ones make the ring uneven on smaller trays.
Common mistakeAvoid too many petals covering the diya wick - it can drown the flame.
17. Haldi Tray with Coconut + Marigold Garland Loop
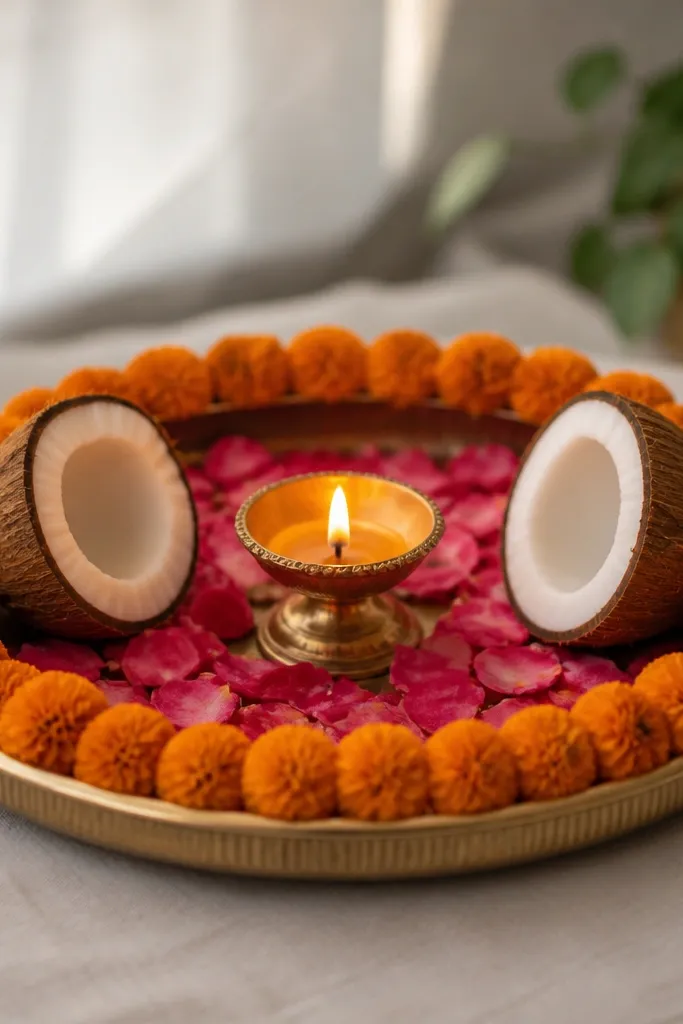
Coconut halves add a sculptural look and marigold garland loops bring the festive meaning. The garland loop is your anchor - it gives a clear circle or U-shape depending on tray size. Coconut also adds texture that reads well under harsh indoor lighting. I've used this setup when the tray had to be carried to multiple photo spots; it stayed stable because coconut halves act like visual weights. It flatters earthy outfits like beige, rust, and olive because coconut color matches the palette. The styling principle is weight + loop - you create a stable frame around the diya.
Start by placing coconut halves at two opposite sides of the tray, about 3 to 4 inches apart from the center bowl. Create a marigold garland loop and place it between the coconut halves, securing the garland ends with tape under the rim. Scatter marigold petals around the center bowl but keep them lighter near the coconut so the tray doesn't look crowded. Place the diya in the center and tuck 2 to 3 petals under the diya base. Finish by adding one tiny marigold head at the front edge of the tray so the garland loop feels connected to the center.
Try thisIf coconut halves are slippery, wrap a small paper strip under them for grip.
Common mistakeDon't stack coconut too high - tall coconut pieces make the tray look top-heavy.
18. Kesar Yellow Silk Thread Wrap Around Diya Stand
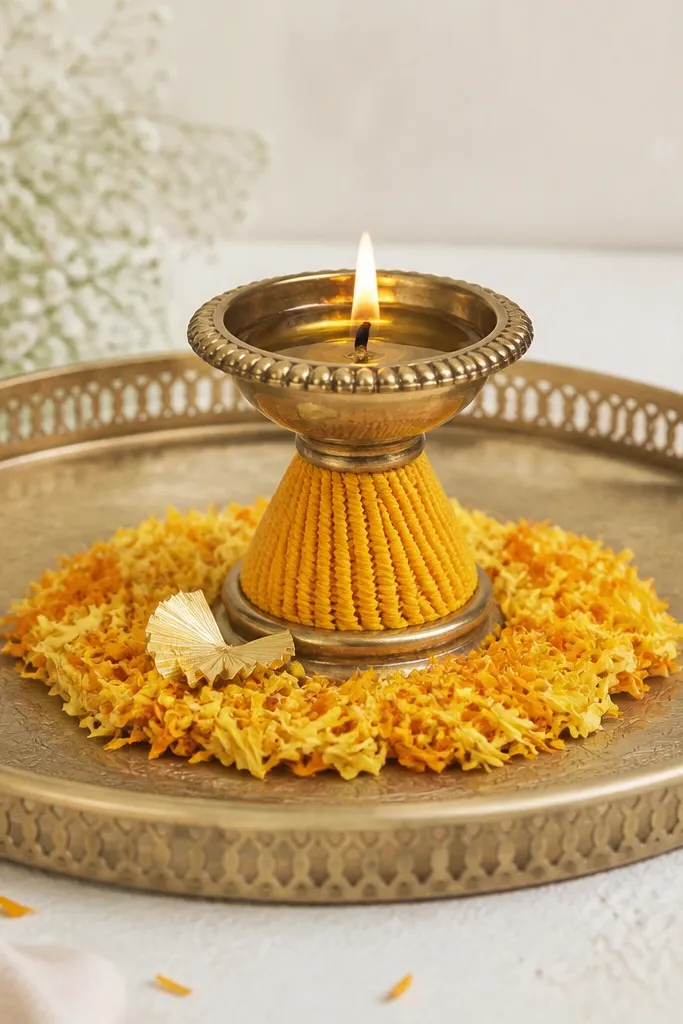
This is the kind of detail people notice up close. Silk thread wraps give a neat, handcrafted look without needing flower volume. Kesar yellow is slightly deeper than turmeric, so it makes the diya area look richer and more intentional. I used this on a tray where we couldn't get fresh flowers on time; the thread wrap saved the look. It flatters medium and deep skin tones because the warm gold-yellow reads bright. The styling principle is micro-texture - you create a textured focal point right where the eye lands.
Start by placing the diya stand near the center bowl, then wrap kesar yellow silk thread around the stand in tight vertical twists. Secure the thread ends with a tiny tape dot under the stand base so it doesn't unravel. Create a tight circle of marigold petals around the stand, about 10 petals, so the stand looks framed. Add a small gold paper accent - a folded 1-inch strip - near the bowl edge to echo the thread shine. Finally, check height: the wrapped stand should not rise higher than the bowl by more than an inch.
Try thisUse thread with a slight sheen, but not glossy - glossy thread flashes too much under phone flash.
Common mistakeAvoid messy loose thread ends - they look cheap and get caught in petals.
19. White Baby's Breath Bed with Marigold Top Knots
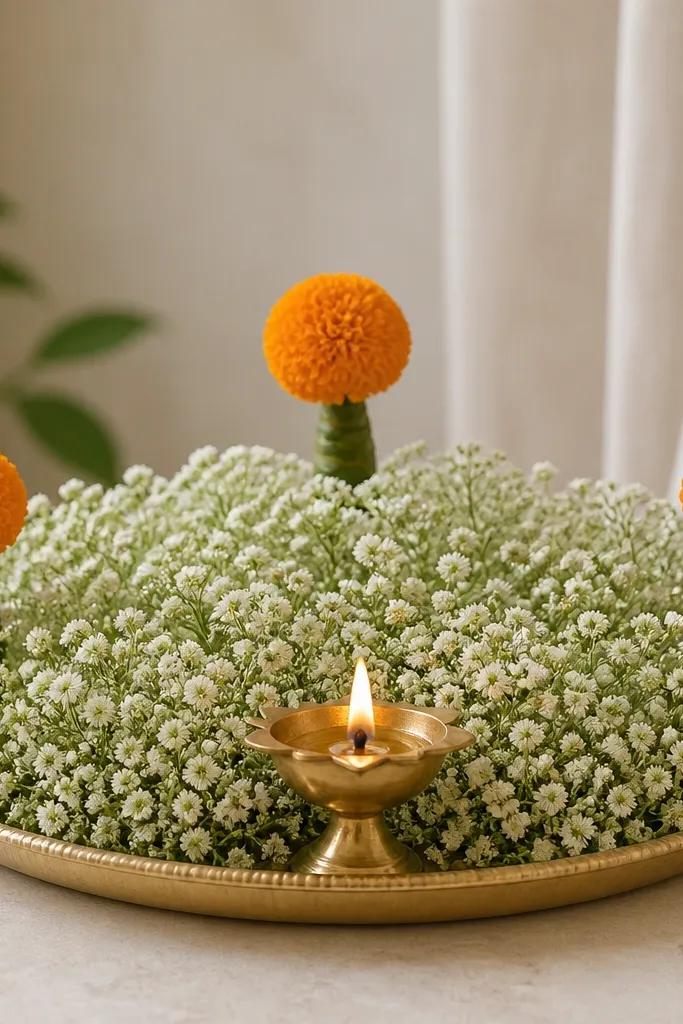
A baby's breath bed makes the tray look clean and airy. The tiny white flowers create a soft surface that hides tray scratches and makes the marigold top knots pop. I tested this during a haldi where the lighting was harsh and yellow tones looked too strong; baby's breath balanced everything. It flatters light outfits because white reads crisp, and it also flatters darker outfits because it brightens the frame. The styling principle is a smooth base with three colored accents.
Start by trimming baby's breath so stems are short enough to lie flat, about 2 inches long. Place a thin layer of petals or tissue on the tray base first so the baby's breath doesn't slip. Cover the base area around the center bowl with baby's breath, leaving a clear space for the diya. Tie three small marigold knots (or gather small marigold clusters) and place them at the top, left, and right of the center bowl, securing with tape. Put the diya at the front center and add 2 petals at the diya base so it looks integrated.
Try thisMist baby's breath lightly before placing so it looks fuller and not dry.
Common mistakeAvoid overstuffing - too many stems make the tray look like a tangled bouquet.
20. Orange Chiffon Ribbon Streamers with Petal Center
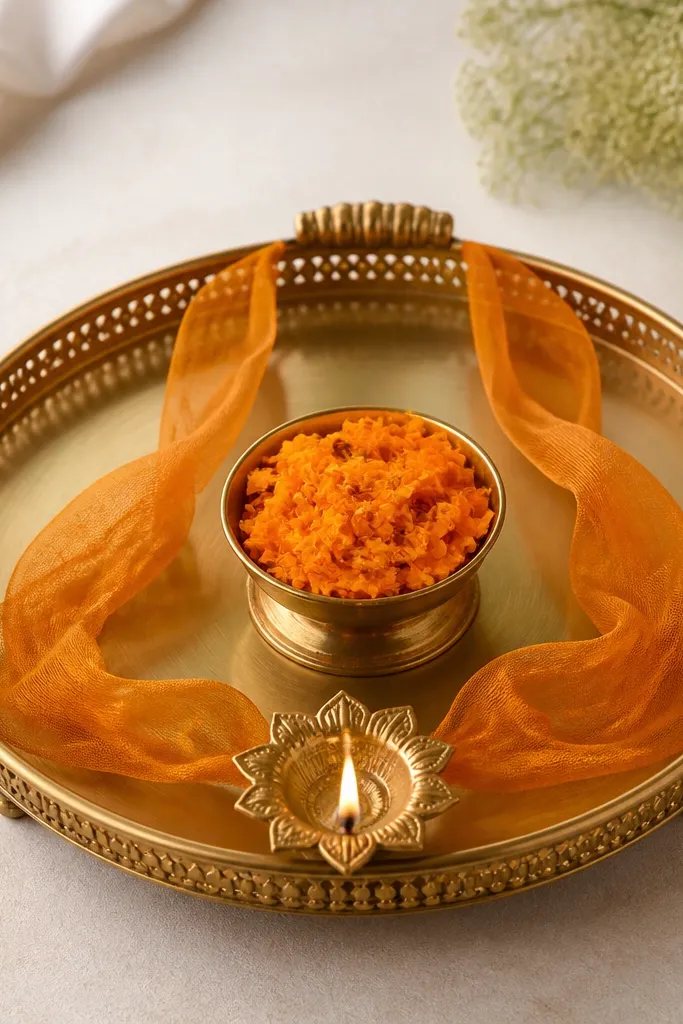
Chiffon streamers create a flowing look that feels festive even with minimal flowers. Orange chiffon looks warm next to haldi's yellow, and it adds motion that reads well in videos and close shots. I used this for a haldi where the tray needed to look good while people walked past it - the streamers moved slightly and kept the frame lively. This flatters anyone with colorful outfits because chiffon is semi-sheer and doesn't overpower. The styling principle is direction - the streamers pull attention toward the center bowl and diya.
Start by cutting two chiffon strips about 18 inches long and 2 inches wide. Anchor each strip at the back rim with double-sided tape, then angle them toward the center bowl so they form a gentle V shape. Place marigold petals in a neat circle around the center bowl, leaving a clean patch at the front for the diya. Set the diya at the front center and tuck 3 petals around its base. Finish by trimming the ends of the streamers so both sides end at the same height - about 2 inches above the bowl rim.
Try thisIf chiffon is wrinkled, hang it in a steamy bathroom for 10 minutes before using.
Common mistakeDon't let streamers cover the diya area - the flame can look blocked and the setup feels messy.