1. Mango-yellow bedsheet drape behind the chair
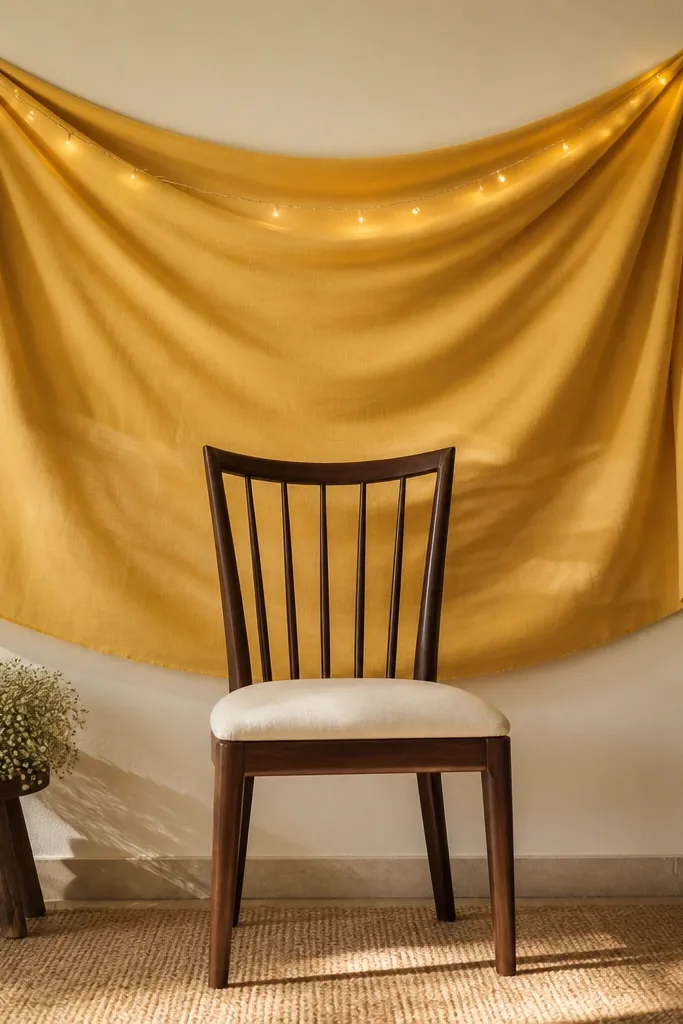
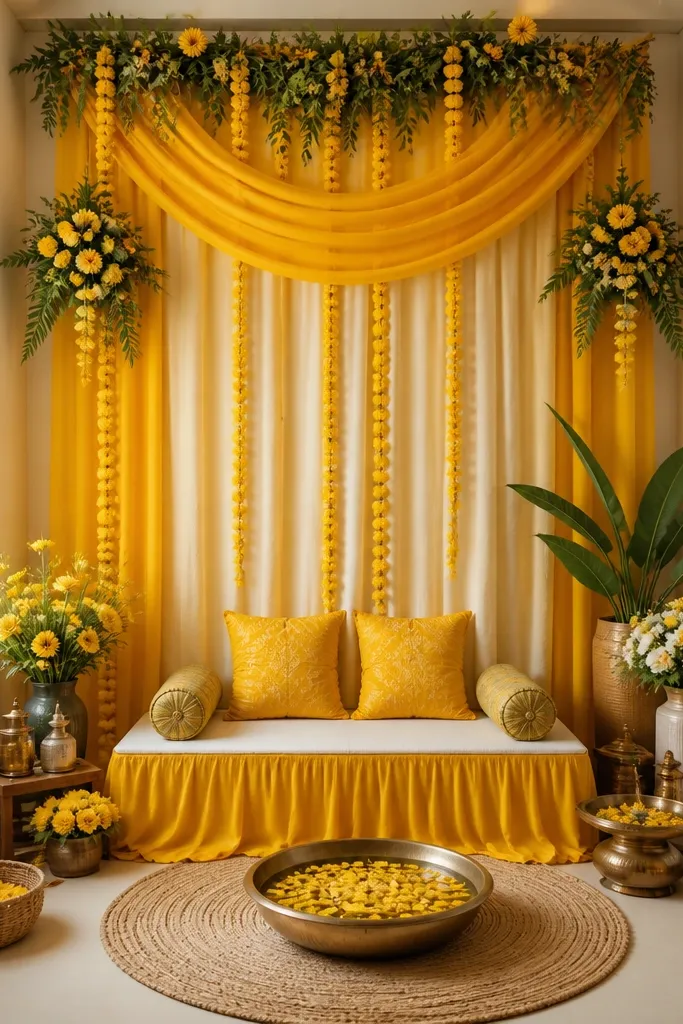
This is the fastest way I know to make a plain wall look like a haldi set. I use a mango-yellow bedsheet because it has enough weight to fall in folds instead of fluttering like thin net fabric. Pin it so the folds create a U-shape around the chair, then add white flowers to stop the yellow from looking flat. It photographs well on medium to deep skin tones because the yellow warms everything without washing you out. If your room has cool lighting, the warm LED lights keep the tone consistent.
Start by ironing the bedsheet so the drape looks smooth, then hang it from two pushpins or tape points about 5-6 inches apart from the chair's back. Drape the center lower so it reaches about seat height - this gives you a frame without swallowing your subject. Add a warm LED string (battery pack) along the top fold only, keeping it loose so it looks like a soft halo. Place a small stool beside the chair and put 3-5 white flowers in a bowl or vase on the stool, not directly on the chair back.
Try thisUse double-sided tape on the back of the fabric so the sheet doesn't slip during guests' movement.
Common mistakeSkipping ironing makes the folds look wrinkled in photos, even if the rest is perfect.
2. Stacked cardboard boxes wrapped in kraft and yellow ribbon

This setup gives you height without buying stands. Kraft paper looks warm and handmade, while the yellow ribbon ties it directly to the haldi color story. I've used this on apartments where the wall space is limited - guests can stand around it and it still looks "designed." It looks especially good if your outfit has gold embroidery or a warm undertone, because kraft + yellow matches that earthy shine. Keep the number of boxes to three so it reads as one structure, not random stacks.
Start by finding three boxes that stack neatly with slightly decreasing sizes (example: 14x14, 12x12, 10x10 inches). Wrap each box in kraft paper and tape the seams on the underside. Tie yellow satin ribbon around the front edge of the middle box and make a bow on top - keep the bow centered so it looks intentional. Finish by placing a small tray of petals on the top box and a jar of marigolds on the side facing the main camera angle.
Try thisIf your boxes look too "new," lightly rub the kraft paper with a dry tea bag for a subtle warm tone.
Common mistakeUsing shiny plastic gift wrap makes the boxes look cheap in natural light.
3. White + marigold garland on a wall corner with a curtain rod
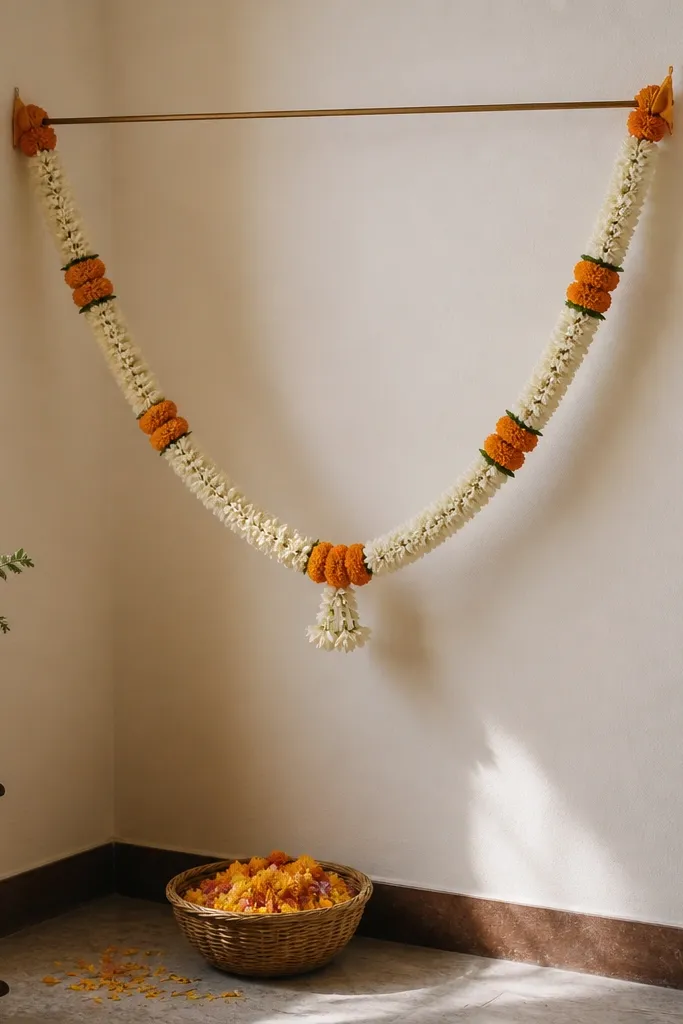
Garlands make haldi instantly feel traditional, but the way you hang them matters. A curtain rod gives you a stable, curved shape, so the garland doesn't sag like it would on a single hook. I combine white flowers with marigolds because white adds contrast and keeps the yellow from overpowering the frame. This works well for people with warm or neutral skin tones since the marigold color looks lively under indoor light. If you're using a plain saree or kurta, the garland adds the "event" feel without extra effort.
Start by mounting a curtain rod or using two Command hooks at the height you want the garland to sit (usually 6-7 feet). Lay the garland on the floor and measure the length so it forms a soft arc rather than a straight line. Hang the garland on the rod and tuck the ends into loops made from leftover dupattas or thin fabric strips. Place a basket of petals and one small white flower bunch on the floor directly under the center of the garland.
Try thisSpritz the garland lightly with water right before guests arrive to keep the petals from drying out.
Common mistakeLetting the garland touch the wall without any space makes it look flat and dusty.
4. Paper fan backdrop in sunshine yellow behind the chair
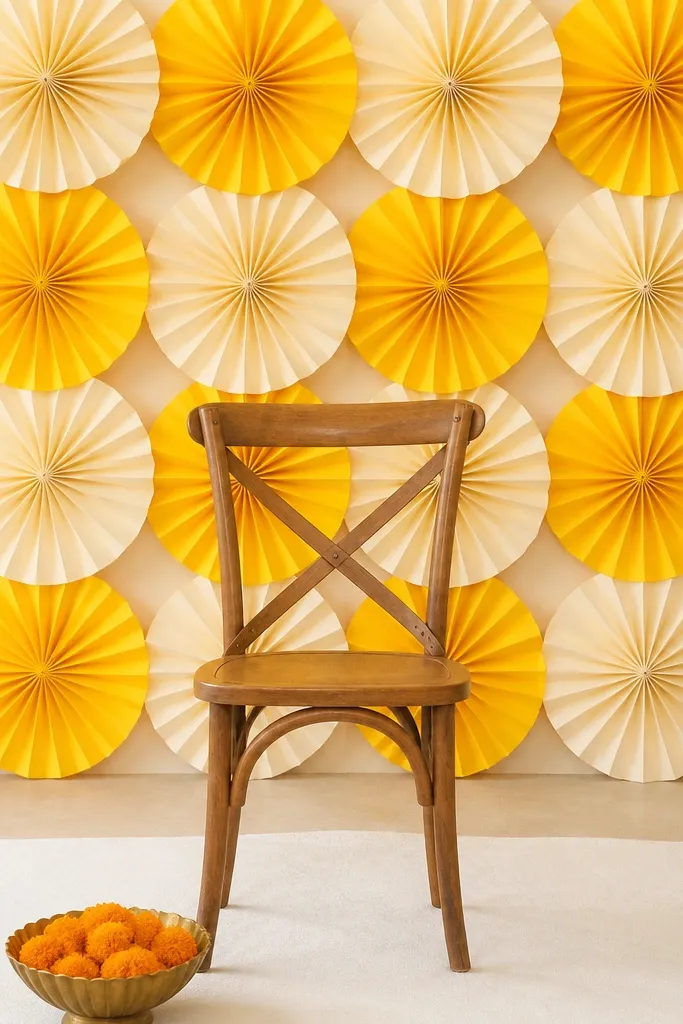
Paper fans are a photo cheat code because they create texture and depth even in a small room. I like sunshine yellow combined with pale cream so the backdrop doesn't look like a single loud color block. The overlapping fans create shadows, and shadows make your outfit look sharper in pictures. This is flattering for both light and deep skin tones because the cream tones soften the edges around you. It also works when you can't hang anything from the ceiling.
Start by cutting 12-16 paper fans using thick chart paper or craft paper, each fan about 10-12 inches wide. Fold accordion-style, glue the folds to make a fan, and attach a strip of cardboard behind each fan to keep it rigid. Arrange fans in a staggered grid behind the chair - I keep the center row slightly larger. Finally, drape a white cloth runner on the floor and place a bowl of petals in front of the center gap.
Try thisUse matte paper, not glossy - glossy paper reflects overhead lights and looks washed out.
Common mistakeMaking all fans the same size creates a flat backdrop that doesn't frame your subject.
5. Copper LED candles in glass jars plus marigold petals
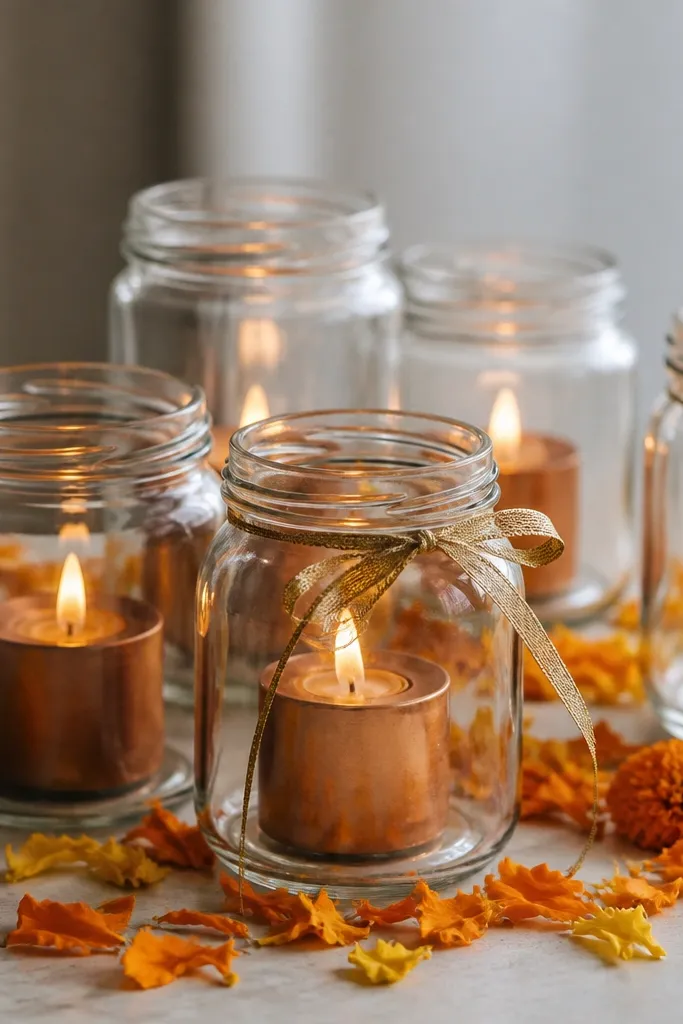
Candles make haldi feel warm and cozy, and LED candles solve the safety problem. Copper-toned LEDs look like real candlelight without the smoke or wax mess. I scatter marigold petals around the base because it ties the table to the haldi theme without needing a full floral arrangement. This looks good for anyone wearing gold, mustard, or cream - the copper glow pulls those tones together. It also makes your room feel festive even if your background is plain.
Start with 5-7 identical glass jars or small tumblers, wiped dry so they don't fog under light. Place an LED candle in each jar, then wrap one jar with a thin gold ribbon at mid-height. Scatter petals around the jar bases, keeping the petals closer to the front edge so they show in photos. Add one small bowl of water or rose petals in the center so the table looks styled, not random.
Try thisPick LEDs with a warm 2700K glow for the most natural skin tone in photos.
Common mistakeUsing cool-white LED candles makes the whole setup look like a party room, not a haldi.
6. Yellow and cream dupatta ceiling swag over the main corner
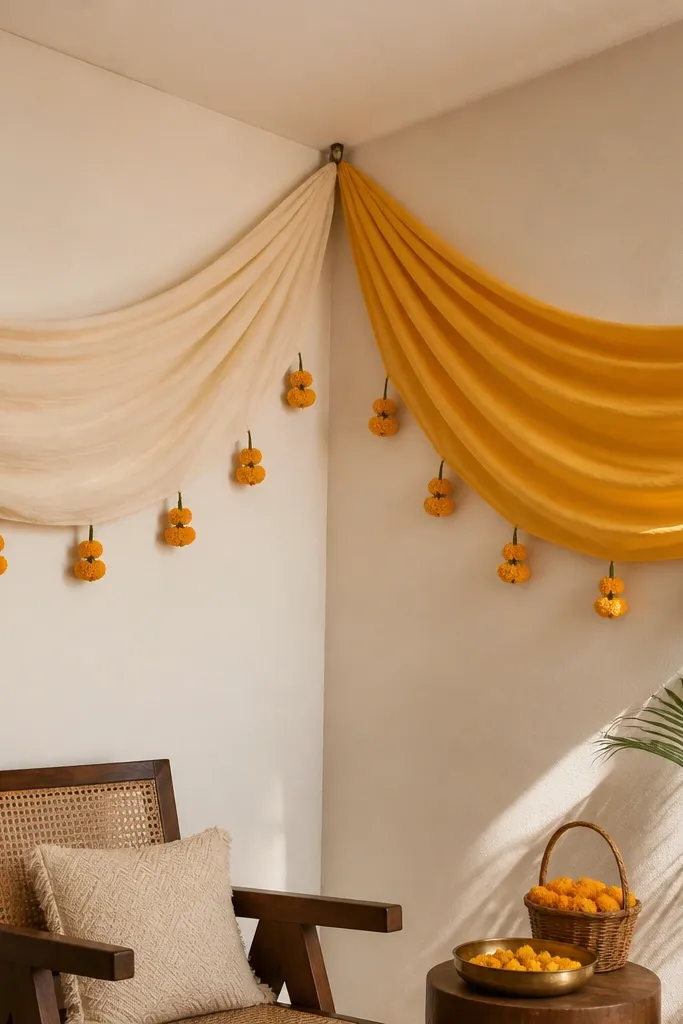
Ceiling swags add movement and make the room feel decorated without covering the whole wall. I use two fabrics - pale cream and mustard yellow - because the cream creates breathing space and the mustard gives the haldi color punch. The fabric weight matters; dupattas with a slight sheen drape better and look smoother. This works for small rooms because it uses overhead space instead of floor space. It's especially flattering if your outfit is solid-colored, since the swags give you a soft frame above.
Start by tying two dupattas at the top center point - use a ceiling hook or a strong thumbtack in a corner beam. Let the cream dupatta hang slightly shorter, and the mustard one slightly longer so you get layered depth. Gather the lower edges with small knots every 12-14 inches to create a gentle wave. Hang 2-3 small marigold bunches on the lower edge using thin thread so they don't swing too much.
Try thisSteam the dupattas before hanging so the folds look intentional.
Common mistakeUsing very thin net dupattas - they tangle and look messy quickly.
7. Haldi tray styling with brass plates and three heights
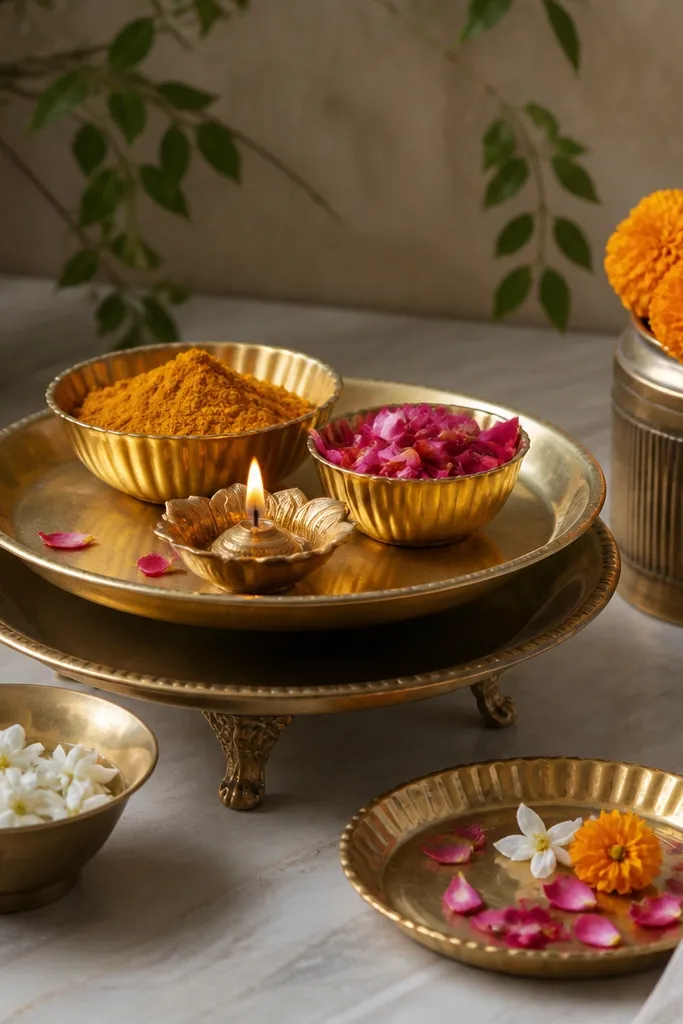
A haldi tray looks expensive because it reads as "curated," but you can build it with simple household items. Brass plates add warm reflectivity, and three heights make the arrangement feel alive. I keep colors tight: haldi yellow, rose red/pink, and white petals. This combination flatters most skin tones in photos - the yellow warms, the pink adds contrast, and the white keeps it clean. If you plan to take close-ups, this is the setup that actually makes the shots look like a plan, not a scatter of props.
Start with a base tray or a thick serving board. Place the largest brass plate or shallow bowl at the back, then add a smaller plate in front. Use one jar on the right side as the tallest element - fill it with marigolds or mango leaves. Arrange haldi powder in a small bowl at center, rose petals on the left, and a tiny diya/LED diya on the right. Keep spacing between bowls so the brass and tray show.
Try thisUse a small spoon to level the haldi powder surface - uneven mounds photograph messy.
Common mistakePacking bowls too close together makes the tray look cluttered.
8. Rangoli-style floor mat with turmeric-yellow stencil
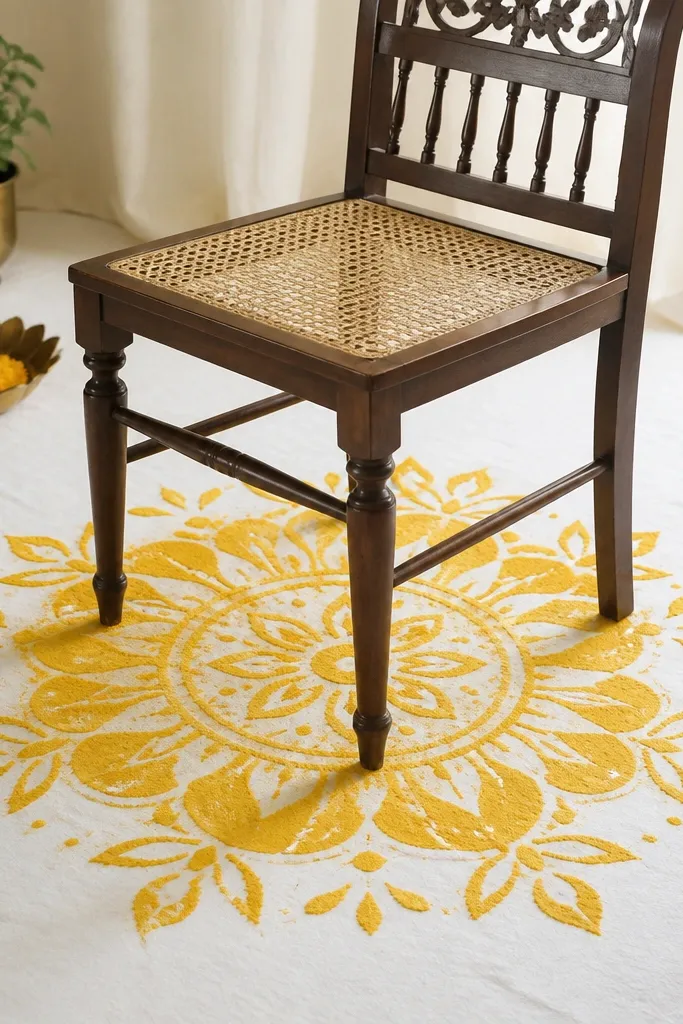
A floor focal point is what makes your haldi corner look complete. I use a white cloth as the base because it keeps the yellow pattern crisp and clean. The stencil method looks neat even if you're not good at freehand rangoli. This is ideal if your room is small, since it creates a defined "zone" without adding clutter. It looks great on camera because it frames the feet and lower outfits, and it works for both light and deep skin tones.
Start by laying a clean white cloth on the floor and taping the corners so it doesn't slide. Place a stencil in the center under the chair, then dust turmeric powder or a bright yellow rangoli color using a small brush. Lift the stencil carefully to keep edges sharp. Add two small side motifs near the front corners of the mat and sprinkle a few petals outside the stencil pattern for softness.
Try thisDust the powder through a fine sieve for even coverage and cleaner lines.
Common mistakeUsing wet haldi paste on cloth - it stains and looks dull in photos.
9. Marigold mini-bushes in reused paint buckets
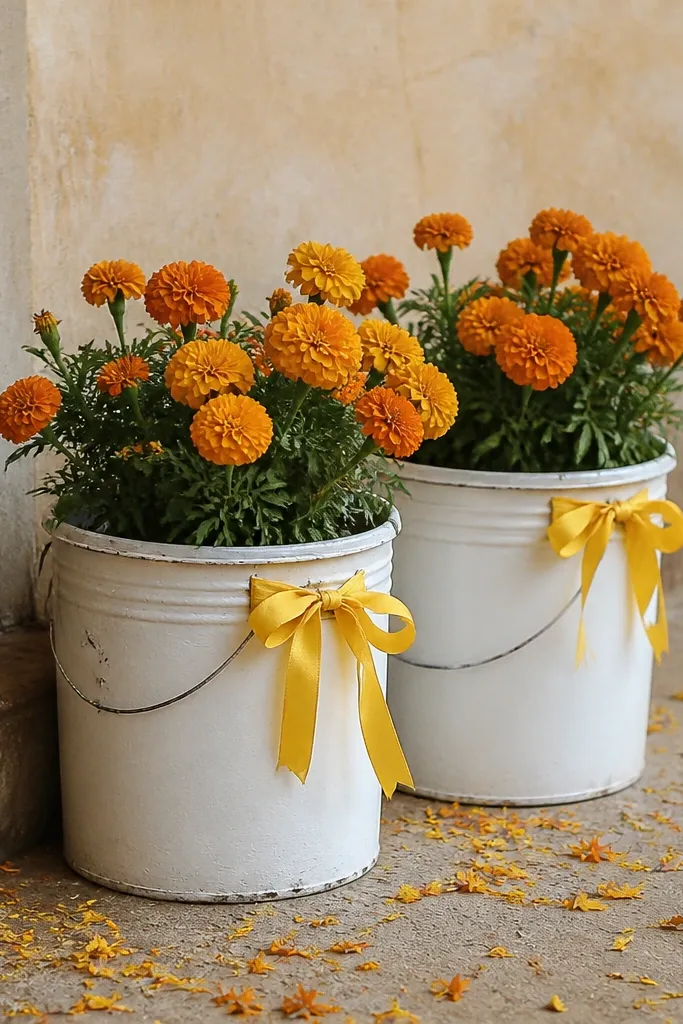
This is a practical decor hack when you need multiple matching flower holders quickly. Paint buckets are sturdy, and a matte coat makes them look intentional instead of trashy. I paint mine matte white, then add a thin yellow ribbon so the color matches the haldi theme. It's flattering in photos because the white background makes the marigolds pop without turning the whole room yellow. It also works for wide spaces where you need repetition - two buckets on each side of the main area looks balanced.
Start by washing and drying two paint buckets (or similar sturdy containers). Spray or paint them matte white and let them dry fully - overnight is best. Tie a yellow ribbon around the upper section so it sits just below the handle line. Fill the buckets with marigold stems or small bunches, adding a few green leaves for volume. Place one bucket on each side of the chair or main table, then sprinkle petals around the base.
Try thisCut the stems to equal heights so the marigold tops sit at the same level.
Common mistakeLeaving buckets unpainted - the texture and labels show and cheapen the look.
10. Yellow and white balloon clusters with ribbon tails
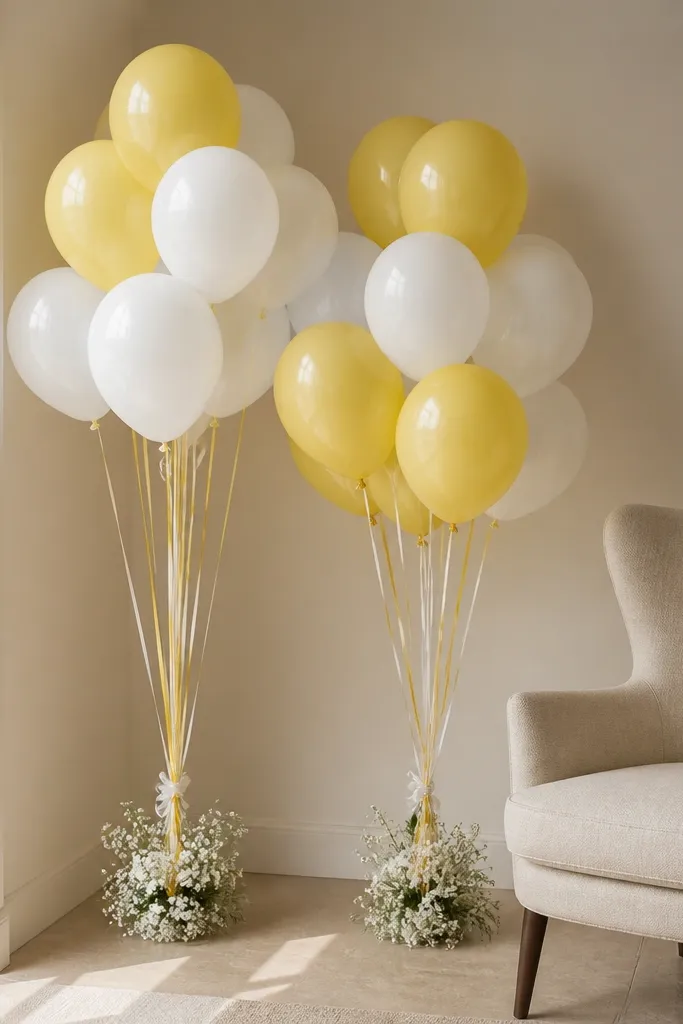
Balloons are the simplest way to add a "festival" feel fast, and ribbon tails stop them from looking like a birthday party. I use a 2:1 mix of yellow to white balloons because it keeps the haldi theme strong without being too monochrome. The ribbon tails give you that soft, flowing visual that fabric does, and they also hide the knot area. This looks good for everyone because it adds color near the face. If your room lighting is dim, balloons still read clearly because they're bright.
Start by inflating balloons slightly smaller than you think (about 10-12 inches for indoor clusters) so they don't crowd the subject. Tie 5-7 balloons into one cluster and add a thin ribbon tail to each knot - cut all tails to a similar length like 16-18 inches. Place the cluster near the chair corner, not behind the main backdrop, so it doesn't compete with your garland or drape. Tie a small white flower bunch or green leaf sprig to the ribbon base for a more haldi-specific look.
Try thisUse matte balloons if you can - they reflect less light and look warmer in photos.
Common mistakePutting balloons too close to the backdrop makes the whole frame look busy.
11. Leaf wall using mango leaves and a jute string grid
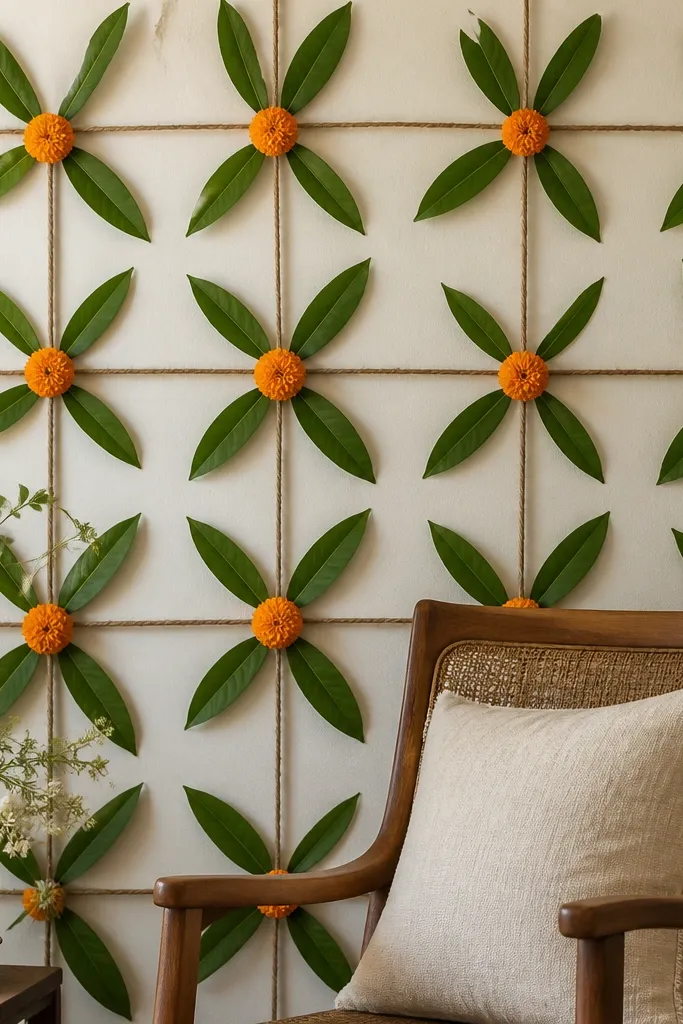
If you want a haldi look that feels fresh and grounded, leaf walls do it better than paper decor. Mango leaves are sturdy and stay in place, and their green tones balance the yellow. I build a jute string grid because it gives you a structure to tuck leaves into - you don't need fancy holders. This works well when your outfit has both yellow and green tones, like a kurta with leaf embroidery or a saree with green border. In photos, the leaves add depth and prevent the background from looking flat.
Start by marking a rectangle on the wall with painter's tape - about 4 feet wide and 3 feet tall. Stretch jute string horizontally and vertically inside the rectangle so you get small squares. Tuck mango leaves at intersections and secure with thin thread or cloth pins clipped to the string. Place 1-2 marigold blossoms at the center grid point and add a small basket of petals below the leaf area.
Try thisMist the leaves with water right before guests arrive so they look fresh.
Common mistakeUsing too many leaves without spacing - the grid becomes messy and hard to read in photos.
12. Yellow table runner made from old bedsheet + lace trim
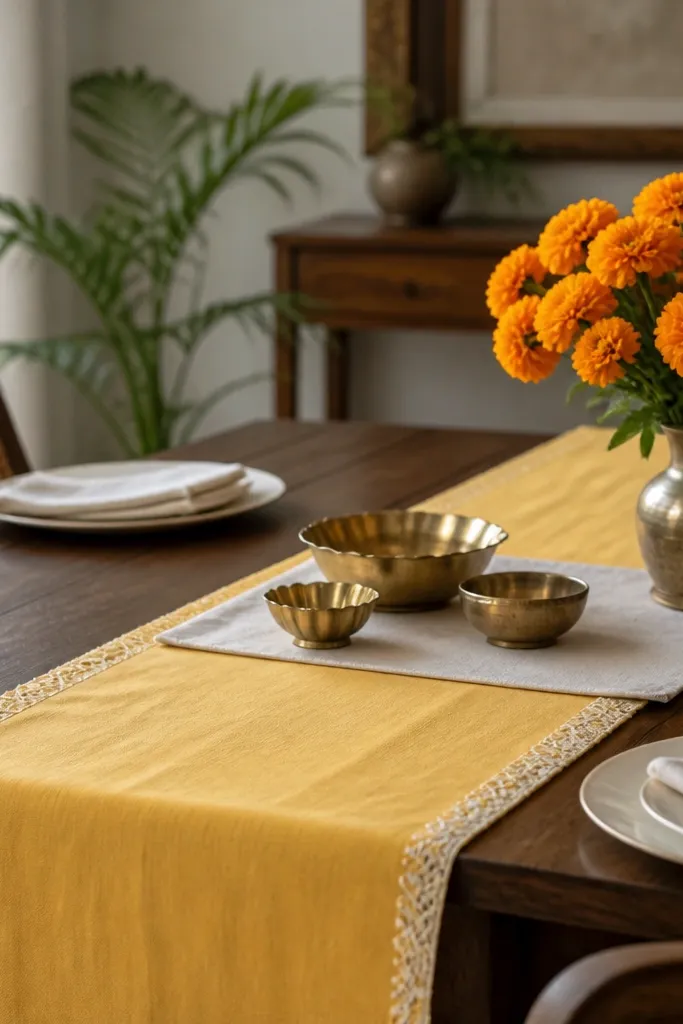
A table runner can make your whole haldi setup look coordinated because it gives a continuous line across the frame. I use an old yellow bedsheet because it's wide and easy to cut without wasting fabric, then add a lace trim for a softer finish. Lace is tricky - too much can look costume-y, so I keep it to a single edge. This styling flatters people wearing plain solid outfits because the table adds texture and makes the photo background feel intentional. It also helps when you're using simple plastic chairs since the table area becomes the visual anchor.
Start by cutting the bedsheet runner to your table length, usually 12-14 inches wide for most dining tables. Fold one long edge over and stitch or tape the lace trim along that edge only. Place a white placemat under your main bowls so the yellow doesn't overpower the food and powder colors. Arrange 3 bowls (haldi, rose petals, and water/diya) in a triangle pattern across the runner. Add a small vase of marigolds at one end, not the center.
Try thisIron the runner right before use - creased fabric makes lace look messy.
Common mistakeUsing a super bright neon yellow - it can overpower skin tones in daylight photos.
13. Torans with thrifted saree strips on a wooden hanger
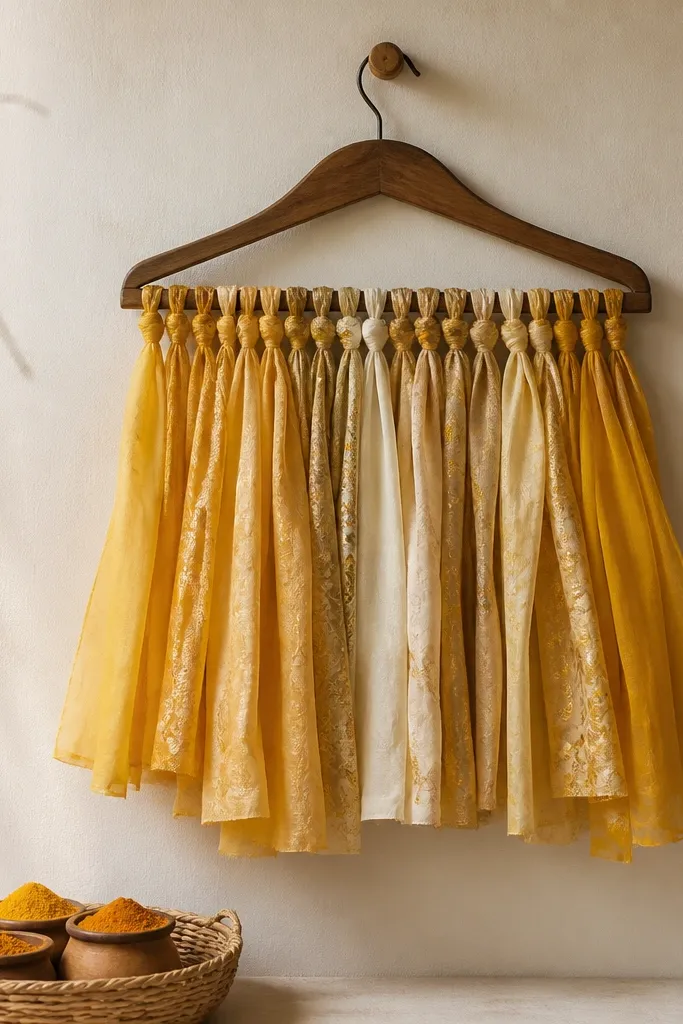
Torans are classic, but the wooden hanger trick makes them look neat and photo-ready. I use thrifted saree strips because they already have texture and sheen, so they don't look like cheap craft ribbon. Keep the strip length around 6-8 inches so they hang with movement but don't tangle. This works for both men and women's outfits because it adds a festive frame near the upper body, where photos catch detail. It's also beginner-friendly - you can assemble it in one evening.
Start by mounting a sturdy wooden hanger horizontally at about head height behind the main chair. Cut saree strips into 6-8 inch lengths, mixing yellow and cream, and add a few gold pieces for shine. Tie 20-30 strips to the hanger hook using thin thread, then spread them so the center looks fuller. Place a small basket of haldi items below the hanger on the floor. Add one marigold bunch at the basket corner facing the camera.
Try thisClip the knots with a tiny dot of hot glue so they don't slip while guests pass by.
Common mistakeUsing long strips that touch the floor - they pick up dust and look unclean quickly.
14. Petal path on the floor with masking tape outline
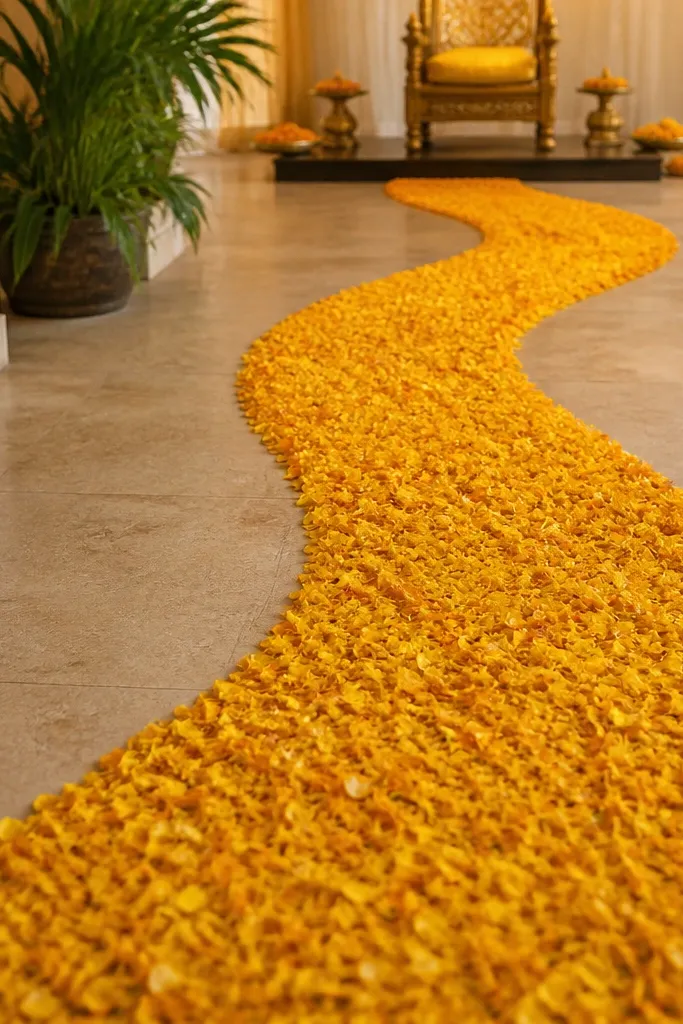
A petal path gives you that "procession" feel without any extra props. I outline the shape with masking tape so the petals land in a controlled curve - this makes it look intentional instead of spilled. Marigold petals look best when they're dry and separated, not clumped, and a curved path guides attention toward the chair. This is great for homes where the main decor is on one side, but guests walk in from another spot. In photos, it adds depth because it pulls the eye through the frame.
Start by deciding the path curve - I usually make it 3-4 feet long from the doorway or from the nearest seating area to the chair. Tape an outline on the floor with masking tape, then remove any dust so petals stick better. Fill inside the outline with dry marigold petals, using your palm to gently press edges into place. Carefully lift the masking tape once the petals are set. Place a small bowl of petals near the chair as backup for touch-ups.
Try thisSprinkle a few petals at the edges only, and keep the center slightly lighter - it looks more natural.
Common mistakeUsing wet petals - they stain floor and clump into dark patches.
15. Haldi corner mirror frame with yellow border tape
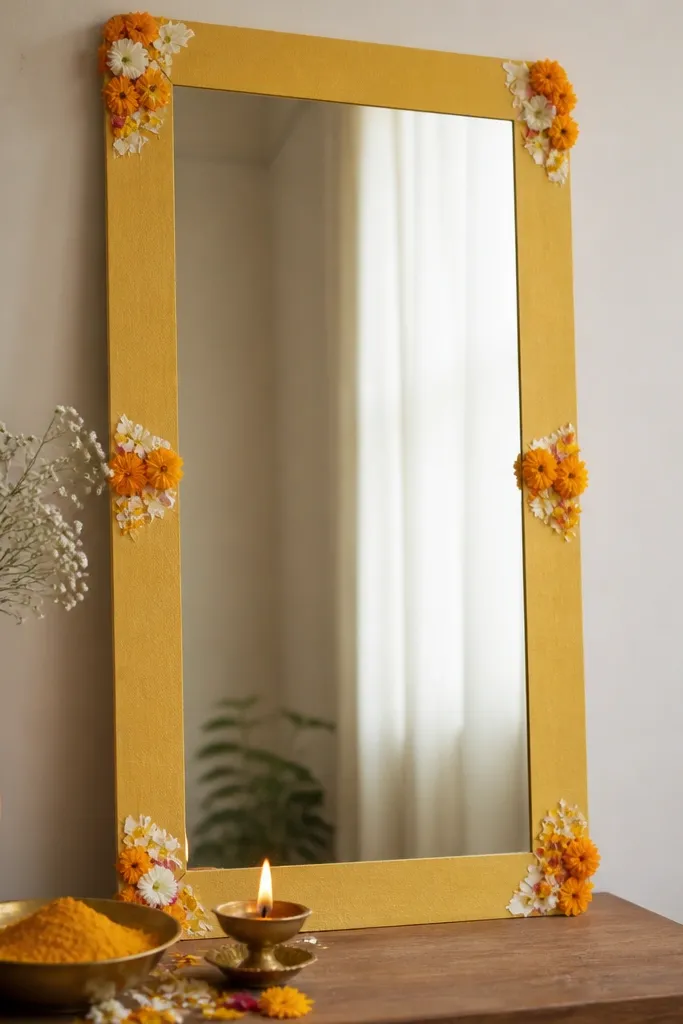
Mirrors multiply light and make a small haldi corner feel larger. I like using matte yellow paper tape or kraft paper strips around the mirror edges because it looks clean and doesn't peel like glossy stickers. The mirror reflects garlands and helps your decor reach more of the room. This works especially well if your haldi area is near a window - the reflected daylight makes everything look warm. It also flatters portraits because the frame draws attention to faces and upper outfits.
Start by cleaning the mirror so the tape sticks well. Add a border using matte yellow paper tape in a neat rectangle or a simple V-shape at the top. Then place small marigold clusters and a few white petals along the outer edge of the mirror without covering the glass reflection. Put a diya or LED diya on a small table directly below the mirror and add a bowl of haldi powder beside it. Keep the table items aligned so the reflection looks tidy.
Try thisUse paper tape instead of vinyl - it removes cleanly after the function.
Common mistakeOver-decorating the mirror glass - it creates glare and hides your background.
16. Yellow and cream fabric ceiling swag with fairy lights trail
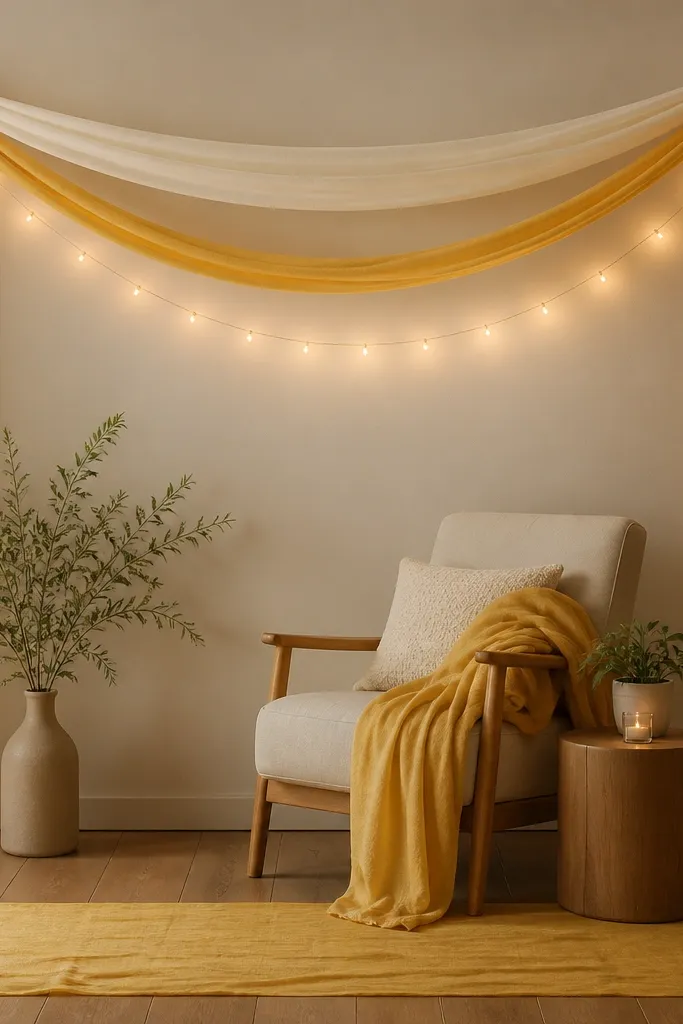
This is the setup I use when I want photos to look dreamy without going overboard. Fabric swags soften the ceiling, and the fairy light trail creates a guided line above the couple/chair. I prefer warm fairy lights because they blend with haldi's yellow tone instead of making the room look blue. This looks good with both men's and women's outfits because it frames the upper body and head area. If your room has low ceiling height, keep the swag short so it doesn't feel cramped.
Start by tying two fabric strips (cream on the top layer, yellow underneath) to ceiling hooks spaced 4-5 feet apart. Let the fabric fall to about 2-3 feet above the chair so it's visible but not in the way. Drape fairy lights in a shallow arc between hooks, leaving 6-8 inches of slack so it looks organic. Place a yellow cloth runner on the floor under the arc and add one low bowl of petals centered on the runner. Turn off the overhead light and rely on the warm lights for the best color.
Try thisTest the light color at night before the function - warm bulbs look different under daylight.
Common mistakeUsing bright white lights - they make yellow look sickly.
17. Marigold + rose bud mini centerpieces on mismatched plates
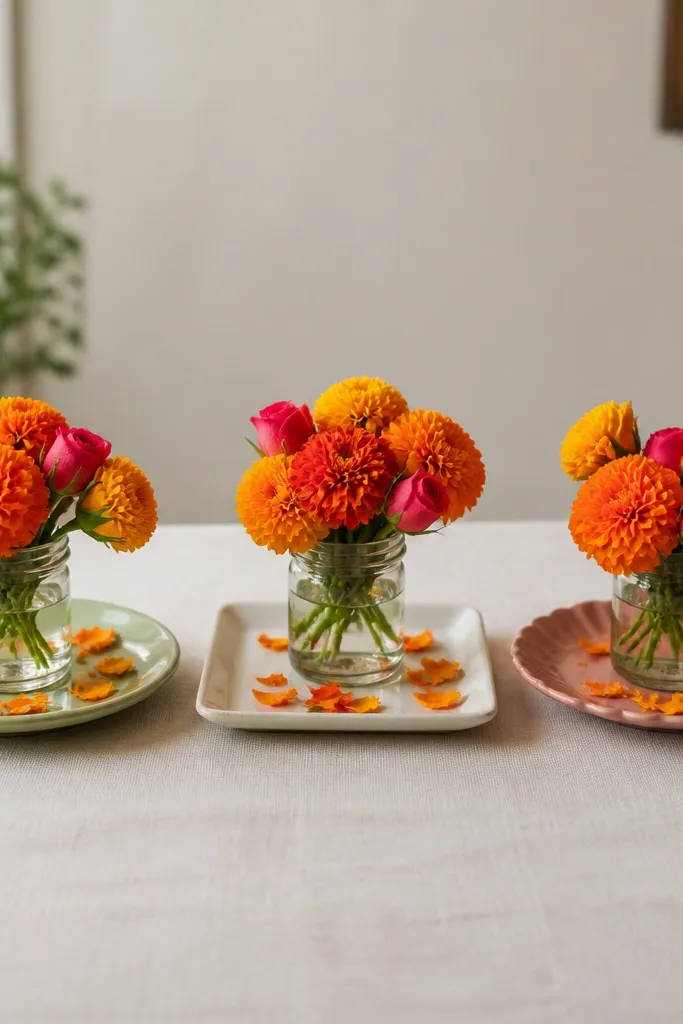
Mismatched plates sound risky, but they look great when you keep one element consistent. The consistent element here is the jar of marigolds and rose buds, which brings haldi's yellow and the softer celebration colors together. I do this when I don't want a single big floral arrangement. It works for photos because the eye sees three focal points instead of one cluttered centerpiece. On medium to deep skin tones, the rose buds add a flattering pop that doesn't wash out like bright pink can. It also works for both men's and women's haldi because the decor doesn't compete with outfits.
Start by collecting 3-5 small plates or shallow bowls you already have, varying shapes but keeping them clean. Place each jar or small glass cup in the center of a plate, then fill the jar with marigolds and 2-3 rose buds. Sprinkle petals around the jar base but keep the plate edges visible so it looks styled, not messy. Space the centerpieces evenly across the table - I keep about 12-14 inches between them. Finish by adding a small spoon or haldi bowl on one plate to show the function theme.
Try thisCut rose buds to sit above the marigolds so they show clearly in photos.
Common mistakeUsing too many flowers in one jar - it turns into a blob and hides details.
18. Yellow sheer curtain backdrop with clothespin clips
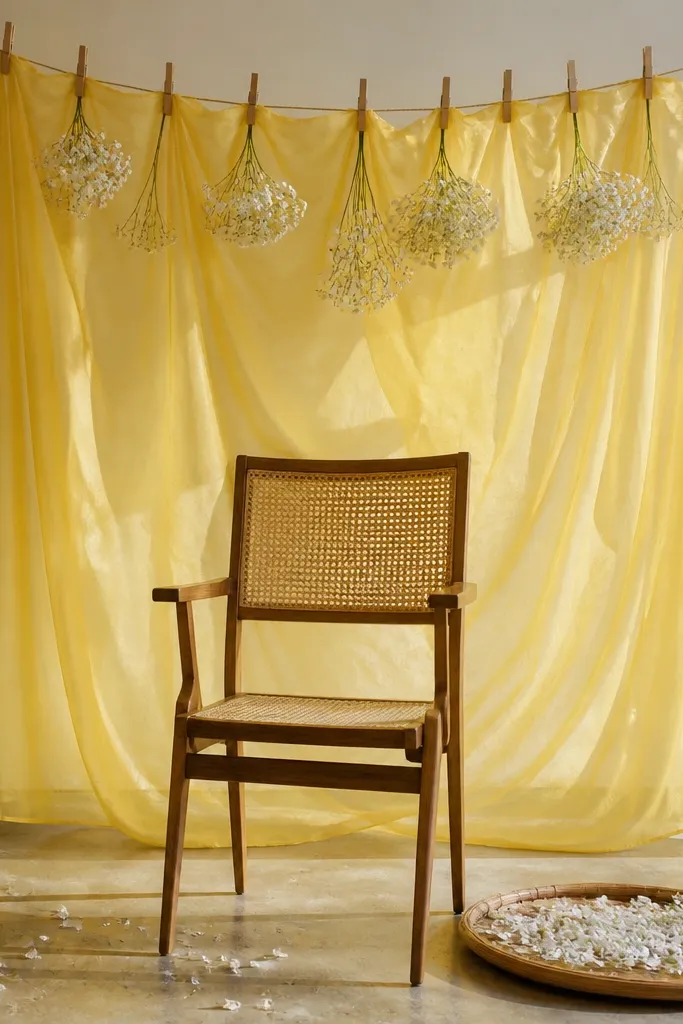
Sheer curtains make everything look soft and airy, and haldi looks better when the background isn't harsh. I like yellow sheer because it glows slightly under warm lighting, but I keep it layered so it doesn't turn everything too yellow. I pair it with white flower bunches to maintain contrast and prevent the backdrop from blending into the outfit. This works well for people with darker outfits too, because the sheer fabric creates a light halo behind you. It's also easy to remove after the function, which matters if you're reusing the space the same day.
Start by mounting a clothesline or thin rod behind the chair at the height you want (about 7 feet). Hang the yellow sheer curtain and clip it with clothespins spaced every 6-8 inches for even drape. Add two white flower bunches near the top so they sit at shoulder height in photos. Place a tray of petals on the floor in front and keep the chair centered. If your room is bright, keep the curtain slightly pulled to one side to create a gentle wave instead of a flat sheet.
Try thisSteam the sheer lightly so wrinkles don't catch light and look shiny.
Common mistakeHanging the sheer too flat - it looks like a backdrop sheet instead of a drape.
19. Turmeric-stained bedsheet backdrop with pinboard photos
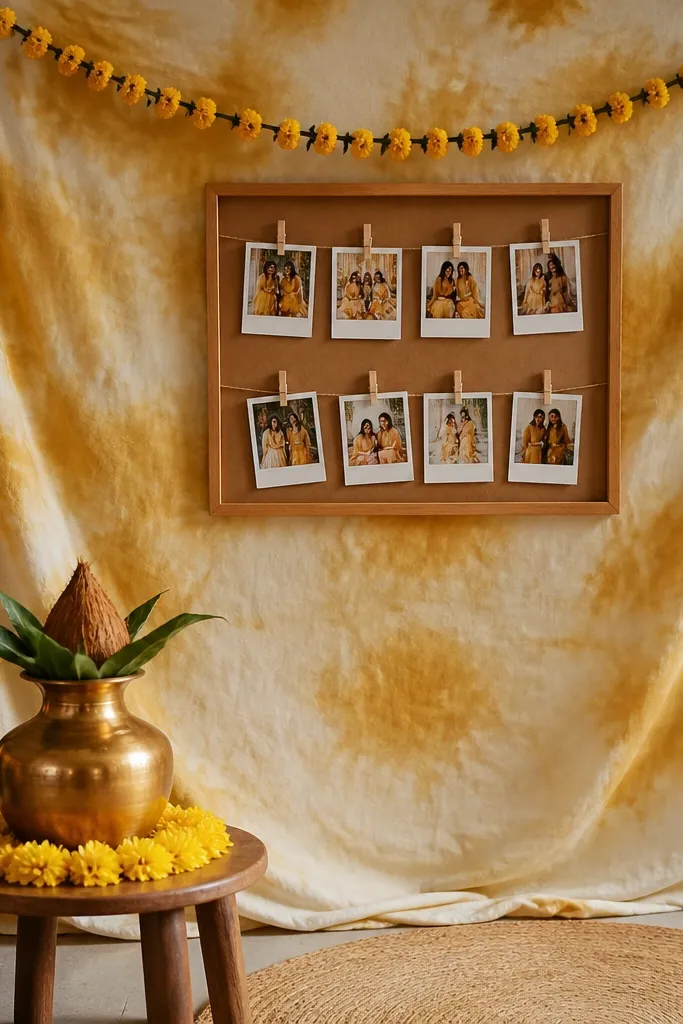
This one looks handmade because the backdrop already has a warm, lived-in color. I did this at home by staining a plain bedsheet and then adding simple photo clips, and it made the haldi corner feel personal without buying extra decor. The golden tint ties everything together with turmeric, so your marigold and brass pieces don't look random. The pinboard layout also gives you height - photos sit above the tray and make the whole setup read "event" from across the room.
Hang a bedsheet behind the chair or corner with two curtain rods or sturdy hooks, leaving a 6-8 inch fold at the bottom so it doesn't look flat. Mix turmeric with warm water (about 2 tablespoons turmeric to 1 cup water), dip a paint brush or sponge, and dab in uneven blotches - stop before it turns too dark. Let it dry fully, then lightly iron on the wrong side so it doesn't crease badly. Make a pinboard by stretching brown craft paper or jute cloth over a small wooden frame (or even a thick cardboard sheet) and securing the edges with tape or staples. Clip 6-10 photo prints using mini clothespins and keep them in a tight cluster so it looks intentional. Add a thin marigold bud string along the top and place the haldi kalash slightly forward so it sits in the "frame" of the backdrop.
Try thisUse thicker paper for the photos so the turmeric color doesn't bleed through and ruin the edges.
Common mistakeSkip soaking the whole sheet evenly - harsh uniform staining looks dull and cheap compared to the soft blotch effect.
20. Coconut-shell candle holders with haldi glow
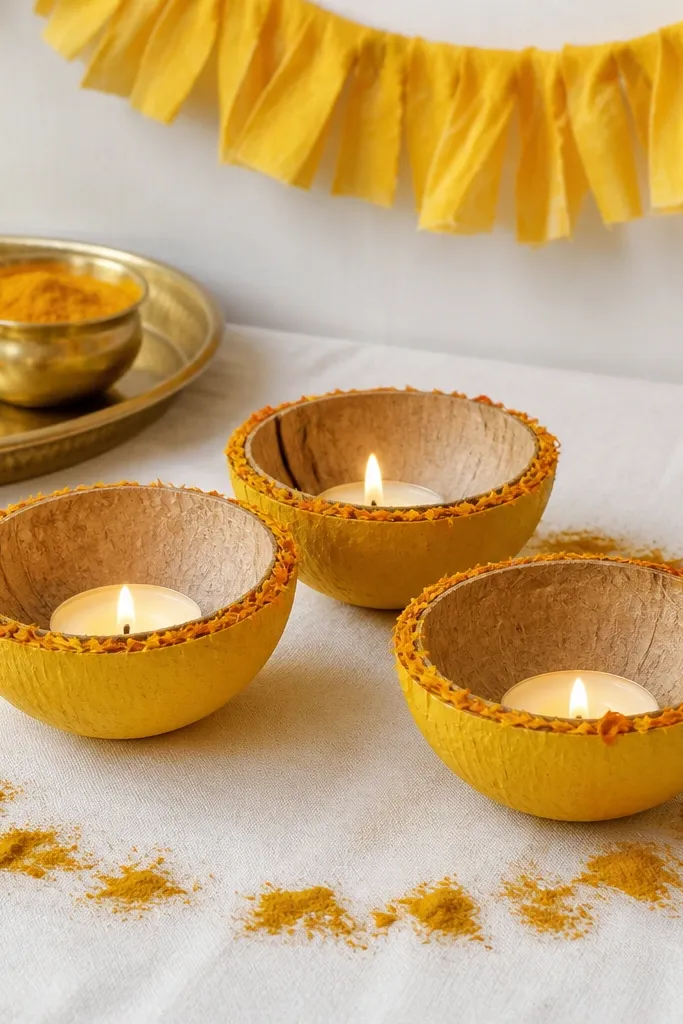
Coconut-shell holders give you texture you can't fake with store-bought plastic cups. I used them for a haldi night setup, and the warm candle flame made the mustard paint look like it was lit from within. The shells also catch light at the edges, so even a small cluster looks like a centerpiece instead of random candles. It works because you're repeating the haldi color family - mustard-yellow, turmeric gold, and brass - across height and surface texture.
Clean three coconut shells and cut them in half if you're starting from whole ones, then dry them completely so paint sticks. Paint the outer surface with matte mustard acrylic (2 thin coats), and leave a small raw ring near the inner rim so it looks natural. After paint dries, sprinkle a little turmeric mixed with a pinch of water on the white cloth base to create faint smudges - keep it light so it doesn't stain too hard. Place the shells on a white cloth or a plain tray liner and set tea lights inside. Arrange them in a triangle around the haldi tray, with the tallest shell slightly closer to the mirror or wall so it frames the corner. Scatter a few marigold petals around the base, not on the candle flame - keep petals only on the cloth area.
Try thisUse LED tea lights if you have kids at home - the glow still looks right, but you avoid wax mess on your decor.
Common mistakeSkip glossy paint - it reflects the room lights too strongly and makes the candle cluster look like a craft project.