1. Ivory Chiffon Cathedral Arch with Gold Corner Frames
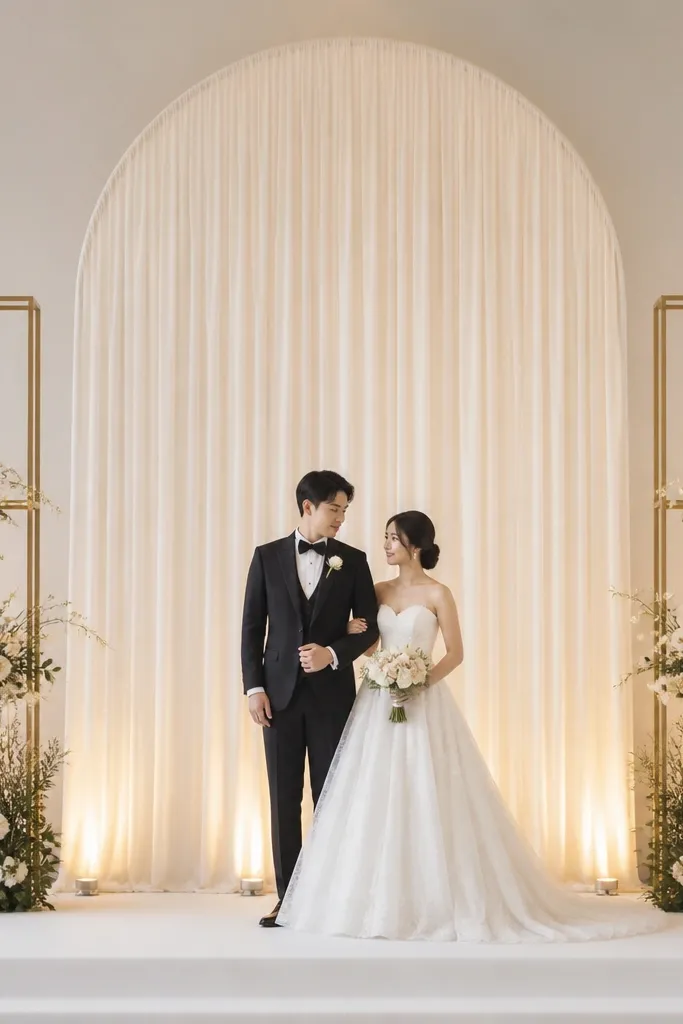
This setup makes photos look expensive because the arch creates a clear silhouette and the chiffon gives you that smooth, backlit glow. I used ivory chiffon panels with a matte gold frame, then added warm white uplighting aimed upward so the fabric shows texture instead of looking like a flat sheet. It flatters most skin tones because ivory reflects light without turning faces yellow. If you have a shorter stage, you still get height because the fabric falls in long vertical lines, which visually stretches the center.
Start by building a simple center arch frame at about 10 to 12 feet tall, sized so it clears the couple's heads by at least 8 inches. Hang four chiffon panels from the top bar so they overlap slightly in the middle, then tie the overlap with discreet clear string so the folds stay vertical. Place two gold corner frames near the stage corners, each about 6 to 7 feet tall, and drape a thin strip of ivory fabric down the inner edge of each frame. Finally, run two uplights at floor level aimed at the arch base so the light travels up the folds.
Try thisUse warm white bulbs, not cool - cool light makes ivory chiffon look gray in photos.
Common mistakeAvoid mixing multiple whites (bright white + ivory + cream) because it reads patchy under venue lighting.
2. Black Velvet Backdrop with Mirror-Edge LED Outline
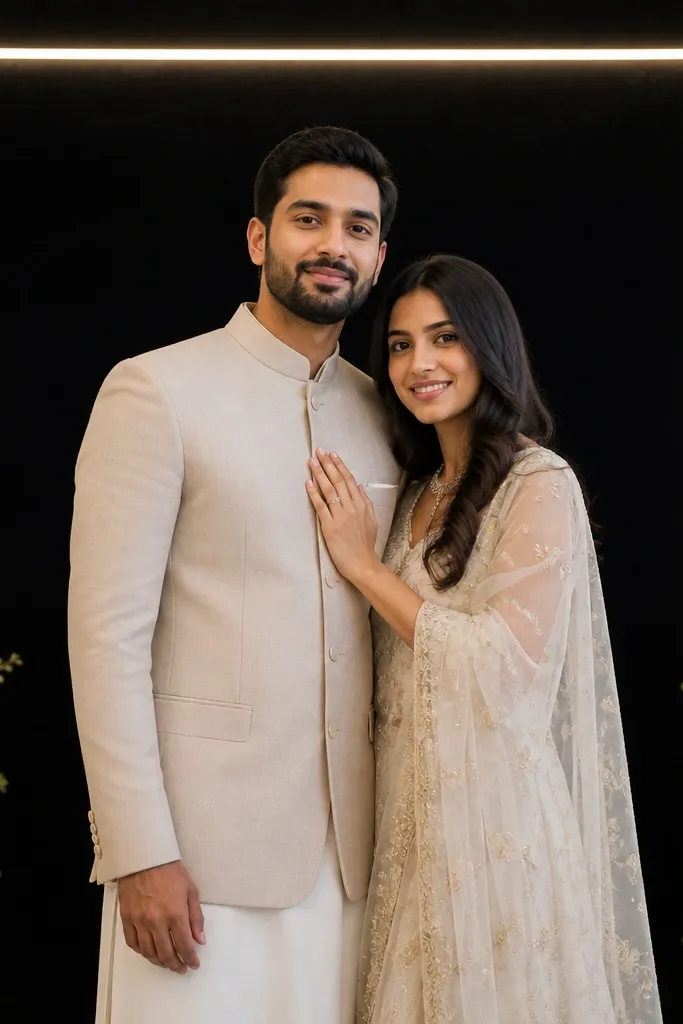
Black velvet sounds risky, but it photographs like editorial when the LED outline is clean and the fabric is smooth. The velvet absorbs stray light so the couple pops, and the mirror-edge outline gives you a luxe frame without adding clutter. I've seen this work especially well for modern venues and for couples wearing lighter gowns or tailored black suits because the contrast is strong. For medium to deep skin tones, black velvet looks flattering because it doesn't wash the face the way white backdrops can.
Start by stretching black velvet tightly across a backdrop wall or freestanding frame so you remove wrinkles at the corners first. Build a rounded rectangle LED outline about 4 feet wide and 6 feet tall centered where the couple stands. Keep the LED dim enough that it outlines, not blasts; aim the LEDs slightly inward so the glow wraps the velvet surface. Add two small greenery garlands on the lower left and right edges, each about 3 feet long, so the bottom doesn't look empty.
Try thisTest the LED brightness from the guest seats - if you can see hotspots with your eyes, it will look harsh on camera.
Common mistakeSkip cheap "neon" tubes that flicker in photos; get steady output LEDs or your outline will look inconsistent.
3. Sage Green Waterfall Panels with White Rose Concentration
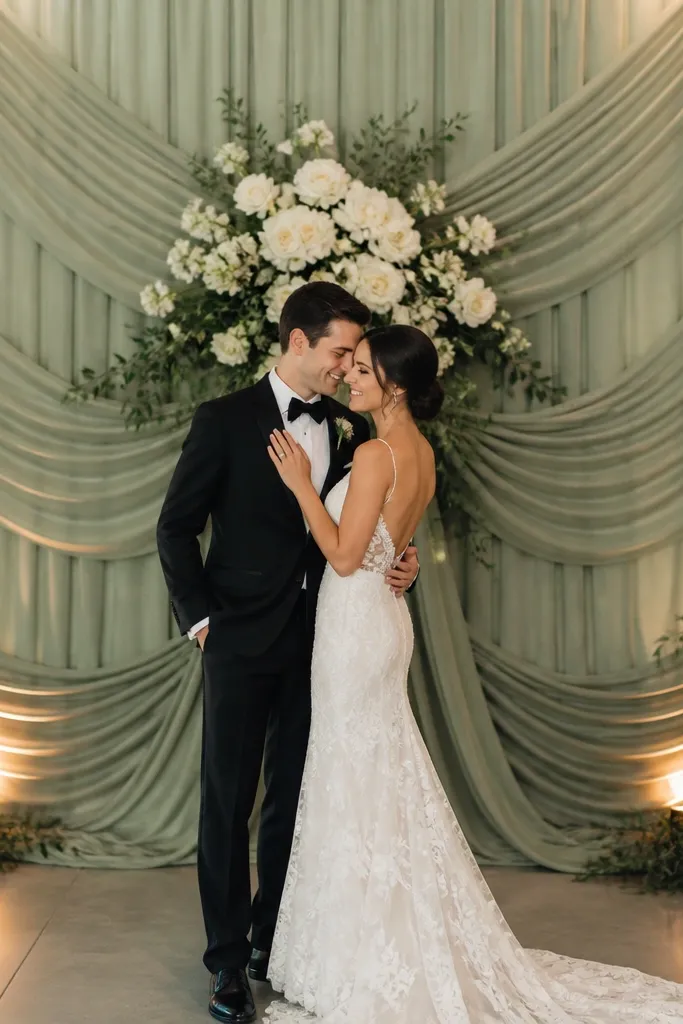
Waterfall panels give you movement and height without needing a huge arch structure. Sage green reads fresh and calm, and white roses as a center concentration make the backdrop look curated instead of scattered. I like this for spring and early summer weddings because the palette looks clean even in daylight. It also flatters because sage sits well next to most skin undertones and doesn't overpower skin the way neon greens can.
Start by hanging layered sage fabric - use 6 to 8 panels of chiffon or lightweight satin so each layer starts from the top and falls to different lengths. Aim for the shortest panel to end around waist height and the longest to reach just above the stage base. Build a centered rose focal cluster about 2.5 to 3 feet wide using white garden roses and a little baby's breath or small filler flowers. Finish by placing two small greenery drapes at the lower corners so the base looks intentional.
Try thisUse different shades of sage only if they are all matte; glossy satin between matte chiffon makes the layers look mismatched.
Common mistakeDon't spread the roses across the whole wall - a tight center cluster photographs sharper.
4. Pampas and Dried Grass Halo Backdrop with Brass Candelabras
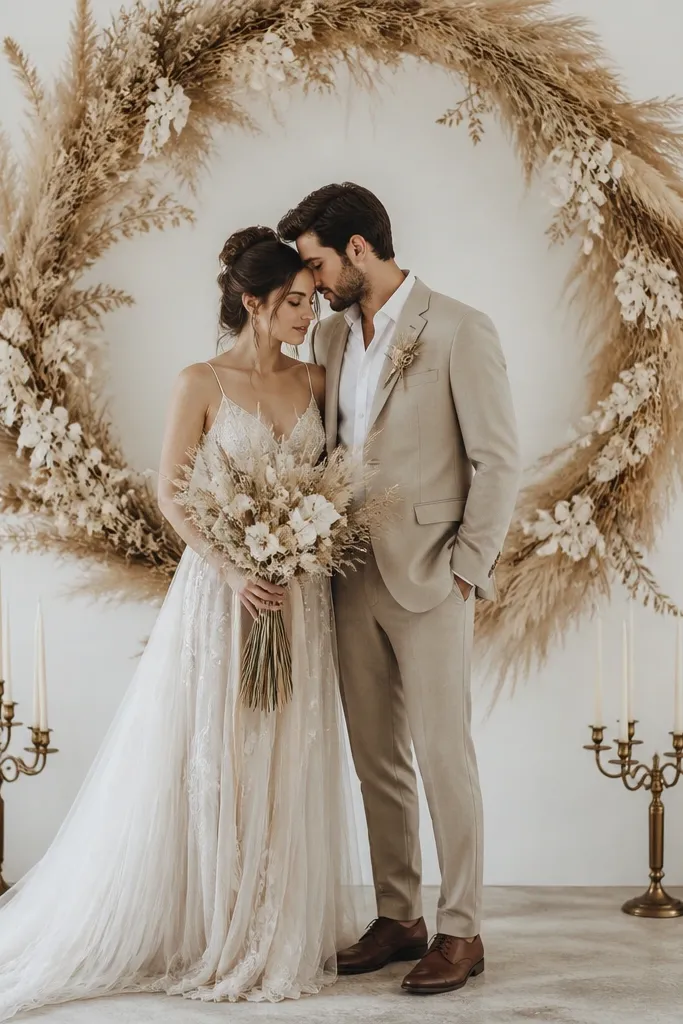
This is the setup that looks expensive because dried textures catch light in a way fresh flowers can't. Pampas and dried grass create a halo that frames the couple's faces, and brass candleholders add warmth without turning the stage into a candle risk. I used this for a late afternoon ceremony and the golden stems glowed even when the venue lights dimmed. It's also forgiving for different skin tones because the palette is neutral and the halo sits behind the head area.
Start with an off-white fabric backdrop or a plain wall covered in matte muslin so the dried stems stand out. Build a circular frame about 7 feet wide and hang pampas plumes around it in a ring, leaving a small center gap so the couple's heads are the focal point. Add dried grass bundles in a few spots to create texture variation, then secure with floral wire to the frame. Place two brass candelabras on the stage floor, each about 18 to 24 inches tall, centered left and right of the halo.
Try thisMist the dried stems lightly with a matte hair spray fixative before install so they don't shed during photos.
Common mistakeAvoid overstuffing the halo; if the ring is too thick, it blocks the couple and looks like a wall of hay.
5. White Floral Wall Squares with Sage Green Grid
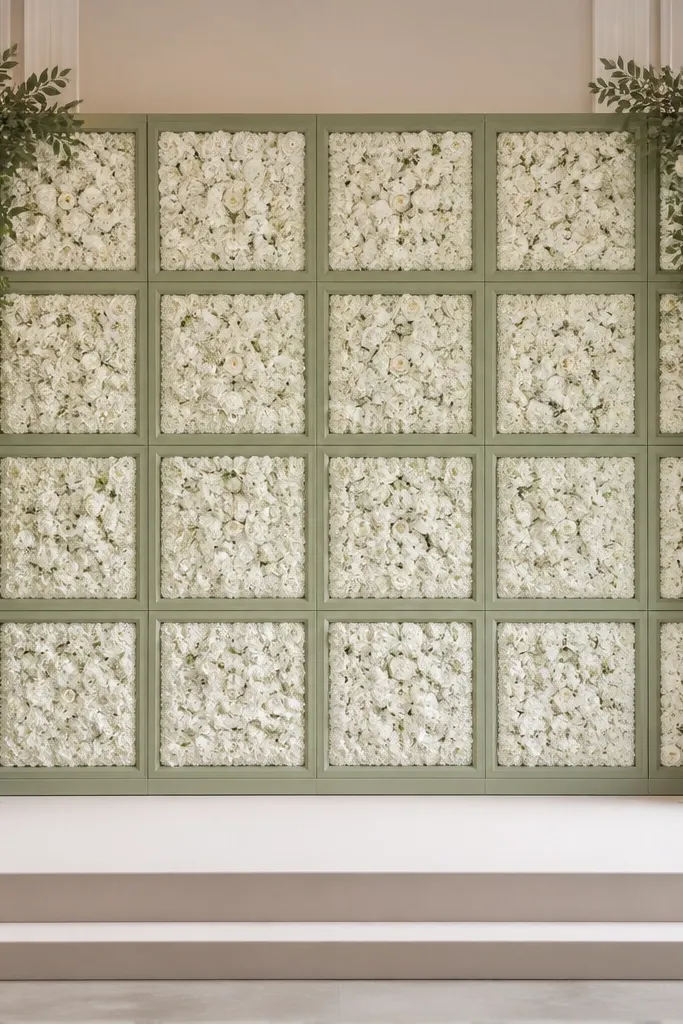
Square grids make a stage look designed, not decorated. The sage grid gives structure and the white blooms in each square create repeatable photo texture. I've used this when the venue has plain walls behind the stage because it turns a bland background into something graphic. It flatters because the white blooms sit in consistent blocks and keep the couple's faces readable.
Start by building a lightweight grid frame using thin wooden strips or aluminum channels, sized to the backdrop wall. Wrap the grid intersections with sage fabric strips so the lines are crisp in camera. Fill each square panel with white blooms - use a mix of larger focal flowers and smaller filler so the texture isn't one-note. Keep the squares behind the couple slightly less dense than the outer squares so the center breathes, then add two sage garland lines down the stage sides.
Try thisUse the same white flower type in at least 70% of the squares so the wall looks cohesive, not random.
Common mistakeSkip foggy, low-contrast whites; if the venue lighting is dim, pure white needs warm bulbs to avoid looking flat.
6. Long-Sweep Floral Runner with Low Greenery Coast
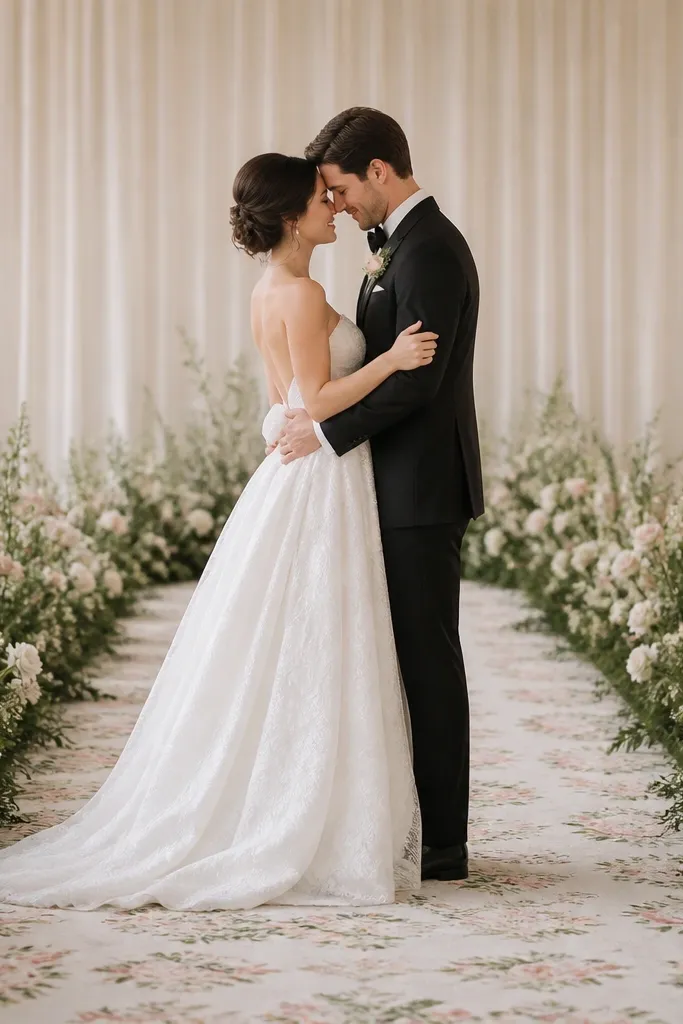
This setup is the one that makes guests feel like they're walking into a picture. Low greenery and small blooms create depth because the camera sees the runner leading lines, while the simple backdrop keeps the stage from looking crowded. I used this for a ceremony with a lot of guest movement and it stayed photogenic the whole time. It flatters because the low profile doesn't block dresses or suits and keeps attention on faces.
Start by laying a neutral base fabric on the stage, then center a long floral runner made with greenery strips about 12 to 16 inches wide. Place small blooms (white + blush) every 6 to 8 inches, keeping them close to the greenery so nothing towers. Build a simple drape backdrop in warm cream chiffon behind the couple and add a small centered floral cluster at eye level. Finish by adding two low greenery "coasts" at stage edges so the runner looks anchored.
Try thisIf you're using real petals, keep them off the main runner texture and use greenery instead - petals scatter and look messy by cocktail hour.
Common mistakeAvoid tall centerpieces on the floor; they block legs and look chaotic in standing photo angles.
7. Champagne Satin Drapes with Layered Crystal Fringe
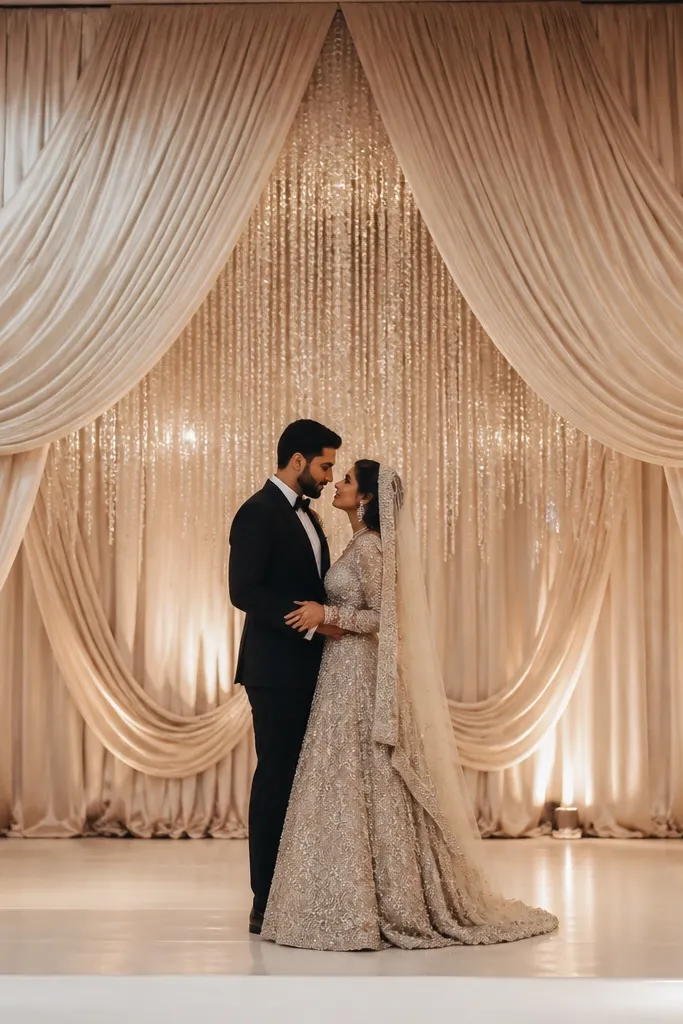
Satin + crystal fringe reads expensive because the fabric looks smooth and the fringe adds motion sparkle without needing a huge floral budget. I've seen this work best when the venue has spotlights aimed upward because the fringe catches light and doesn't look like static decoration. Champagne satin is flattering across skin tones because it's warm and soft, not stark white. It also fits indoor evening weddings beautifully.
Start by draping champagne satin panels behind the couple in two layers - an outer layer that reaches to just above the stage base and an inner layer that ends around chest height. Add a center fringe curtain made of crystal drops sewn to a mesh or clear beaded strip, hanging from a top bar down to mid-height. Place two warm spotlights low and angled upward so the fringe flashes gently. Keep the floor decor minimal - a few candle clusters or slim vases only, so the sparkle stays the focal point.
Try thisChoose crystal fringe with warm-toned metal trim; silver trim can look cold against champagne satin in photos.
Common mistakeSkip bulky fringe that hits the couple's shoulders - it causes glare and makes faces look shiny.
8. Matte Blush Velvet Curtain with Gold Leaf Name Panel
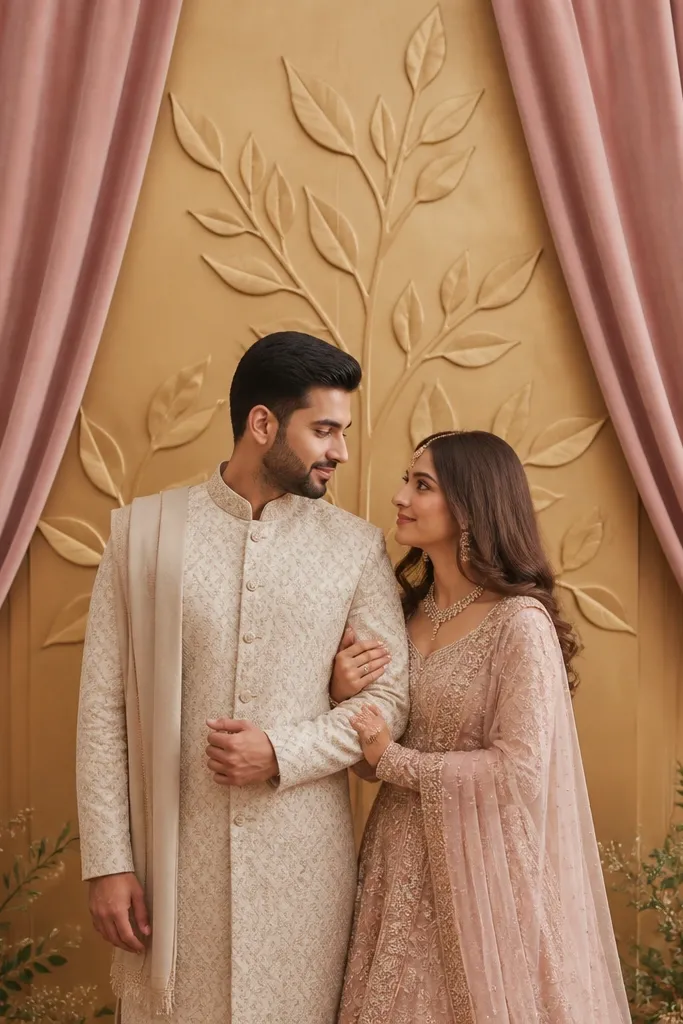
Velvet curtains give you depth, and blush velvet looks romantic without turning the stage into a pink carnival. A gold leaf name panel is a clean focal point for ceremony photos and works well when you want personalization without heavy florals. I like this for couples who have a modern font on invites and want the stage to match that design language. It flatters because blush velvet adds warmth and the gold panel draws the eye to faces.
Start by hanging two blush velvet curtains from a top track so they part in the center, leaving a clear photo opening about 6 to 7 feet wide. Use matte velvet, not shiny - the sheen kills the "lux" look under flash. Create a centered gold leaf panel on a matte backing board, sized around 30 by 48 inches, and place it at eye level behind the couple. Add two small greenery swags at the bottom corners to keep the velvet from looking too empty.
Try thisIf you're printing the names, use foil-style vinyl or real gold leaf paper - regular gold ink can look dull under stage lights.
Common mistakeDon't hang the panel too low; if it sits near waist height, it blocks dresses and looks like a sign, not decor.
9. Terracotta Clay + Cream Drape with Dried Flower Clusters
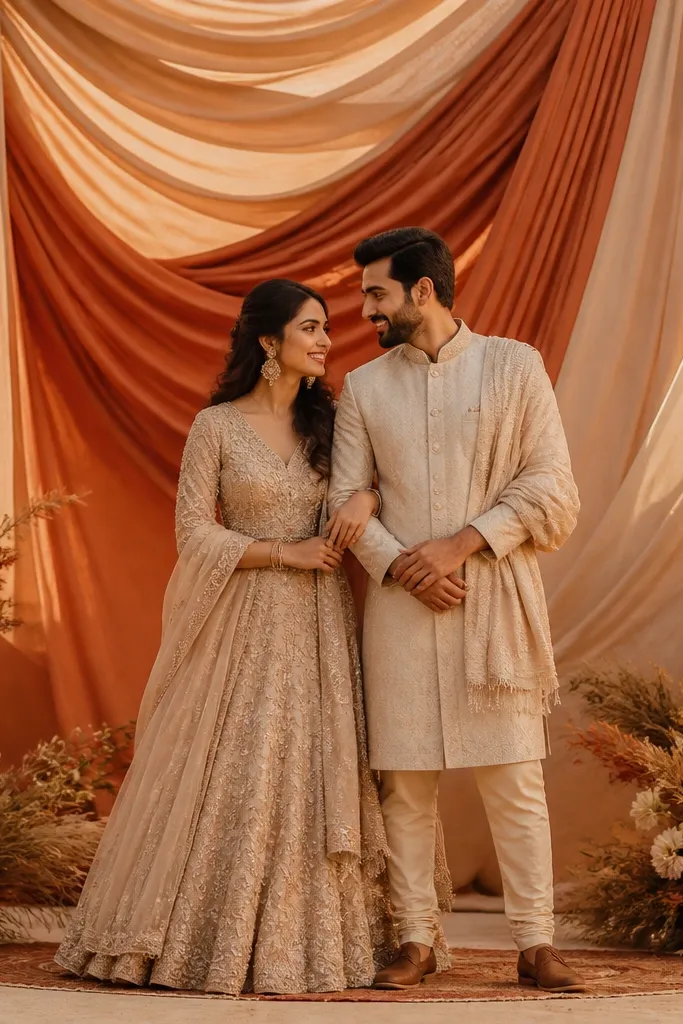
Earthy color staging looks high-end when you keep it warm and textured. Terracotta drape with cream fabric gives you contrast that flatters both light and deep skin because it warms the lighting. Dried flower clusters at the base corners make the stage feel grounded instead of floating. This is the setup I choose when the venue lighting is unpredictable because earthy tones stay flattering even when the room is dim.
Start with a cream drape backdrop, then add terracotta fabric panels as side swags that reach from above the couple's heads down to just above the stage base. Place dried clusters at stage corners using a mix of dried florals like strawflower, dried marigold, and small seeded stems - keep each cluster about 2 feet wide. Build a simple center focal using one larger dried arrangement behind the couple's head height. Use warm uplights or candlelight tones so the terracotta reads true, not muddy.
Try thisPin the terracotta swags to the frame so they fall in consistent arcs; uneven arcs make it look handmade in a bad way.
Common mistakeAvoid adding bright neon accents; terracotta makes neon look cheap fast.
10. Monochrome White Balloon Column Frame (No Balloon Wall)
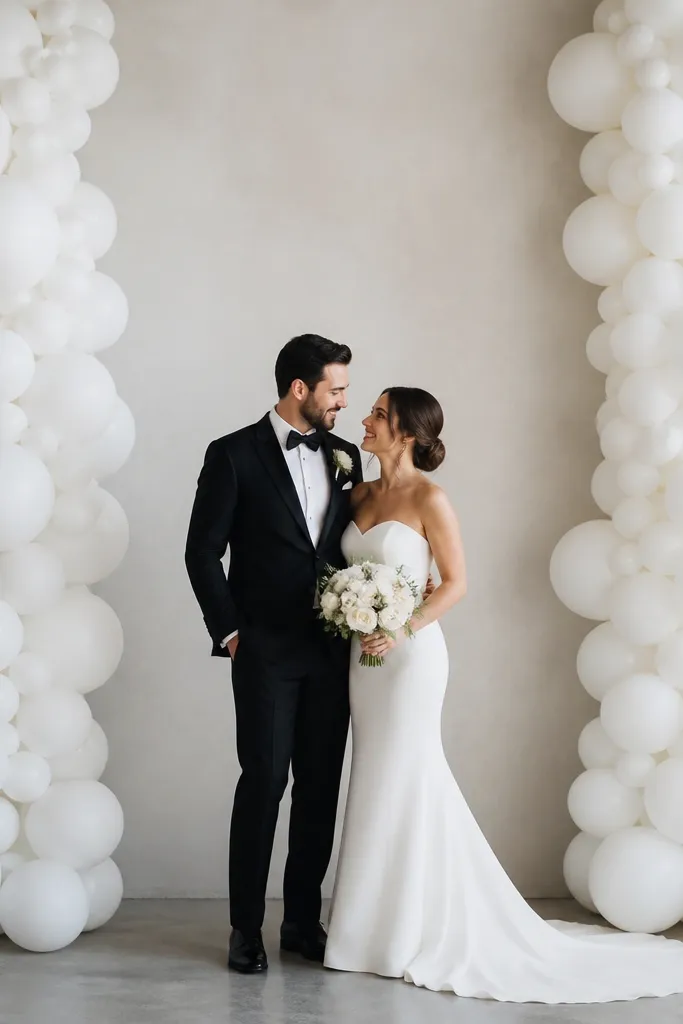
Balloon columns can look like a party if you fill the whole backdrop. Keep them to the sides and you get a sleek frame that reads modern in photos. I used matte-finish white balloons in a gradient from larger bottom balloons to smaller top ones, then kept the center backdrop clean. This flatters because white columns brighten the edges of the frame without washing out faces. It's also practical for venues that don't allow heavy builds.
Start by marking the stage sides where the columns will stand, keeping at least 3 feet between the columns and the couple's standing area. Build each column with balloons arranged in tiers - bigger at the bottom, smaller at the top - and use a matte finish in consistent shade. Add a thin greenery garland around the inner edge of each column so it doesn't look like a standalone balloon prop. Keep the center behind the couple as a plain drape or simple backdrop so the photo has one focal point.
Try thisUse balloon anchors with weighted bases and secure them to stage rails if allowed; loose columns shift during speeches.
Common mistakeSkip glossy balloons; they create harsh reflections that show up as glare on cameras.
11. Acrylic and Floral Floating Steps Behind the Couple
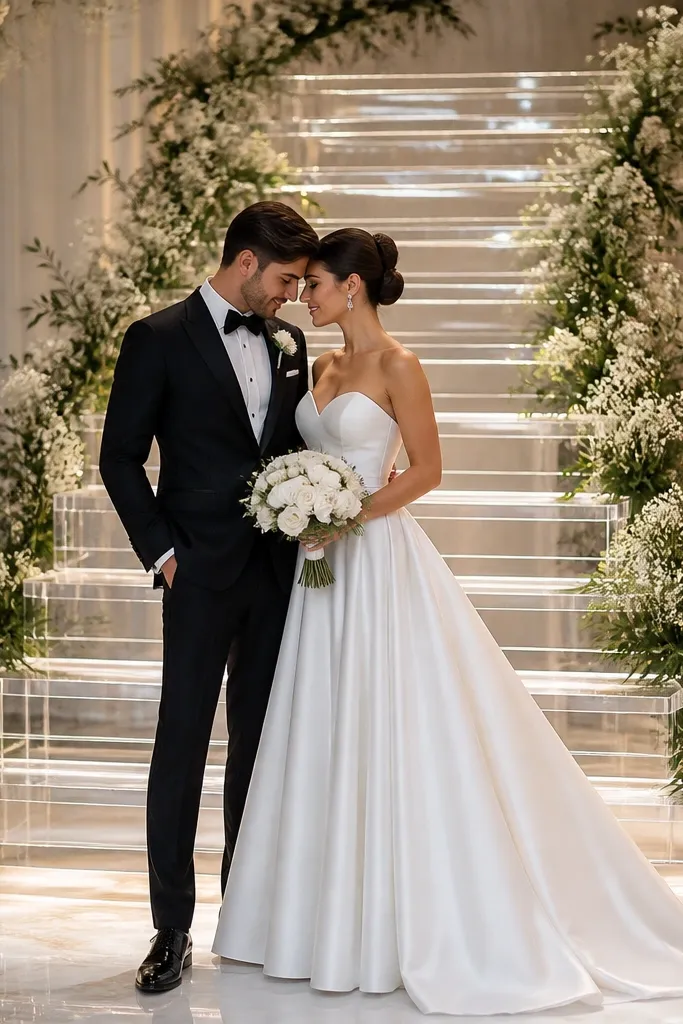
Floating-looking steps make the stage feel designed and add height without a huge wall of decor. The clear acrylic catches light and keeps the focus on the couple instead of blocking sightlines. I used this in a venue with narrow stage sightlines where tall arches would have obstructed cameras and wedding party members. It flatters because the greenery edges sit low and the couple's legs stay visible in photos.
Start by placing acrylic riser steps behind the couple, centered and aligned with the camera axis. Wrap the front edge of each step with a thin greenery strip, then tuck tiny white flowers along the greenery at 6-inch intervals. Keep the top step clean so the couple has a clear background behind their heads. Add two low uplights aimed at the steps to brighten the acrylic edges and create that "float" look.
Try thisWipe acrylic before install; fingerprints show as bright streaks under stage lights.
Common mistakeAvoid heavy, dense flowers on the steps; too much volume turns it into a cluttered platform.
12. Gold Geometric Lattice with Warm White Florals
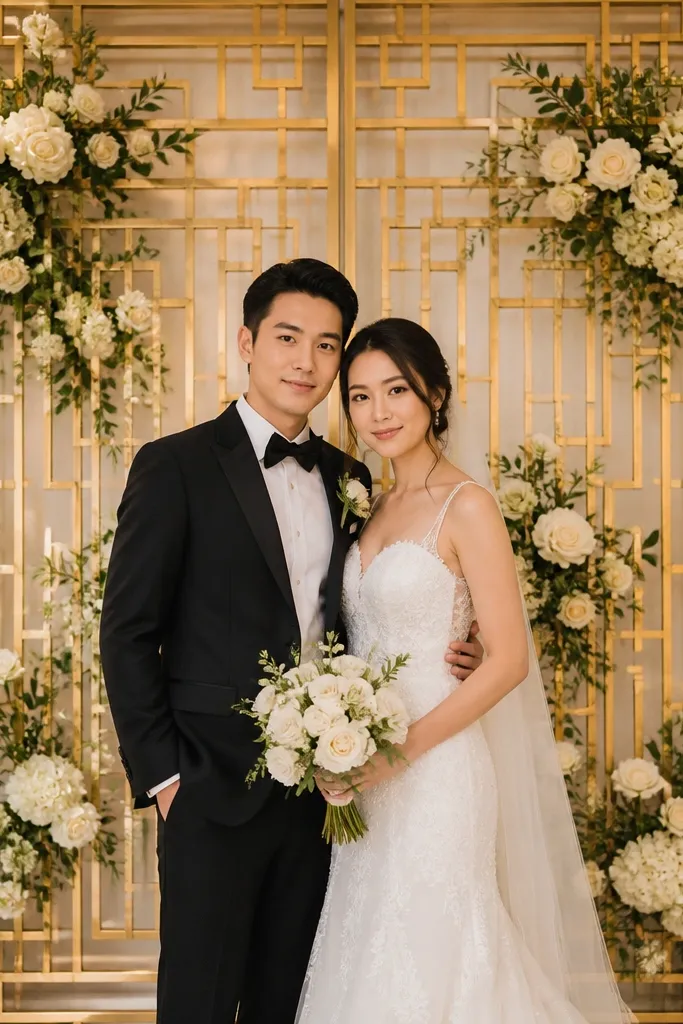
Geometric lattice makes the stage look architectural. When you weave warm white florals into the grid, you get texture that stays neat from every angle. I've used this in venues where the back wall is bland and the lighting is flat - the lattice pattern gives the camera something to lock onto. It flatters because the gold lines frame the face area and the florals stay concentrated, not sprawling.
Start by installing a gold lattice panel centered behind the couple, about 8 feet wide and 10 feet tall. Weave greenery first - thin vine or boxwood strips - into the grid squares using zip ties or floral wire. Then tuck warm white flowers into the same grid points so the blooms repeat in a pattern. Add two smaller lattice side panels or mirror the grid edges with slim drapes to keep symmetry.
Try thisUse a consistent flower size (choose one main bloom) so the grid doesn't look like random stuffing.
Common mistakeSkip mixed metals; if you add silver candle trays, the gold lattice looks less intentional.
13. Oversized Silk Ribbon Bows on a Neutral Drape Wall
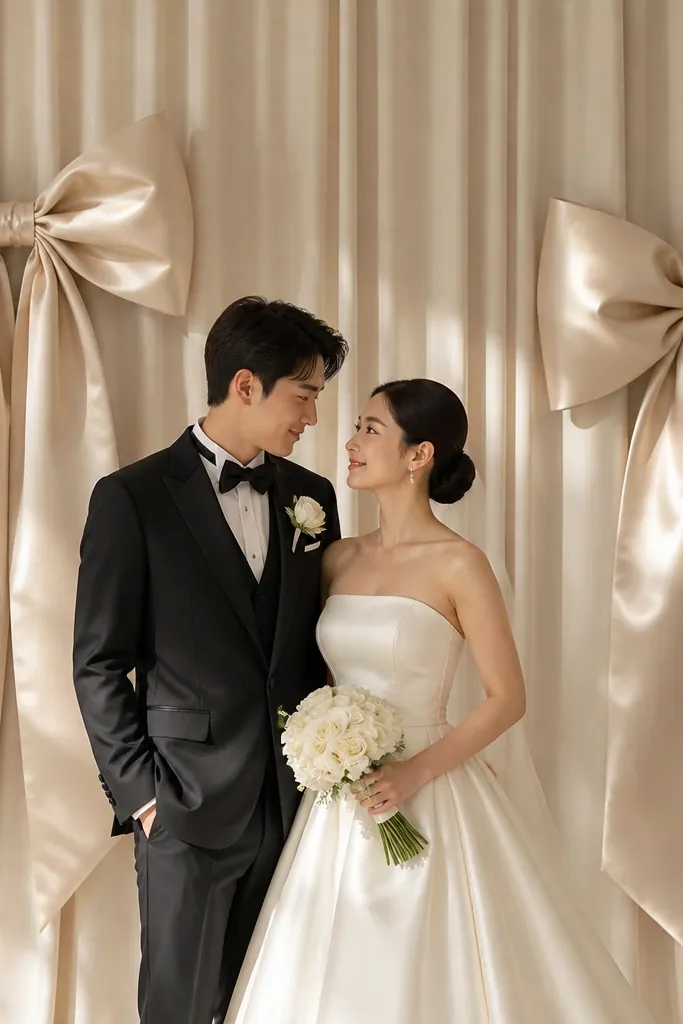
Ribbon bows are a cheat code for stage drama because they look big in photos without needing heavy structure. I like this when you want a clean backdrop but still want something playful and romantic. The neutral drape wall keeps the frame calm, and the oversized bows add personality at the correct height. It flatters because beige and cream tones don't fight with skin undertones, and the ribbon tails create a gentle vertical line behind the couple.
Start by covering the backdrop wall with neutral matte fabric like muslin or thick tulle so it doesn't shine. Create two giant bows using silk-like ribbon in a single shade such as champagne or pale blush, each bow about 36 to 48 inches wide. Mount the bows at about shoulder height behind the couple's sides, then let the tails hang down to mid-stage. Add a small centered floral cluster between the bows so the center doesn't look empty.
Try thisUse double-sided mounting tape plus zip ties to keep the bow loops from sagging later in the day.
Common mistakeAvoid thin satin ribbon that wrinkles - it reads cheap under flash.
14. Rainbow of Pastel Fabric Layers with a White Backdrop Center
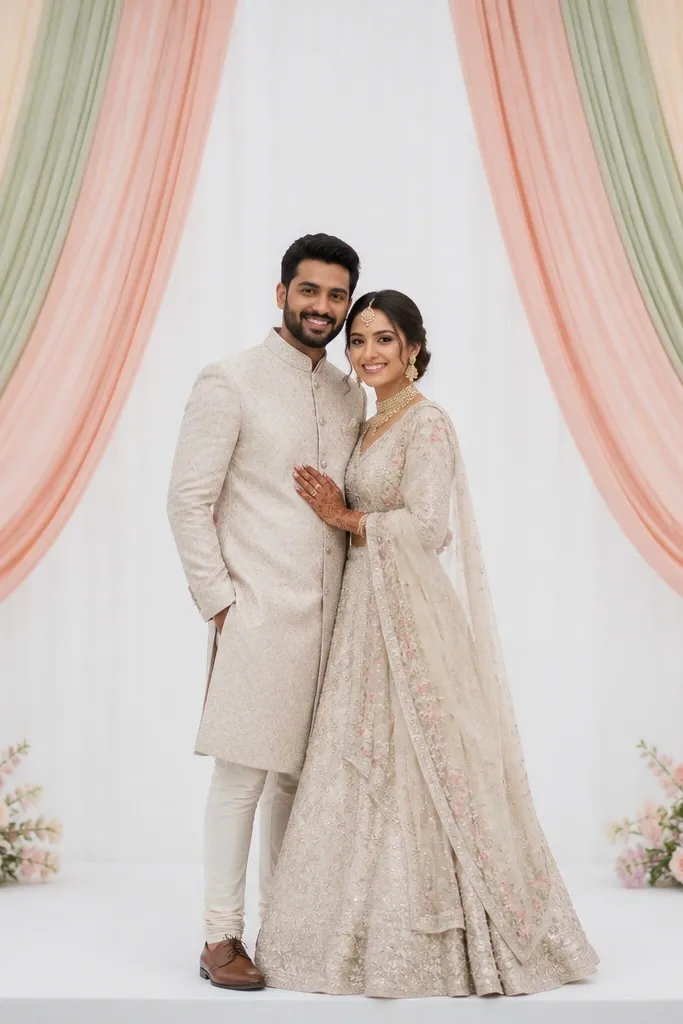
This one works when you want color but don't want a loud backdrop. Pastel layers create soft dimension, and the white center keeps the couple's faces bright and readable. I built this for a spring wedding where the invites had pastel gradients, and the stage matched without looking like a kids' party. It flatters because pastels tint the air around the couple instead of washing skin with one harsh color.
Start with a white center panel that is about 6 feet wide behind the couple, using thick white fabric that doesn't wrinkle. Add pastel drape layers on both sides in 3 to 5 colors, each layer about 12 to 18 inches apart, creating a gentle arc. Keep the drape ends at two heights only: mid-height behind the couple and longer ends near the floor. Place small pastel flower clusters at the lower corners of the stage to tie the colors to the base.
Try thisChoose pastels that match your stationery - if you can't name the colors, the stage will look random in photos.
Common mistakeAvoid adding more than five pastel shades; beyond that, it starts to look like dyed fabric scraps.
15. Feather-Light White Draped Ceiling 'Cloud' Over the Couple
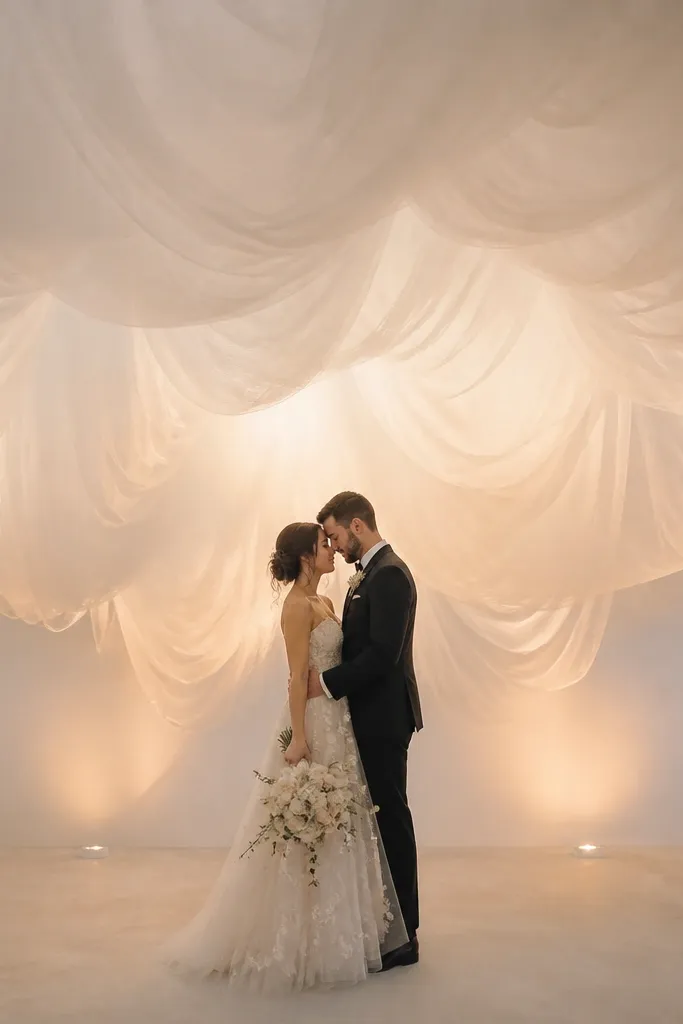
A ceiling cloud is the most "wow" stage move when your venue has height. It frames the couple from above and makes portraits look soft and cinematic without building a bulky backdrop. I've used it for ceremonies where the floor stage was small - the canopy adds dimension without taking up width. It also flatters because the light diffuses across faces, making harsh shadows less obvious.
Start by checking your venue height and measuring where the couple stands relative to overhead beams. Hang sheer white fabric in a cloud shape using a ring or support points so the center dips slightly over eye level. Keep the fabric airy - don't bunch it - and taper the edges so it blends into the background drape. Add two warm spotlights aimed at the fabric from below so the cloud glows instead of looking like a hanging sheet.
Try thisUse clear fishing line for the cloud tie points so the support stays invisible in photos.
Common mistakeAvoid heavy blackout fabric overhead; it blocks light and makes the couple look darker.
16. Monogram Backdrop with Florals in the Negative Space
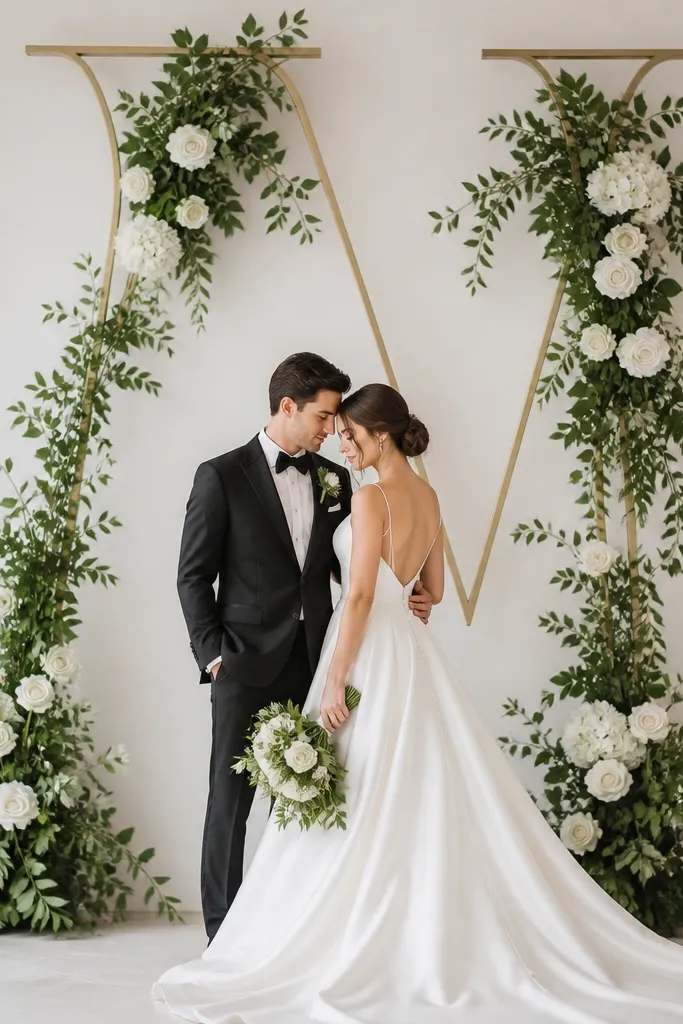
Negative space is what makes monogram stages look designer. Instead of stuffing flowers everywhere, you let the monogram shape do the work and you place florals where the eye naturally lands. I've used this when the couple wants personalization but doesn't want a busy wall. It flatters because the clean letter outlines keep faces readable and the greenery adds color without overwhelming the background.
Start by choosing a monogram letter about 7 to 8 feet tall for a full stage backdrop, centered behind the couple's standing position. Mount the monogram frame on a backing drape in matte cream or light gray. Attach greenery along the monogram edges in thin strips, then tuck white blooms only on the outer curves and corners. Finish by adding two smaller clusters at the stage base aligned with the monogram's lower points.
Try thisPick one bloom type for the monogram accents so it looks intentional, not like leftovers.
Common mistakeAvoid placing florals inside the monogram center; it destroys the negative space and turns it into a wall.
17. Sculpted Greenery Columns with White Ribbon Wrap
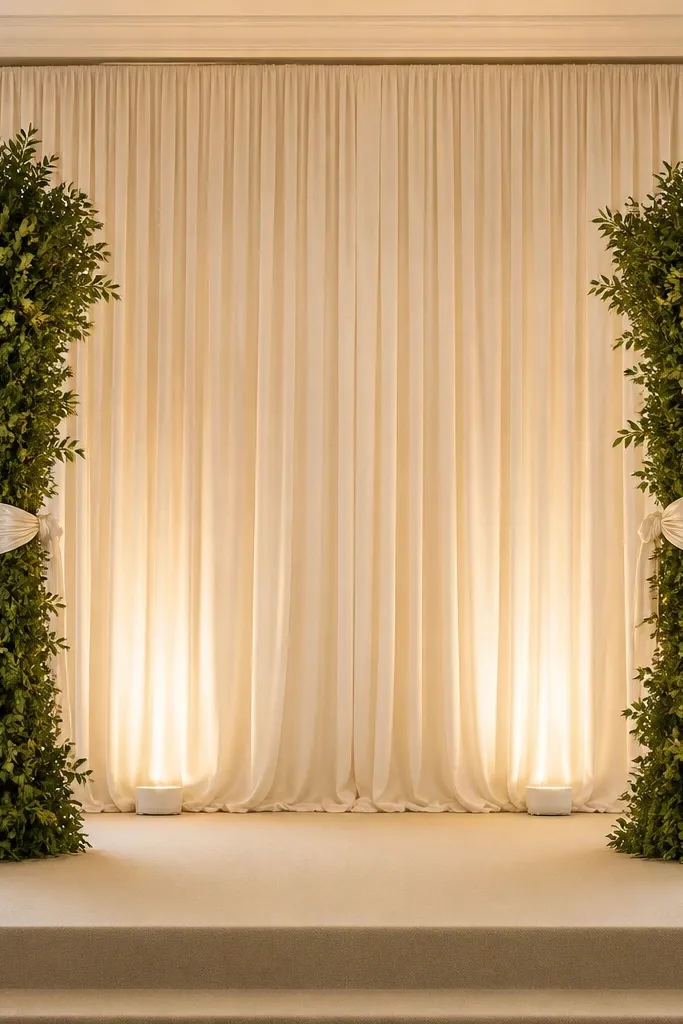
Greenery columns are clean, tall, and camera-friendly. White ribbon wrap gives you a formal look without extra signage, and the ribbon creates a crisp highlight line in photos. I like this for couples who want a classic ceremony stage but don't want a full flower wall. It flatters because greenery stays neutral and ribbon adds brightness near shoulder level where faces sit.
Start by creating two columns using a metal or foam base at about 7 to 8 feet tall, then wrap with greenery in a tight spiral so it looks sculpted. Use ribbon loops around the midsection, about 20 to 24 inches wide, in a soft satin that doesn't glare. Place the columns at equal distance from the center so the couple stands perfectly framed. Add a cream chiffon drape behind them and two warm uplights that hit the ribbon and greenery edges.
Try thisTie the ribbon in a knot that sits slightly off-center; perfect symmetry can look mannequin-like in photos.
Common mistakeSkip sparse greenery - columns need density at the front edge or they look like backyard plants.
18. Two-Tone Floral Cascade on a Plain Linen Backdrop
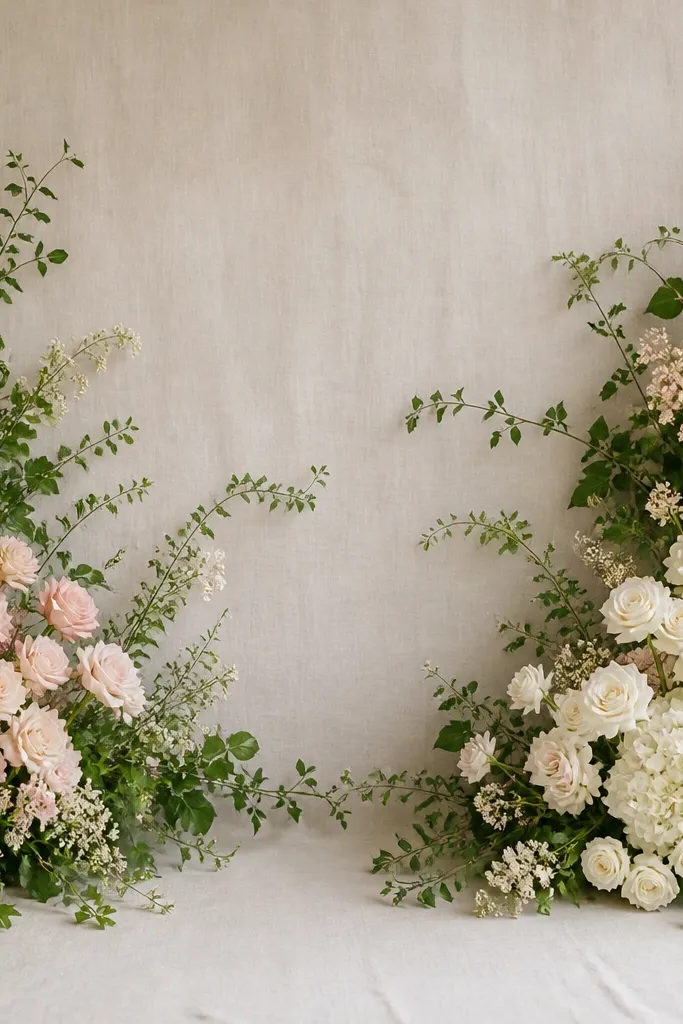
A plain linen backdrop keeps everything calm, and the floral cascade gives you drama without building a large wall. Two-tone gradient cascades photograph well because the eye travels from top to bottom, which makes the stage feel taller. I used blush-to-white cascades for a couple wearing a warm-toned gown, and the stage matched the dress warmth without looking beige-on-beige. It flatters because the gradient adds soft color near the faces and doesn't blast one single hue.
Start by covering the backdrop with matte linen in warm cream. Build two cascades that mirror each other, each about 3 feet wide at the top and 5 to 6 feet long, using greenery strips as the base. Attach blush flowers along the upper portions and white flowers as the cascade reaches mid and lower levels. Leave the center behind the couple mostly clean so faces and the ceremony focal point stay readable.
Try thisHang the cascades slightly higher than you think - they look shorter in photos once everyone stands in place.
Common mistakeAvoid mixing random flower colors; two-tone gradients look intentional, random palettes look like a floral clearance bin.
19. Classic White Hydrangea Steps with Gold Candle Frames
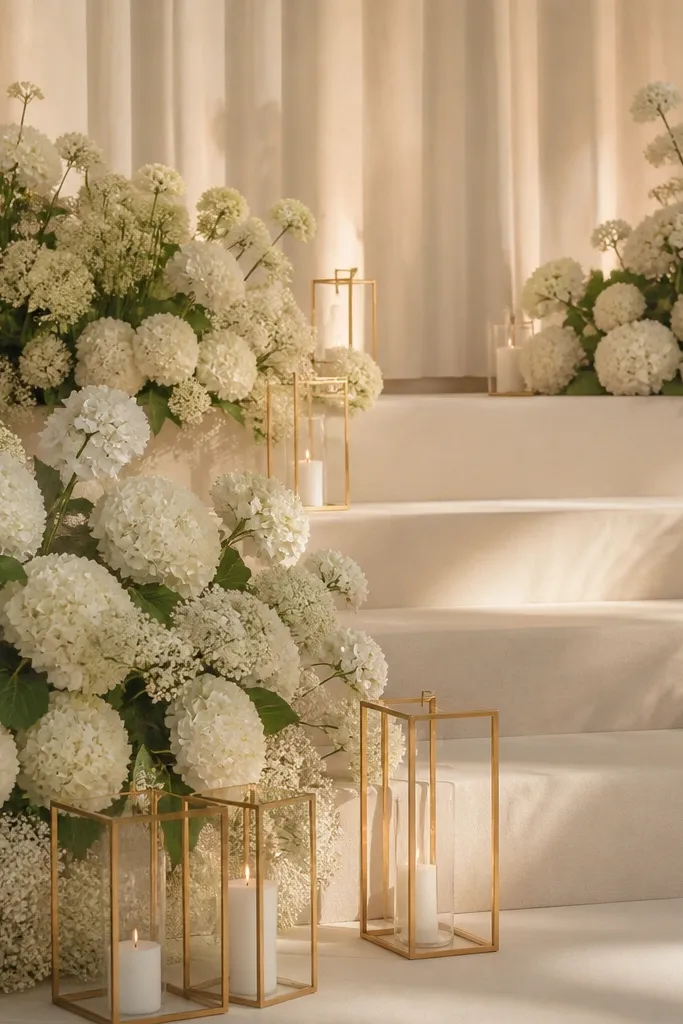
Hydrangea-heavy steps look lush because hydrangeas fill volume quickly and photograph with soft shape. Gold candle frames add vertical sparkle without covering the couple's lower body. I used this for a traditional ceremony where the couple wanted classic, clean, and not too modern. It flatters because white hydrangea reads bright and the gold frames bring warmth that doesn't overpower makeup or skin.
Start with two or three layered risers behind the couple, then cover the top edges with greenery strips. Place hydrangea clusters on the risers, keeping the largest clusters at the top step and smaller clusters on the lower steps so it looks staged, not piled. Add gold candle frames or candelabra stands on the stage floor left and right, each about 30 inches tall. Keep the backdrop drape in cream and add minimal additional flowers so the hydrangea stays the hero.
Try thisIf you use faux hydrangeas, pick ones with visible petal texture; smooth plastic heads look flat in flash.
Common mistakeSkip tall candle flames during speeches if your venue has ceiling fans; the wax smell and smoke can bother guests.
20. Warm White Fairy Light Curtain with Minimal Greenery Base
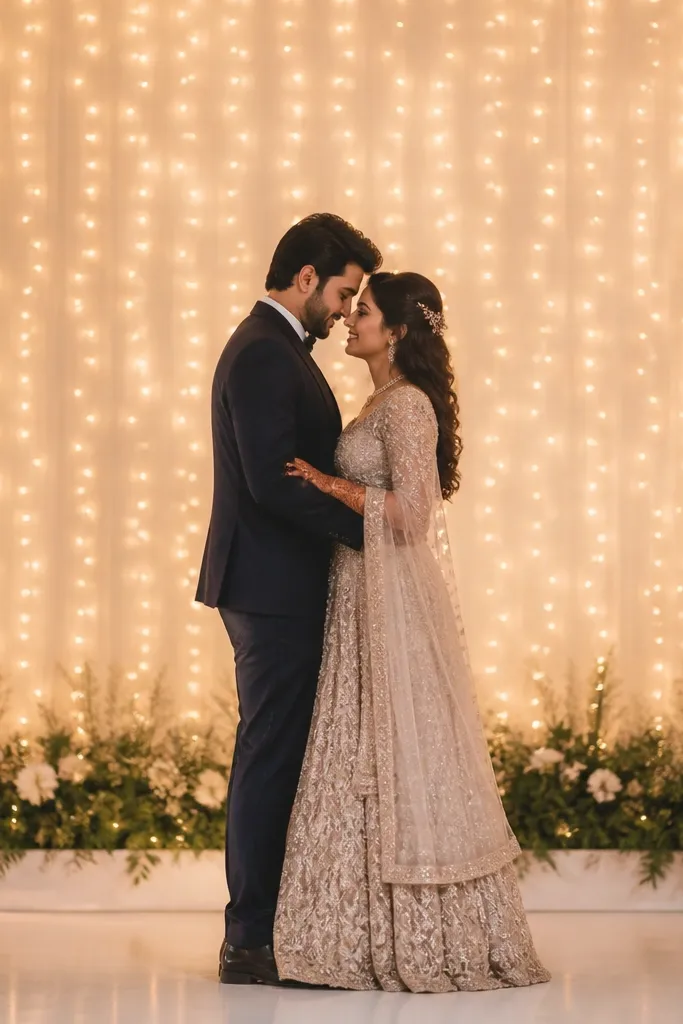
This is the simplest stage trick that still looks expensive. Warm fairy light curtains create a soft bokeh background that makes faces look smoother in photos, and the minimal greenery base keeps it from looking like a novelty. I used this in a budget-friendly build where the venue had ugly walls behind the stage, and the lights solved the problem instantly. It flatters because the glow is gentle and warm, which works with almost any color palette.
Start by installing a plain backdrop panel or drape, then hang a fairy light curtain behind it so the wiring stays hidden. Choose warm white lights, not multicolor, and make sure the curtain covers the full height behind the couple's heads. Add a minimal greenery base - a single low garland about 12 to 18 inches tall across the front edge. Keep the center open so the couple stands in the brightest part of the glow.
Try thisTest the lights against camera mode - if you see hot spots, spread the curtain wider or add a sheer layer in front.
Common mistakeAvoid cool white fairy lights; they make skin look sallow in evening photos.