1. Champagne drape backdrop with a center floral ladder
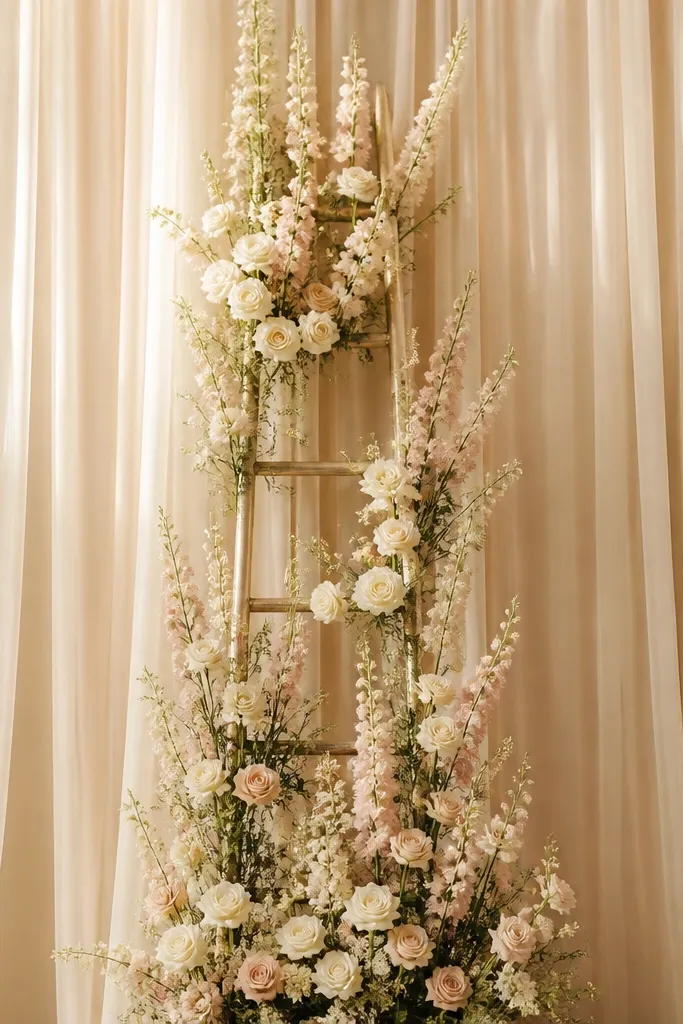
Start with champagne sheer drape so the background looks dimensional instead of flat. The center floral ladder gives you vertical rhythm - it pulls the eye up to the couple and keeps the bouquet colors from getting lost behind them. This setup looks best when the couple's outfits are light to medium tones because the warm drape adds contrast without looking harsh. If you're working with fair skin tones, the blush and cream flowers read softer, and the champagne fabric prevents the stage from looking icy on camera. The styling principle is one strong vertical feature in the middle, balanced by quieter items at the sides.
Hang two wide drapes first - I use 10-12 feet long panels so they puddle slightly on the floor without dragging. Pin the top to a truss or backdrop frame, then pull the fabric into evenly spaced folds with zip ties. Build the floral ladder using foam blocks or a floral net on a vertical frame, keeping the tallest point about level with the top of the couple's heads. Place two slim gold candelabra or lanterns at the base, about 24 inches from the center line, so the composition stays symmetrical. Finish with a low runner of satin organza or tulle across the front edge of the stage.
Try thisUse warm white string lights behind the drape so the folds glow instead of looking flat in photos.
Common mistakeDon't use bright white plastic curtains - they reflect light and turn your whites gray in camera.
2. White and blush rose wall with a hidden arch frame
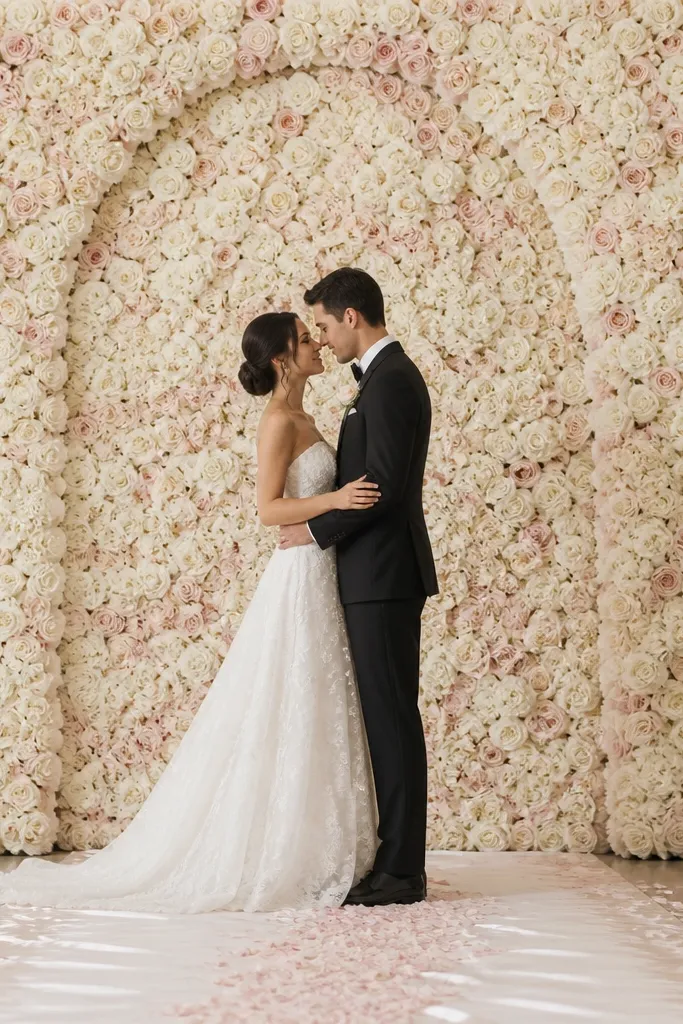
A rose wall makes the stage instantly "event-level" because it fills the entire background with texture. The hidden arch frame matters - it creates a clear top boundary, so the scene looks designed instead of random greenery. White and blush roses flatter most skin tones because they sit in the same warm light family; they don't pull yellow like orange florals can. If the couple's outfits include lace or satin, this backdrop gives that fabric a softer partner. The key is keeping the wall mostly in one color temperature so the photo doesn't look busy.
Build an arch frame using lightweight PVC or a metal frame, sized so the top sits about 6-10 inches above the couple's head height. Wrap the frame with a floral mesh panel, then secure foam blocks where the roses will sit. Layer roses from the bottom up, filling gaps with small buds and a few sprays of greenery so you don't see the base structure. Keep the outer edge slightly denser than the center so the arch shape stays crisp. Add a thin ivory satin runner at the front and scatter petals only within a 2-foot-wide center strip to avoid a messy look.
Try thisMist the flowers lightly with a water-based floral spray if you're using faux blooms with a matte finish so they catch light like fresh petals.
Common mistakeAvoid mixing too many rose shades - five pinks and two purples look pretty in person but read as noise in photos.
3. Two-tower greenery with candle lanterns and a silk ribbon header
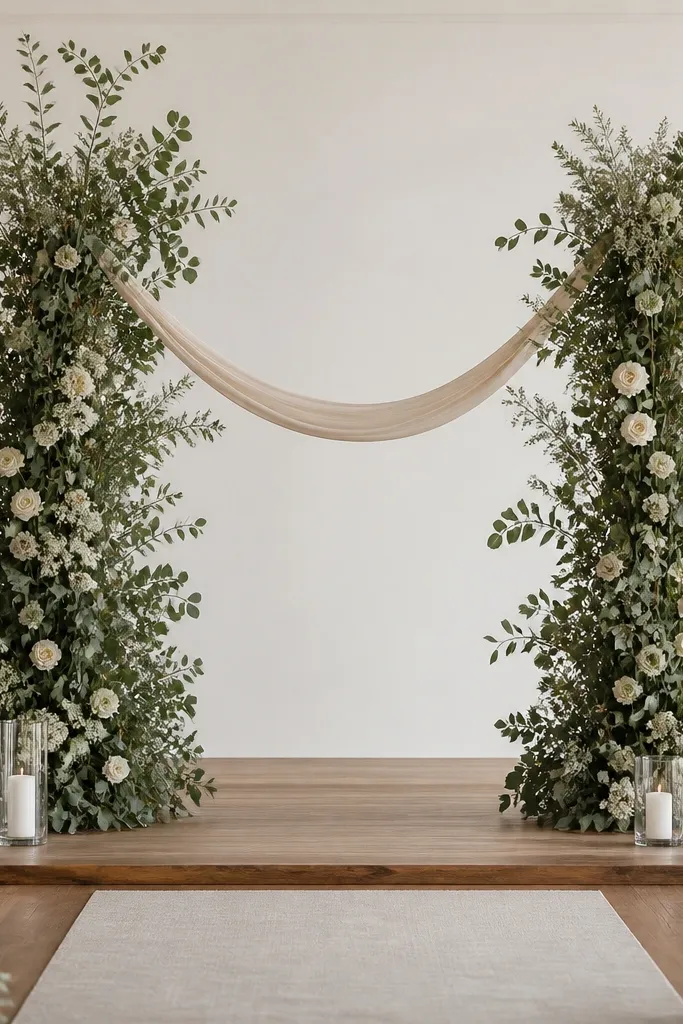
If your stage is small, two towers are the cleanest way to add drama without crowding the couple. Greenery towers give depth and movement, while candle lanterns add warmth that looks flattering in low reception lighting. The ribbon header acts like a "headline" element at eye level, which helps photos feel styled even when the couple's hands are busy. This works especially well for couples wearing darker outfits because the greenery frames them and the candles brighten skin tones. The styling principle is vertical balance: left and right towers match, and the center stays uncluttered.
Start by placing two tall planters or weighted stands on the stage floor, each about 3 feet from the center line. Build the towers by wiring greenery around a central pole, then tuck in cream flowers at heights that mirror the couple's shoulder line. Hang the silk ribbon header between the towers so it droops slightly; I like 2-3 inches of sag for a natural look. Set glass lanterns in pairs at the base, keeping the candle flames (or LED candles) centered and at least 12 inches away from any drape. Finish with a runner that matches the ribbon - ivory or champagne - so the floor doesn't look bare.
Try thisUse LED candles if the venue has strict fire rules - choose ones with a warm flicker mode to avoid a flat glow.
Common mistakeDon't stack lanterns too tall - three levels of candles behind the couple make everyone look backlit.
4. Mirrored gold frame with soft greenery garland
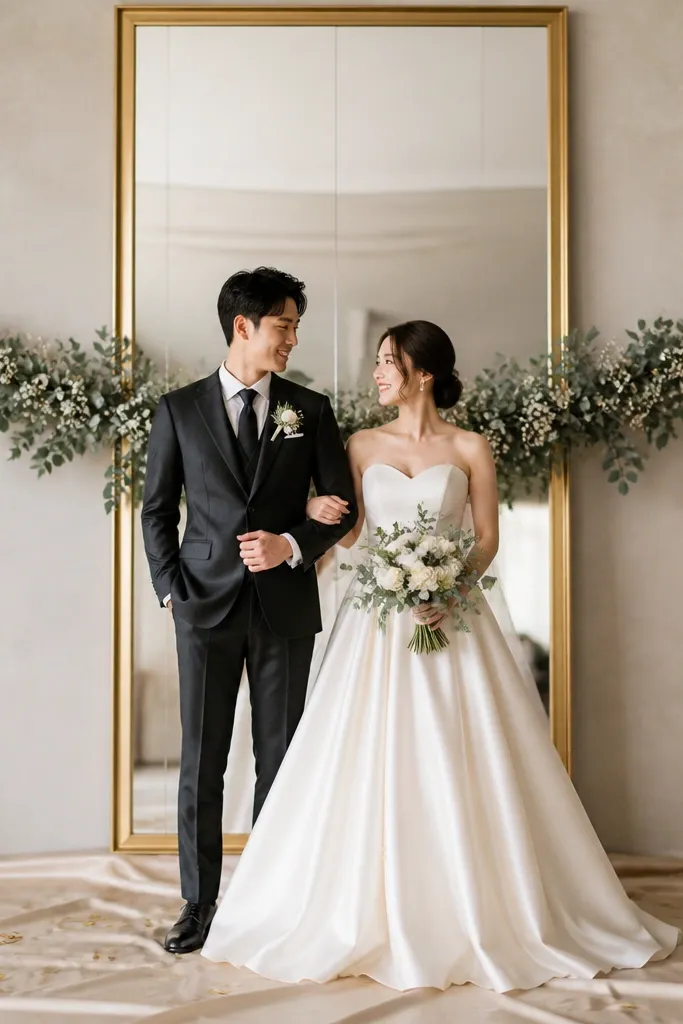
A mirrored frame is my go-to when you want the stage to look polished without heavy florals. The mirror reflects warm lights and makes the background feel deeper, which helps the couple pop even if the venue lighting is dim. Soft greenery garland keeps it organic so it doesn't look like a photo booth prop. This style flatters people of all skin tones because it doesn't add a colored wash - it mirrors the room's warmth. The principle is controlled sparkle: one reflective surface plus quiet greenery, not a dozen shiny items.
Center a mirrored panel on the stage so the couple stands directly in front of it, leaving about 10-12 inches of space above head height. If the mirror is too reflective, cover the edges with a sheer champagne fabric strip so it blends into the stage frame. Drape a eucalyptus garland across the mirror at mid-height, then secure it with clear fishing line behind the mirror so it doesn't droop. Place champagne satin fabric on the floor in a clean rectangle, then add a few gold leaf confetti dots only near the center. Keep any additional decor minimal so the mirror stays the focal point.
Try thisAngle a warm spotlight slightly from the side, not straight on, so you avoid harsh flash reflections in photos.
Common mistakeAvoid placing the mirror too low - if it sits near waist level, it reflects clutter and looks messy.
5. Oversized silk organza bow drape on a warm-gray backdrop
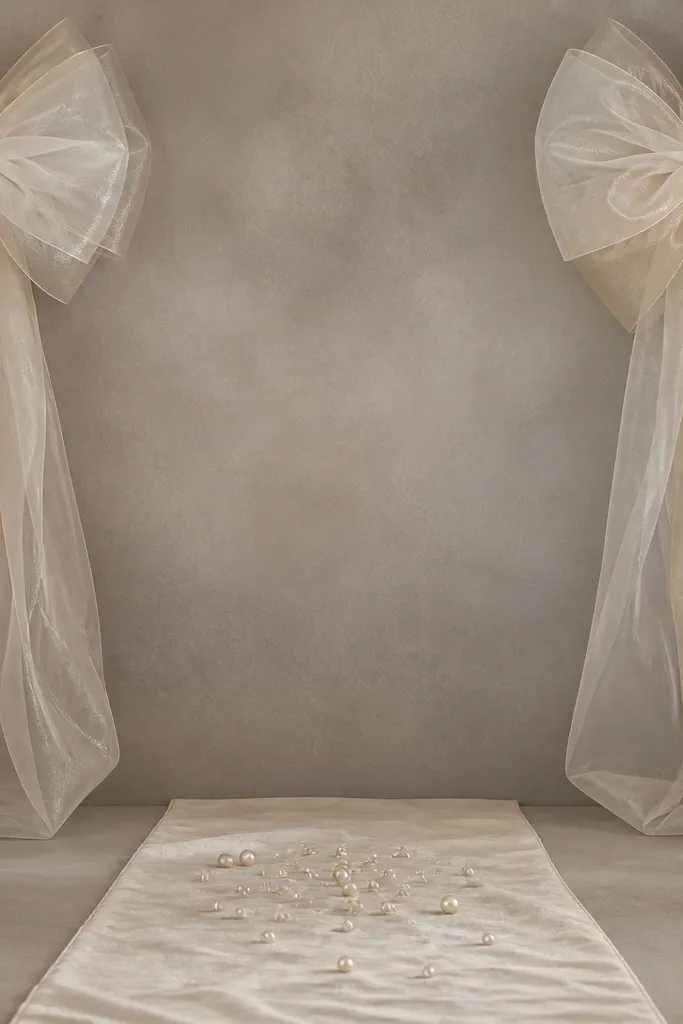
This looks elegant fast because the bow gives you a strong shape without needing a full flower wall. Warm-gray fabric makes the organza glow, and the semi-sheer layers catch light softly instead of looking flat. It flatters couples who wear jewel tones because the gray neutralizes the color and keeps the focus on faces. For darker skin tones, organza adds a gentle highlight around the shoulders that reads flattering in evening photos. The styling principle is one bold graphic element at the top with minimal floor clutter.
Cover your backdrop frame with warm-gray drape, then pull it taut so it doesn't wrinkle into distracting waves. Create two organza bow clusters using layered fabric strips about 6-8 inches wide and 4-5 feet long for each side. Attach the bow clusters at the top corners and let the tails fall to about head height, not lower. Add an ivory runner across the front edge of the stage and place a small pearl cluster or faux pearl strand at the center line. Keep the rest of the stage clean so the bow reads clearly in wide shots.
Try thisSteam the organza before hanging - even small wrinkles show up on camera.
Common mistakeDon't use stiff tulle for the bow - it looks costume-like and loses that soft drape.
6. Long table-style runner stage with layered fabric tiers
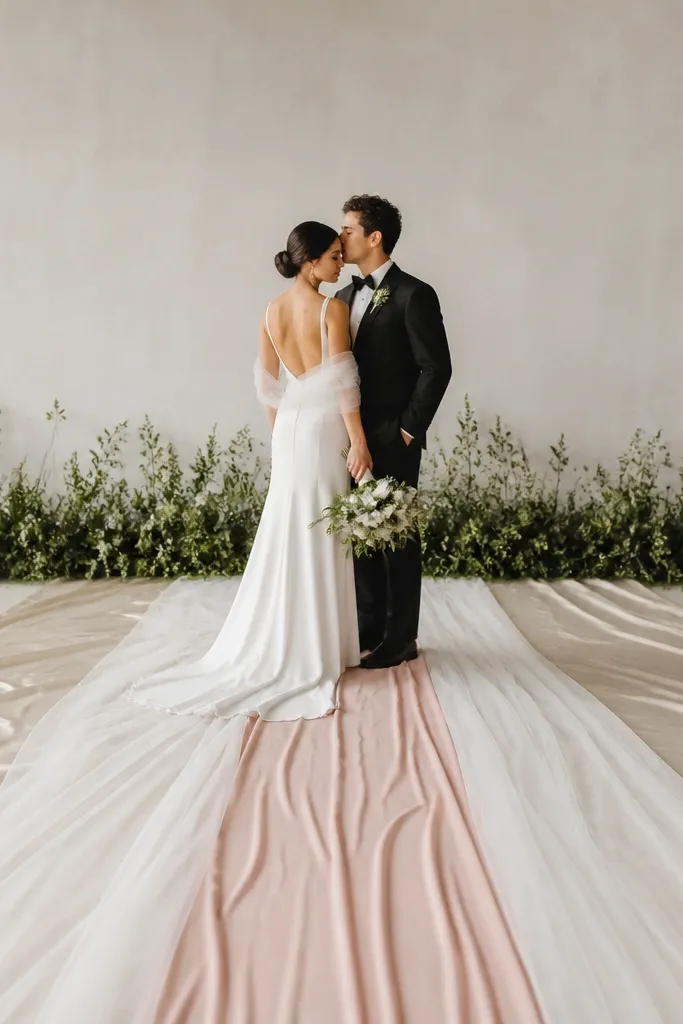
When the stage backdrop is plain or the venue lighting is harsh, floor-first staging saves the day. A layered runner creates depth under the couple's feet, so photos don't show a blank stage base. Champagne satin plus ivory tulle gives movement, and the blush center strip adds a gentle "path" that guides the eye to the couple. This works for couples in both light and dark outfits because the floor tones frame the legs and shoes without pulling attention away from faces. The styling principle is layered height on the ground plus simple backdrop support.
Lay a champagne satin base runner first, sized to cover the stage width minus 6-10 inches on each side. Add ivory tulle on top with a slight wave - I pull it loose in three sections so it looks intentional, not wrinkled. Cut a blush crepe strip about 12-16 inches wide and center it down the middle, then secure it with hidden fabric tape under the top layer. Add a thin greenery line along the backdrop edge, about 2 feet tall, so the background doesn't compete with the floor. Finish by placing two matching low candle cylinders at the runner's front corners.
Try thisUse double-sided carpet tape under the tulle so it won't slide when people walk near the stage.
Common mistakeAvoid one single flat fabric layer - it looks like a cover sheet instead of a designed stage.
7. Peony and hydrangea cluster corners with airy center negative space
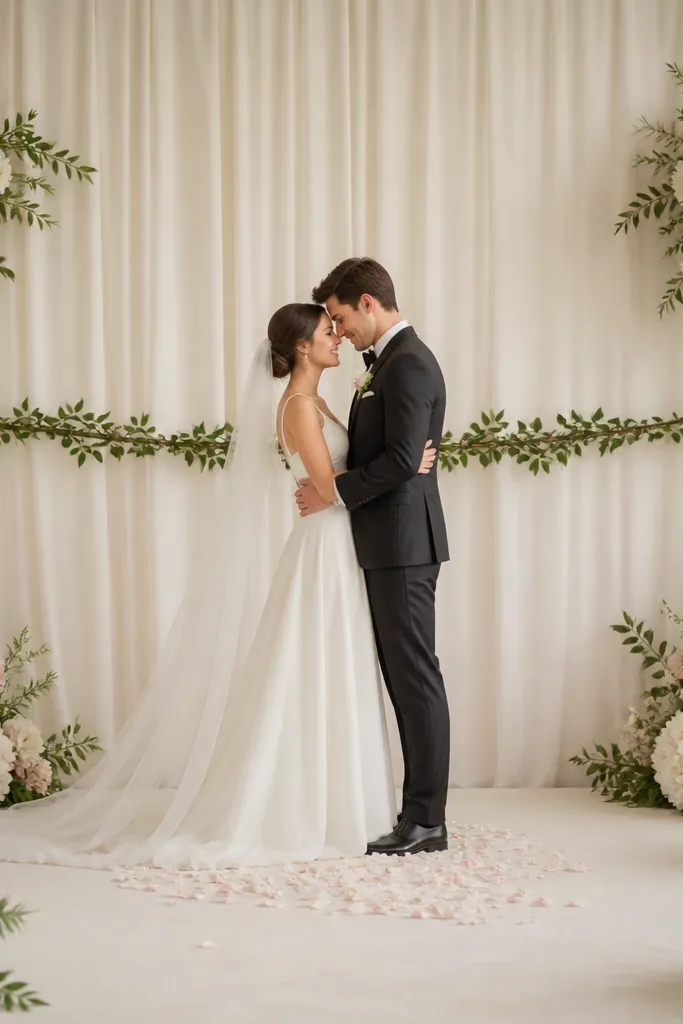
This is the style I pick when I want the stage to feel expensive but not heavy. Dense clusters at the corners create a frame around the couple, while the negative space behind them keeps attention on faces and outfits. Peonies and hydrangeas look full and romantic without needing a full wall of flowers. This flatters both minimalist dresses and heavily detailed gowns because the flowers don't compete with the dress texture. The styling principle is corner density and center breathing room.
Place two corner stands at each side of the stage, about 18-24 inches from the edge, aligned with the couple's shoulders. Build each corner cluster using one large peony-type bloom as the anchor, then fill with hydrangea-like sprays and soft greenery. Keep the center line clear - no tall stems in the middle - so the couple stands in an open photo zone. Add a thin garland line at shoulder height across the backdrop edge, then stop it before it reaches the center. Finish with a clean ivory runner and scatter petals only within a 20-24 inch oval in front of the couple.
Try thisIf you're using faux flowers, choose ones with visible petal texture - smooth plastic clusters look flat in close-up shots.
Common mistakeDon't put corner flowers too close to the center - it kills the airy look and makes the background feel crowded.
8. Hanging floral strip from a ceiling truss with lantern lights
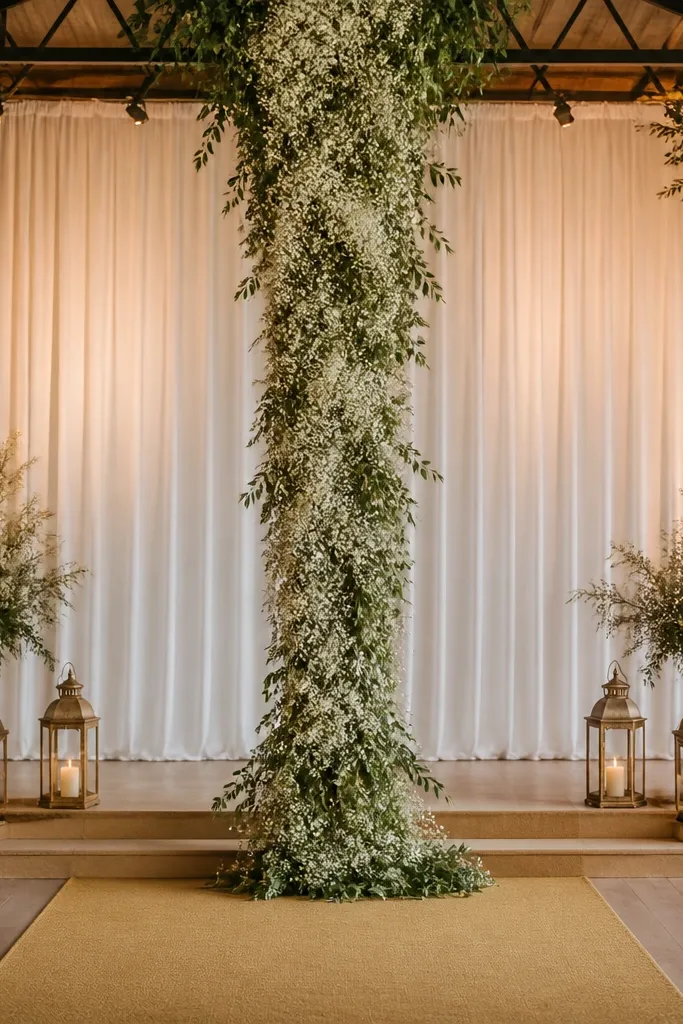
A hanging strip is perfect when your backdrop is limited or your stage can't handle a big freestanding structure. It creates a vertical focal point directly above the couple, so your photos look centered even when people are moving during the ceremony. Cascading greenery and tiny white blooms read airy and romantic without adding bulk at eye level. This style flatters taller couples because the hanging element adds structure above them, but it still works for shorter couples since the strip is centered and controlled. The principle is "top focus" - you place the drama overhead, not behind the heads.
If you have a truss, measure the distance from the truss to where you want the bottom of the strip to land - I aim for 8-12 inches above the couple's head height. Build a floral strip on a long mesh ribbon or floral net, then attach it with three suspension points so it hangs straight. Add tiny blooms along the lower third and keep the upper third more greenery so it doesn't look heavy. Place two lanterns on the floor or stands at the sides, about 3 feet from center, with warm LED bulbs. Use a muted gold runner so the warm tones match the lantern glow.
Try thisUse clear monofilament line for any extra micro-tucks so the cascade looks like it's floating.
Common mistakeDon't let the bottom of the strip reach shoulder level - it blocks faces in candid photos.
9. Black and ivory velvet panels with brass candle stands
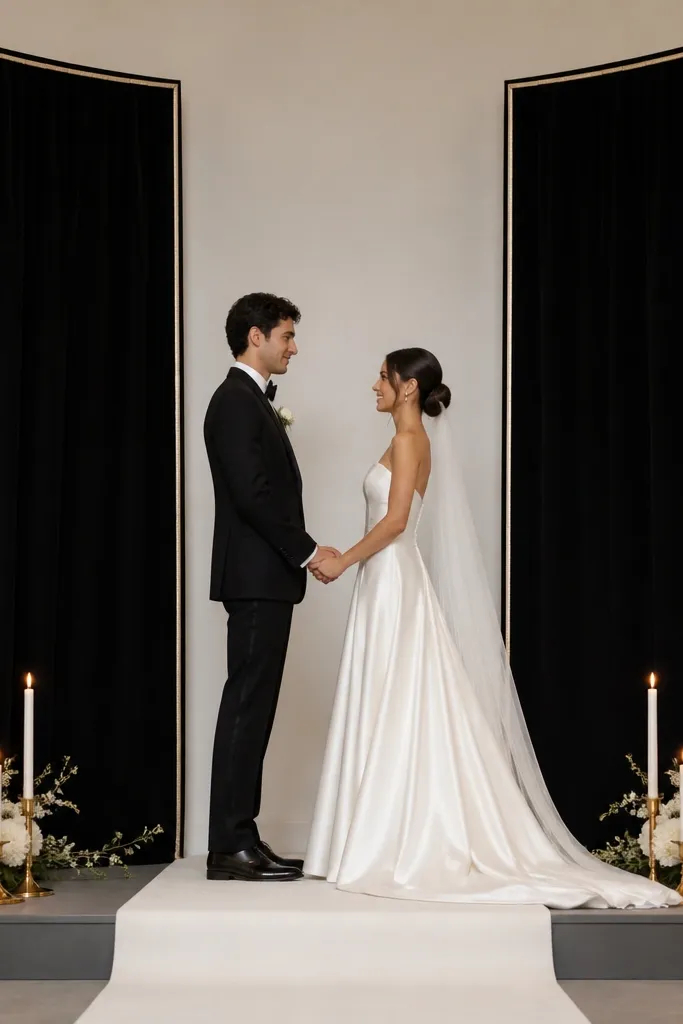
Velvet panels are the shortcut to "evening luxury" because they absorb light instead of reflecting it. Pairing black with ivory keeps the look elegant and high-contrast, especially in ballroom lighting where whites can wash out. Brass candle stands add warm highlights without going glittery. This style flatters people with warm undertones because the brass and ivory sit in the same warm family. The principle is contrast control: deep background, clean center path, and a small number of metallic points.
Cover your backdrop frame with black velvet, keeping the panels about 3-4 feet tall and positioned so the couple's shoulders sit between them. Add ivory satin piping or a thin ivory fabric strip at the outer edges for a crisp border. Place brass candle stands at the front corners of the stage, angled slightly inward so the flames reflect softly on the velvet. Add a narrow ivory runner down the center, about 24-30 inches wide, and keep the sides clean. If you're adding florals, use only a small bouquet line at the top edge - no full bouquet wall.
Try thisTest the velvet under the venue lights - if it looks too flat, add a warm side light to bring out the nap texture.
Common mistakeAvoid cheap shiny "velvet" fabric - it looks plastic and makes black look gray.
10. Pastel balloon garland arch with pearl strands and silk ribbons
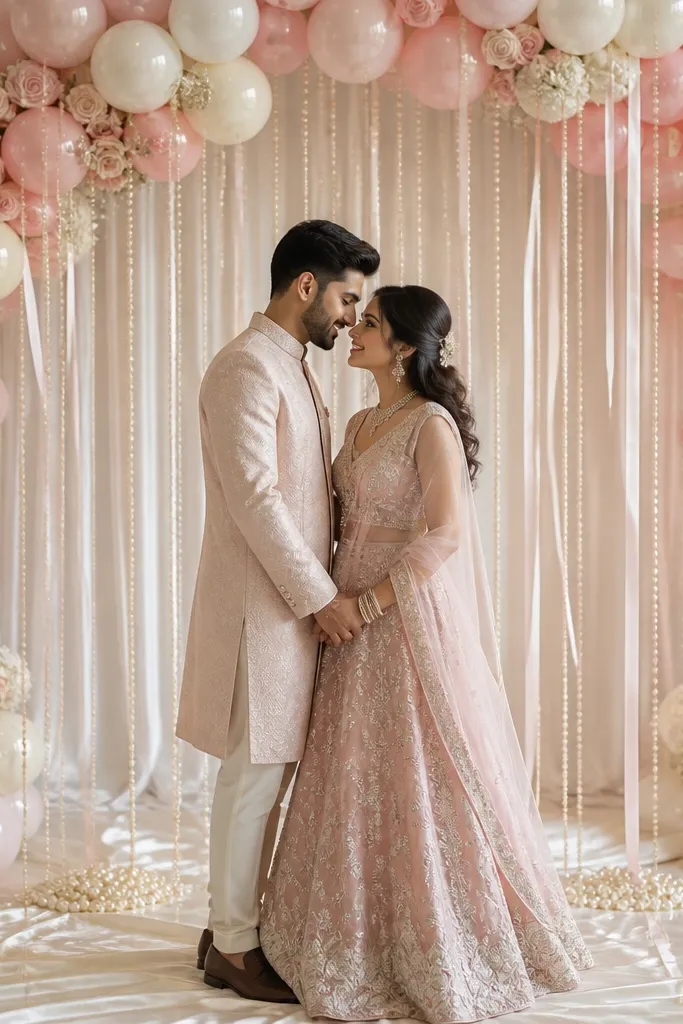
Balloon arches get a bad rap, but a pastel one with pearl strands and silk ribbons looks wedding-ready when you keep the palette tight. The pearl strands add vertical detail that reads elegant in photos, and the ribbons soften the balloon look so it feels like decor, not a party. This is especially flattering for couples wearing satin or chiffon because the pearls mimic that light-catching texture. It also works well for indoor receptions where lighting is even and you want a clear photo background. The principle is to treat balloons as a structural frame and let soft strands do the styling.
Build the arch using two balloon sizes per color: larger balloons for the outer shape and smaller balloons for the inner fill. Keep the arch width to your stage - I aim for 6-8 feet wide for most small stages. Add pearl strands by attaching them with fishing line to the inner balloon frame, then let them fall about to the couple's waist. Tie silk ribbons at three points along the arch so they fan out slightly instead of hanging straight. Cover the stage floor with satin ivory fabric so the pastel colors don't look floating.
Try thisUse pearl strands with a satin-like sheen, not matte beads - matte pearls can look dusty under warm lighting.
Common mistakeDon't add too many balloon colors - five shades turns into candy chaos on camera.
11. Monogram light panel with greenery halo
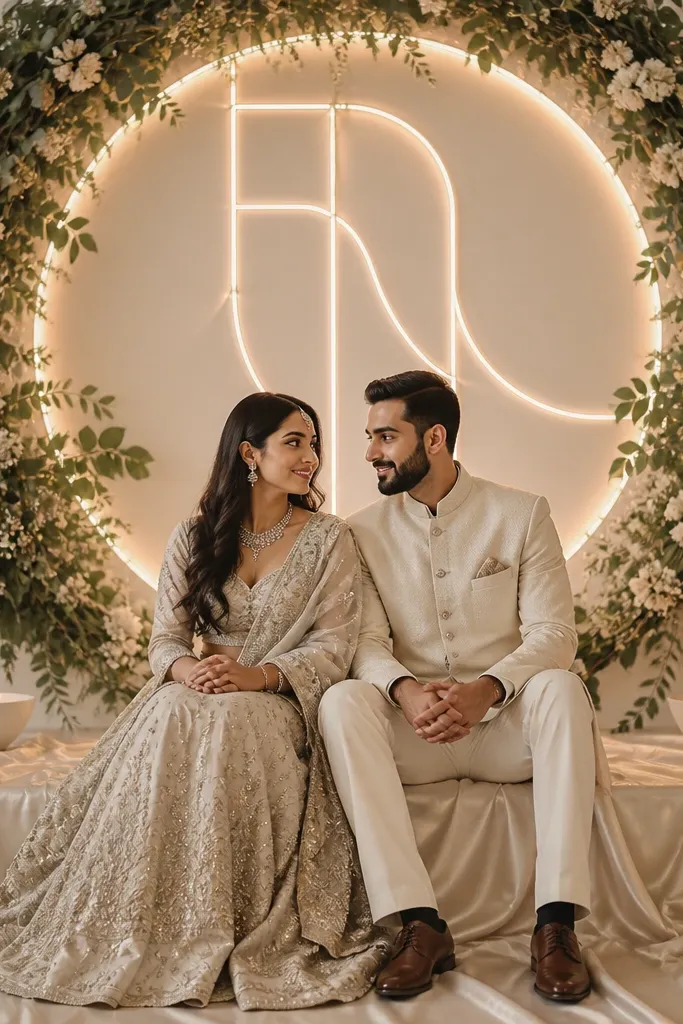
Light panels give you crisp, modern elegance, and the greenery halo keeps the look from feeling cold. Warm white lighting behind the couple creates a clean separation from the background, which helps faces stand out even in dim venues. The eucalyptus tones work with both cool and warm palettes, so it doesn't clash with bridesmaid dresses or table linens. This setup flatters everyone because the glow is centered and controlled. The principle is focused illumination: one light statement plus a soft ring of organic texture.
Place the monogram panel centered behind where the couple stands, at a height so the bottom sits just above knee level and the top reaches around head height. Secure a eucalyptus halo by wiring it into a circular ring and mounting it around the monogram frame, leaving a small gap in the center for the letters. Add tiny white blooms at three points around the ring so it looks balanced, not uniform. Cover the stage floor with champagne satin and place two low candle cups, one on each side, about 2 feet from center. Keep any additional florals off the floor so the glow stays the main feature.
Try thisSet the light panel to warm mode and test from the audience side - it should look like a soft glow, not a bright spotlight.
Common mistakeAvoid placing the monogram too low - it makes the couple look like they're standing in front of a sign.
12. Classic white hydrangea columns with satin ribbon ties
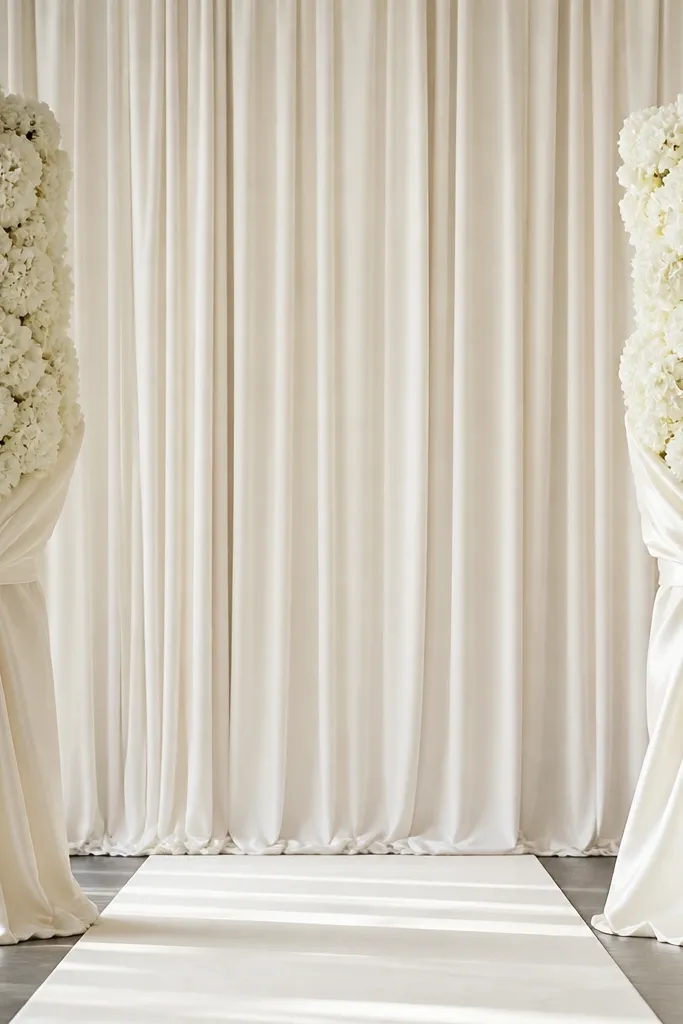
Column decor is one of the simplest ways to create height and formality. White hydrangea columns read bridal without needing a full backdrop, and the satin ribbon ties add a tailored look that feels intentional. This works beautifully for couples with structured outfits like crepe dresses or classic suits because the columns mirror that clean shape. If your venue has plain walls behind the stage, these columns give the photos a defined frame. The principle is symmetrical structure: two matching columns plus an uncluttered backdrop.
Place two tall column bases at the sides of the stage, spaced so the inner edges sit about 3-4 feet apart for most couples. Build the columns with foam or a floral frame so the blooms stay tight; keep the height around 7-9 feet depending on your ceiling. Wrap ivory satin ribbon around the lower half in three bands, then let the ends drape slightly toward the runner. Use a simple fabric backdrop - ivory or warm gray - so the columns stay the focal point. Add an ivory runner centered under the couple and keep the floor free of extra props.
Try thisIf you're using faux hydrangeas, pick ones with visible center texture - it looks fuller up close.
Common mistakeDon't choose overly small blooms - tiny hydrangeas make columns look like a cluster of craft flowers.
13. Tulle canopy over the couple with a soft floral swag
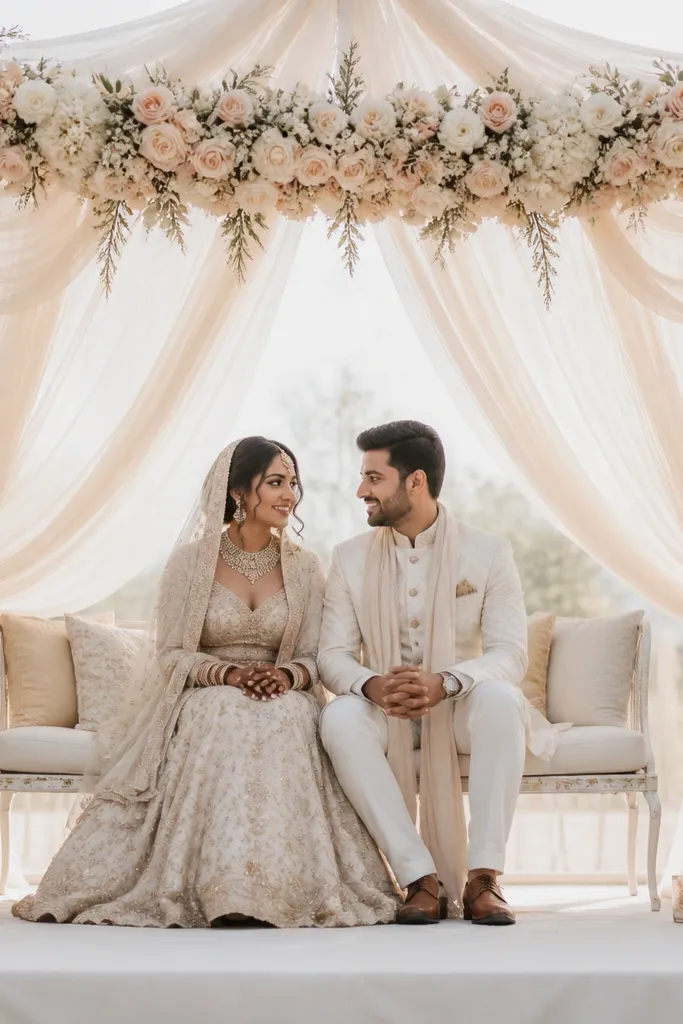
A tulle canopy creates instant intimacy because it frames the couple like a photo booth background, but it looks elegant instead of themed. The canopy also helps hide messy ceiling lines or lighting rigs in the photos. White and pale blush flowers along the front edge catch light and create a soft focal line at eye level. This works especially well for couples who want a romantic vibe without giant floor structures. The principle is a "window" effect: the couple sits under a controlled fabric shape, and everything else stays light.
Use a ceiling mount or a freestanding canopy frame with four points so the tulle stays evenly supported. Drape tulle in warm white or ivory, then adjust the height so the canopy edge sits just above the couple's shoulders. Add a floral swag across the front edge - keep it about 5-6 feet wide and place blossoms at the center and both ends for symmetry. Secure any loose tulle with clear clips so it doesn't flutter in drafts. Place two small candle holders at the front corners of the stage and keep the floor decor minimal so the canopy stays the main focus.
Try thisIf there's airflow, use heavier tulle (wider gauge) or add subtle weights to the canopy edges.
Common mistakeAvoid too much flower density on the canopy - packed florals look heavy and block the airy effect.
14. Gold mirror tiles with ivory roses at the base
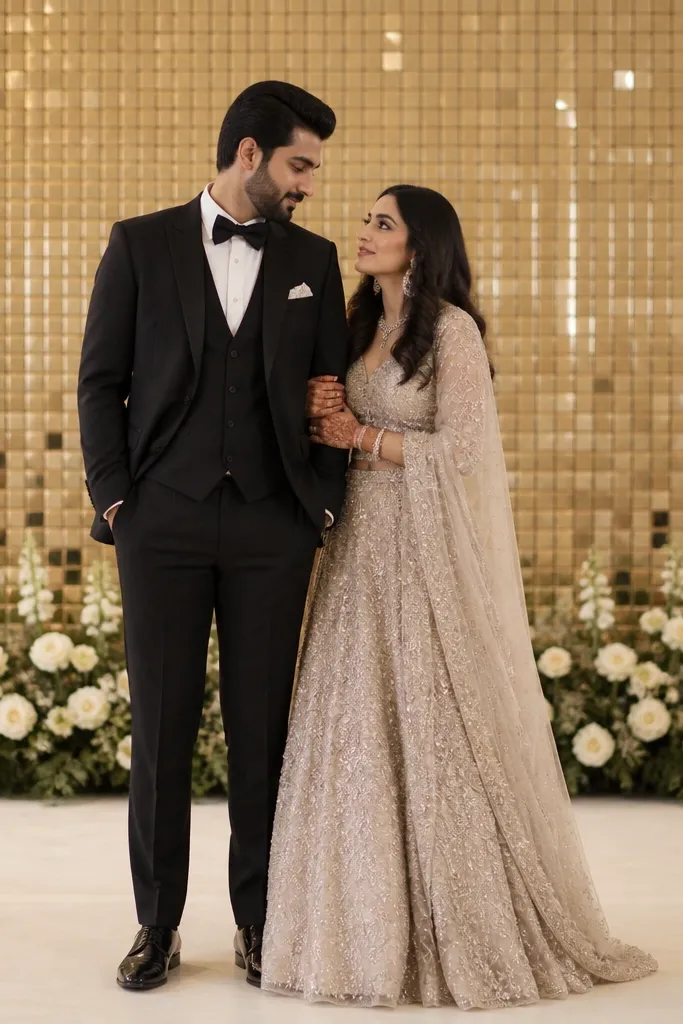
Mirror tiles are a photo hack because they add sparkle without needing a tall structure. When you pair them with a low row of ivory roses, you get contrast: glittery background, soft floral base. The matte ivory floor is key - if you use satin, the stage can look too shiny and faces wash out. This setup flatters couples in both bright and muted outfits because the gold reflects warm tones instead of adding color casts. The principle is controlled shine: reflective tiles behind, matte surfaces below, and limited florals at ground level.
Mount gold mirror tiles on a flat board or frame so the lines stay straight, then center it behind the couple. Keep the mirror height around 6-7 feet so it frames them without reflecting the entire room. Create a low floral border at the bottom edge using ivory roses and greenery, about 10-12 inches tall, secured to a strip of foam. Use matte ivory cloth on the stage floor - I choose cotton-linen look fabric so it doesn't reflect. Add two small gold candle cups at the border corners, keeping the center clear for clean photos.
Try thisTurn off overhead spotlights during test photos and rely on warm stage lights - mirrors look best when the lighting is soft.
Common mistakeAvoid using shiny satin on the floor - it multiplies reflections and makes skin look uneven.
15. Neutral floral semicircle behind the chairs with ribbon streamers
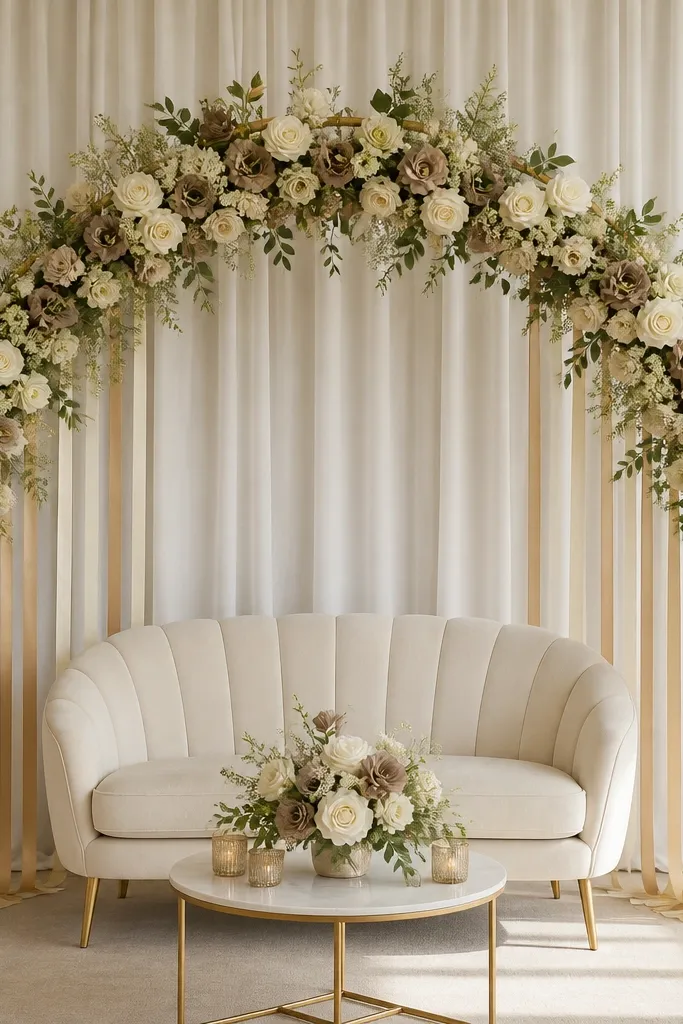
This one is for receptions where the stage has chairs, a sweetheart table, or a small seating vignette. A semicircle creates a clean "smile" shape behind the couple while still leaving space for people to sit comfortably and for the camera to see faces. Neutral florals in cream and taupe look expensive because they read as layered tones, not one flat color. Ribbon streamers add motion and soften the edges, especially when the couple moves hands during speeches. The principle is framing around seating, not a full wall that crowds the view.
Build a semicircle frame that matches your seating width, usually 6-8 feet wide depending on chair layout. Secure floral foam or mesh to the frame, then layer cream roses first, followed by taupe blooms and greenery for volume. Attach ribbon streamers to the lower edges of the semicircle - use 2-3 ribbon colors max, each about 6-8 feet long, and let them fall in uneven lengths for a natural look. Place the semicircle so it sits behind the couple and slightly above chair back height. Add a simple runner on the floor and keep any additional decor to one small candle pair near the front corners.
Try thisUse satin ribbon with a matte sheen - it photographs like fabric, not plastic.
Common mistakeDon't hang ribbon too low - if it reaches the chair seats, it tangles and looks messy in candid shots.