
1. Champagne drape + low bud clusters (before) vs tall greenery line (after)
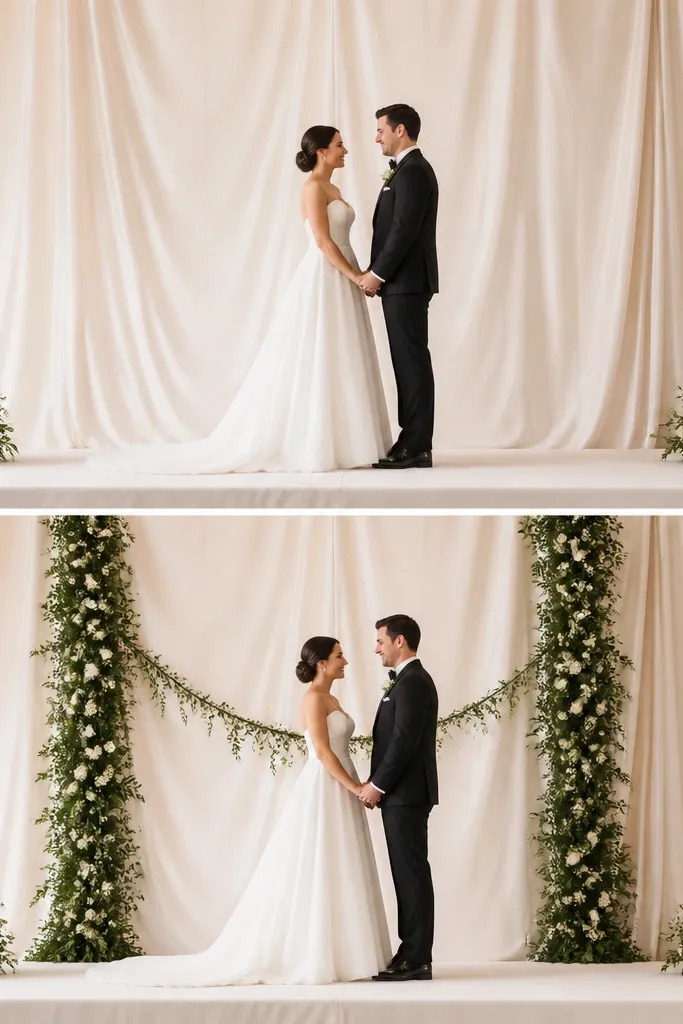
In the before setup, the satin looks pretty up close, but the flowers sit near floor level, so the backdrop has empty "breathing space" that reads flat in photos. The after version adds a tall greenery line behind the couple, which gives the camera a clear vertical shape. I like this for couples who want a clean, soft look without heavy floral budgets. Champagne drape flatters a wide range of skin tones because it's warm, not stark. It also works well for petite stages because the vertical line creates height without needing extra width.
Start by hanging your champagne satin so it reaches at least to the couple's waistline when seated. Then add one tall greenery line centered behind where the couple will stand - think 6 to 8 ft tall, built from foam-backed greenery stems wired into a narrow strip. Finally, keep the front clusters low and small so they don't compete with the vertical line; place them at the same height on both sides so the stage looks balanced.
Try thisDo a quick phone video from the front row and watch for "shadow gaps" behind the greenery. If you see a dark band, move the greenery 2-3 inches forward from the drape.
Common mistakeAvoid placing all florals at the base while the backdrop is bare - that reads like a table centerpiece, not a stage.
2. Arch-free backdrop with one big halo wreath (before) vs two side halos (after)
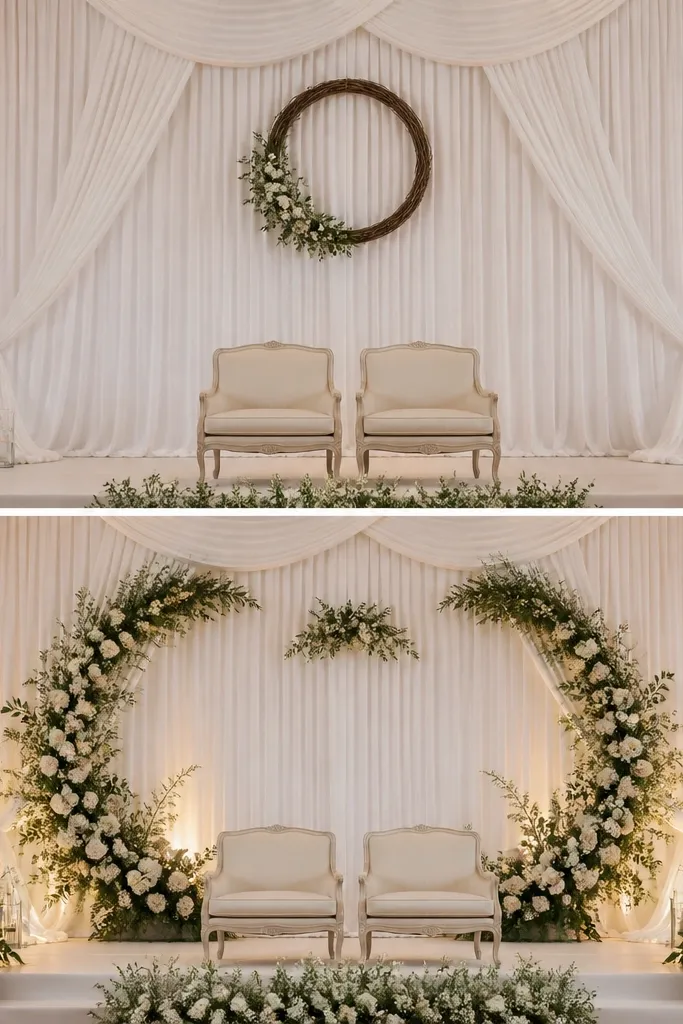
The before setup looks calm, but the single center wreath often gets swallowed by the photographer's framing. When the couple shifts slightly, the wreath loses its "anchor" effect and the stage looks less intentional. The after version uses two side halos so the visual weight stays with the couple even if they move. This is great for venues where the stage is wide but the couple stands a little off-center. It also photographs well for both men and women because the halos frame faces without forcing a rigid arch.
Start with your drape or fabric wall and mark the couple's standing spot with tape on the floor. Then place two half-halo wreaths so their inner edges sit about 18-24 inches from the couple's shoulders; use the same greenery and flower mix for both sides. Finally, keep the center minimal - one small sprig or a short garland - so the side halos stay the main story. Adjust by eye until the halos align with the eye level of seated portraits.
Try thisHang the halos slightly higher than you think - 2-4 inches above eye level - so faces don't get blocked in close-ups.
Common mistakeAvoid a single centered wreath when the stage is wide; it often looks too small once the camera pulls back.
3. Foam columns with fake flowers (before) vs real-stem garland caps (after)
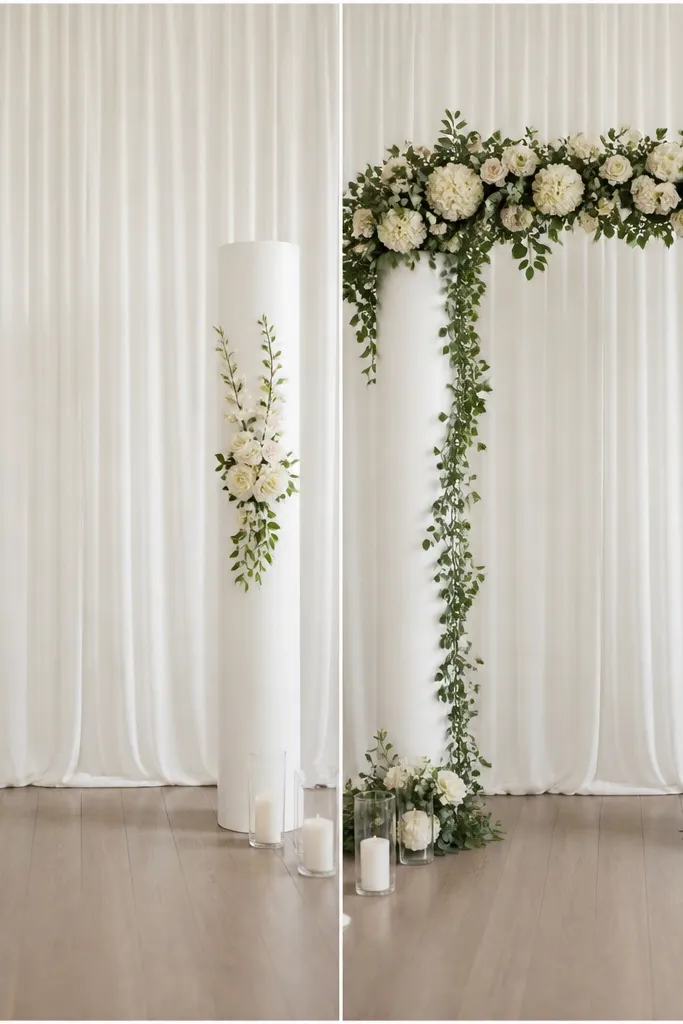
Budget foam columns can look okay at a glance, but in photos the top looks "flat" and the flowers read like separate bunches. The after fix is simple: add a garland cap that wraps the top edge and spills down the inner face of each column. Real-stem style garlands add movement and texture that's hard to fake with small sprays. This works best for classic ceremonies where you want a clean structure and a polished look without building an entire arch. It also flatters medium and darker skin tones because the greenery contrast makes the couple's outfits pop.
Start by covering the columns with a neutral wrap - I use white mesh or chiffon - so the foam texture disappears. Then build garland caps: wire a dense strip of greenery across the top, about 12-16 inches wide, and let it trail down 6-10 inches on the inner side. Finally, add one ribbon band around the column at mid-height in the same color as your bouquet wrap. Step back and adjust so the garland spill doesn't overlap the couple's body in portraits.
Try thisUse floral wire to tie the garland caps to the column frame, not just to the mesh. It stops droop during warm outdoor ceremonies.
Common mistakeAvoid small, evenly spaced sprays on columns - the repetition reads cheap in wide shots.
4. Unframed backdrop with cluttered props (before) vs single ribbon grid (after)
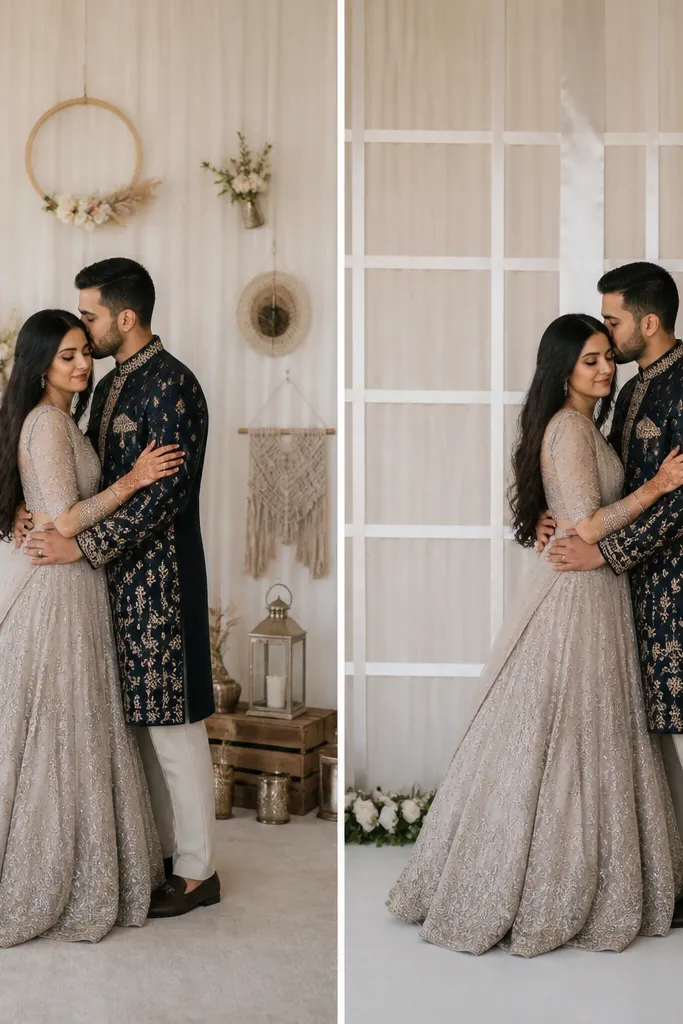
When you hang lots of separate pieces on a fabric wall, the stage looks busy from the guest seats and messy up close. The after setup uses one controlled pattern - a ribbon grid - so the camera has a clear composition. I've used this for vow renewals and smaller venues where you don't have room for a full arch. Satin ribbon also catches warm light beautifully, so it looks "designed" without heavy florals. It's a good choice if your couple outfits are already statement pieces because it doesn't compete.
Start by smoothing your backdrop fabric so it has no wrinkles where the ribbons will attach. Then tie two vertical satin ribbon strips behind the couple's standing spot, spaced about 16-20 inches apart, and connect them with a few horizontal ties at consistent heights. Finally, add a low floral line along the base - just one strip of greenery with small buds - so the stage has depth. Keep everything under the couple's chest line so it doesn't block faces.
Try thisUse the same ribbon width for every tie. Mixing 1-inch and 2-inch ribbon widths makes the grid look uneven in photos.
Common mistakeAvoid hanging props at random heights; the stage becomes a pile instead of a frame.
5. Classic white chair backs with plain aisle runner (before) vs garland edge + floor candle line (after)
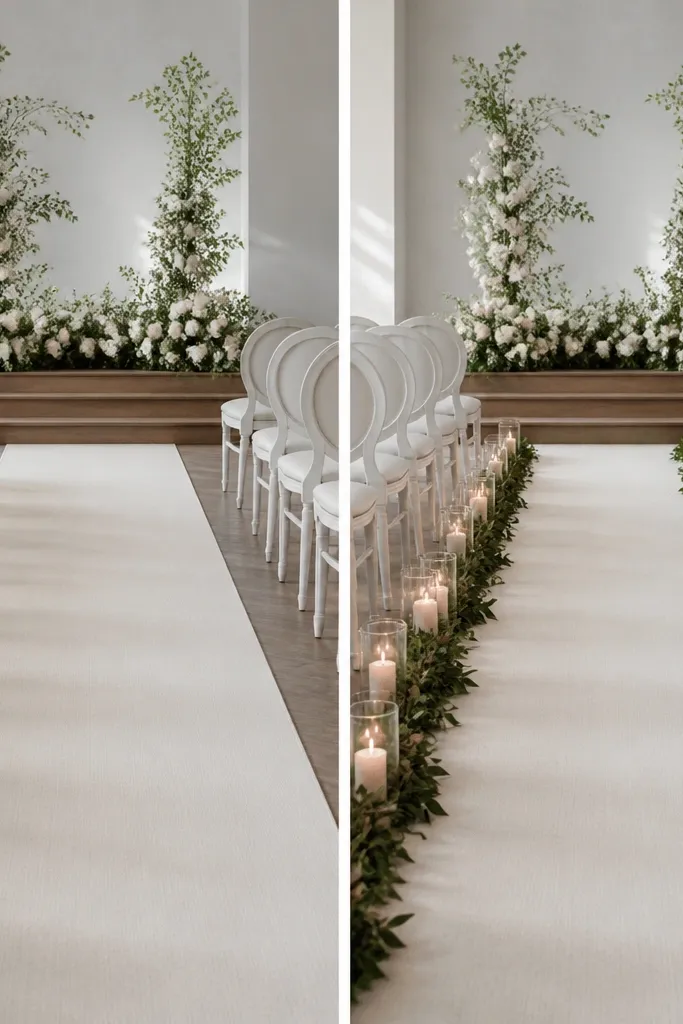
The before setup feels unfinished because the aisle is a long visual road with no "guiding" elements near the stage. The after version adds two things: a garland edge that creates a clean boundary and a candle line that adds height contrast at the end of the aisle. I love this combo because it works for both men and women - it frames the path and makes the stage feel closer. It also photographs well for evening ceremonies since the candle glass reflects light without looking glittery. This is a strong move when you want romance but you don't want an arch.
Start by laying your aisle runner straight and anchoring it with thin tape at the edges so it doesn't ripple. Then add garland along both sides near the stage - about 10-12 ft long - tied to small stakes or weighted clips so it stays aligned. Finally, place 6-10 low hurricane candle holders in a straight line, spacing them 10-12 inches apart. Keep the candle line centered with the stage to prevent the camera from catching it off-axis.
Try thisChoose matte glass holders if you're shooting outdoors in wind; glossy plastic reflections look cheap on video.
Common mistakeAvoid uneven candle spacing - a lopsided line screams "last-minute."
6. All-white florals (before) vs cream + blush mix with a single deep burgundy accent (after)
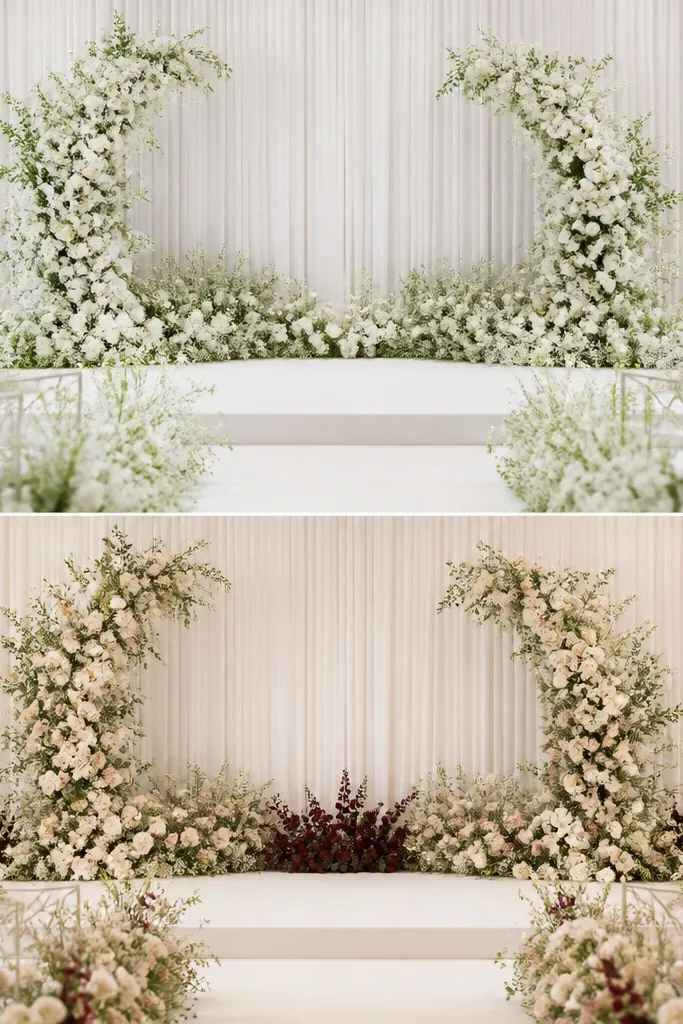
All-white florals look gorgeous in person, but in many venues they go flat under warm lights or look gray under cool lights. The after setup uses cream and blush to keep the softness while adding warmth and variation. Then one deep burgundy accent gives the camera something to hold onto, especially in wide shots. This setup works for couples who wear ivory, champagne, or black outfits and want the stage to look intentional rather than monochrome. It also flatters a range of skin tones because blush reads healthy and burgundy adds contrast without turning the palette into "fall."
Start by swapping any icy white blooms for cream and blush tones - I aim for about 60% cream, 30% blush, and 10% deep accent. Then place the burgundy accent cluster at the center base, where it will show in both seated and standing photos. Finally, add one burgundy sprig on each side of the base so it looks balanced. Keep the drape neutral - cream or warm white - and avoid mixing bright white fabric with soft floral colors.
Try thisIf your venue lighting is warm, test a white bloom against a cream bloom in daylight. Pick the one that doesn't look yellow on camera.
Common mistakeAvoid mixing bright white fabric with soft cream flowers - it creates a "color mismatch" band behind the couple.
7. Tall sheer curtains (before) vs sheer curtains with a solid center panel (after)
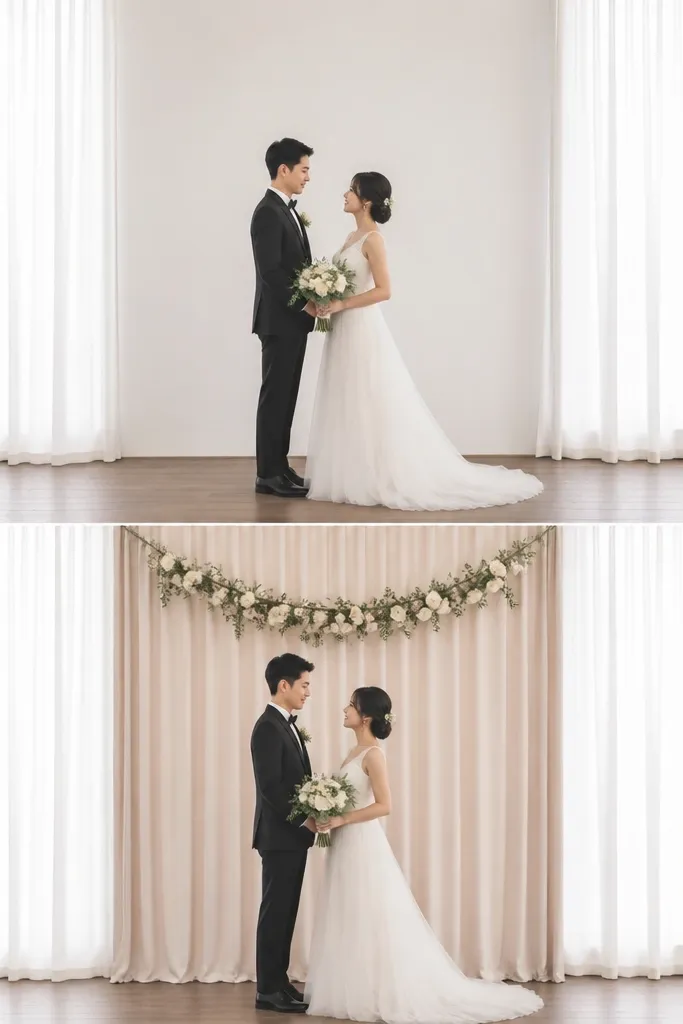
Sheer curtains look airy, but if the center behind the couple is empty, the camera sees through and your stage loses weight. The after version keeps the drama of sheers while adding a solid center panel that "stops" the background from showing through. This is a lifesaver in venues where the wall behind the stage has distracting textures or lighting. It also looks flattering because the couple's silhouette stays crisp, especially for brides in satin or lace. I've used this for outdoor tents too, where the tent fabric can show patterns that fight with floral colors.
Start by hanging the sheer curtains so they frame the couple area, leaving a clear gap in the center. Then add a solid center panel - blackout drape or thick fabric - large enough to cover the couple from mid-torso to head height. Finally, place a thin garland across the top third of the center panel, not the bottom, so it aligns with hair and veil lines. Step back and check that the sheers don't overlap the center panel edges too much.
Try thisUse binder clips to attach sheers to the center panel so the layers stay aligned when people walk past the stage.
Common mistakeAvoid leaving the center "see-through" in photos; it makes the backdrop feel unfinished.
8. Wooden swing-style decor (before) vs simple symmetrical greenery ladder (after)
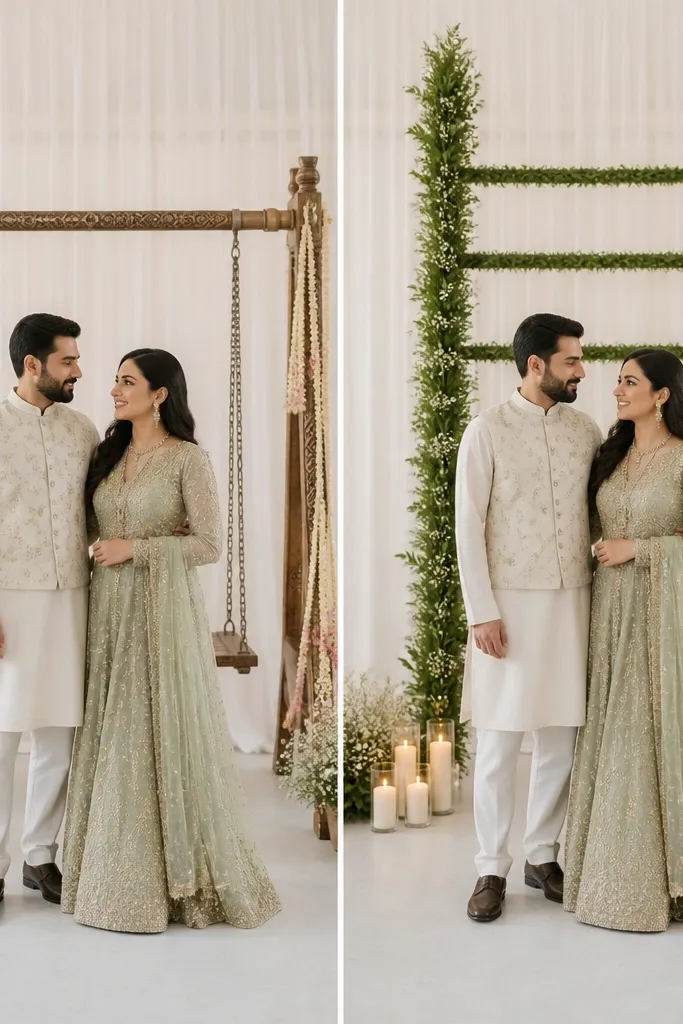
Props like swings are fun, but they create messy shadows and can block faces when the couple turns. The after approach keeps the "structured" feeling without the moving silhouette. A symmetrical greenery ladder gives clear geometry that looks sharp in both photo and video. This works especially well for couples who want a modern, clean look but still want greenery. It's also forgiving if your stage is slightly uneven, because the ladder structure hides gaps better than a free-form prop.
Start by placing two vertical greenery columns behind the couple, spaced about shoulder-width apart. Then add 3-4 horizontal garland steps between them at different heights, keeping the top step aligned with the couple's hairline. Finally, place two matching candle clusters at the base corners, not in the center, so the ladder stays the focal point. Adjust the width so the ladder doesn't overlap the couple's arms in seated portraits.
Try thisTie the ladder to the stage frame or sandbags. Loose pieces sway and the camera catches it immediately.
Common mistakeAvoid hanging props that cast random shadows across faces - it ruins both stills and video.
9. Mirror panels (before) vs warm-gold candle reflections (after)
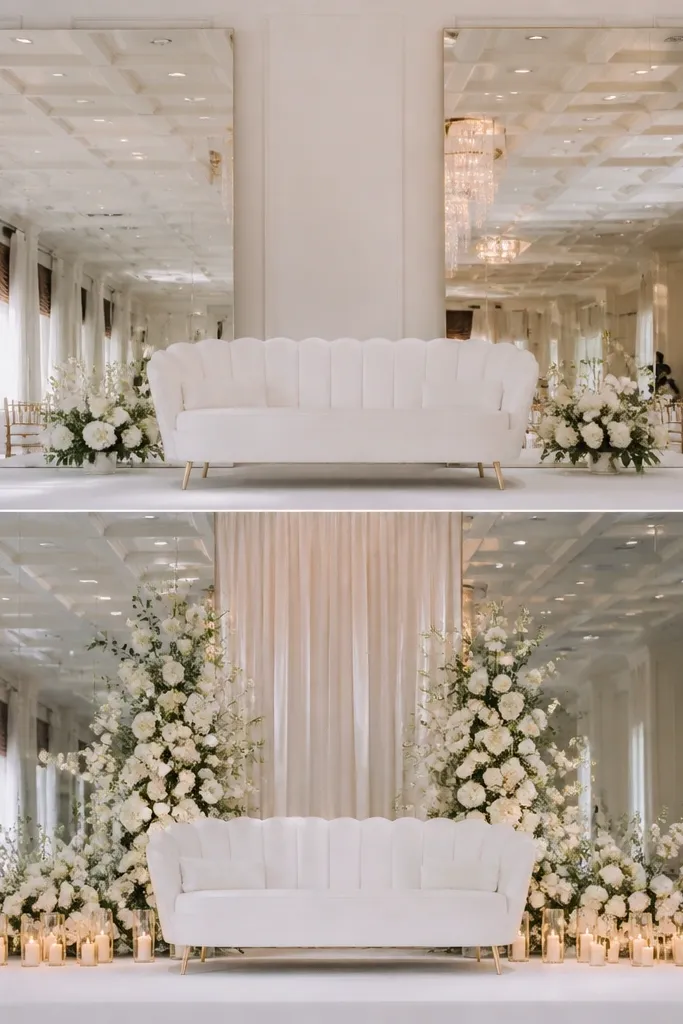
Mirrors look glamorous, but they multiply everything behind them - including empty walls, mic stands, and random chair shadows. The after fix is to control what the mirrors reflect. By moving florals forward and adding a warm-gold candle row in front, the mirror reflections become intentional points of light instead of chaos. This is a great choice for evening receptions and for couples who want a "cinematic" stage without heavy floral volume. It also works for men's outfits because mirror reflections add glow without requiring lace or tulle.
Start by positioning the mirrors so they angle slightly inward toward the couple, not straight out to the room. Then add a neutral drape strip between the mirrors so the reflection has a smooth center. Finally, place 8-12 warm-gold candle holders in a straight line about 2-3 ft in front of the mirrors, spaced evenly. Keep the candle height consistent so the reflections line up in photos.
Try thisTurn off overhead lights during a camera test and check if the mirror reflections look "sparkly" or "spotty." Adjust candle spacing until it looks clean.
Common mistakeAvoid mirrors with nothing in front of them; you'll reflect the room, not the design.
10. Plain backdrop + two side bouquets (before) vs one continuous garland ribbon (after)
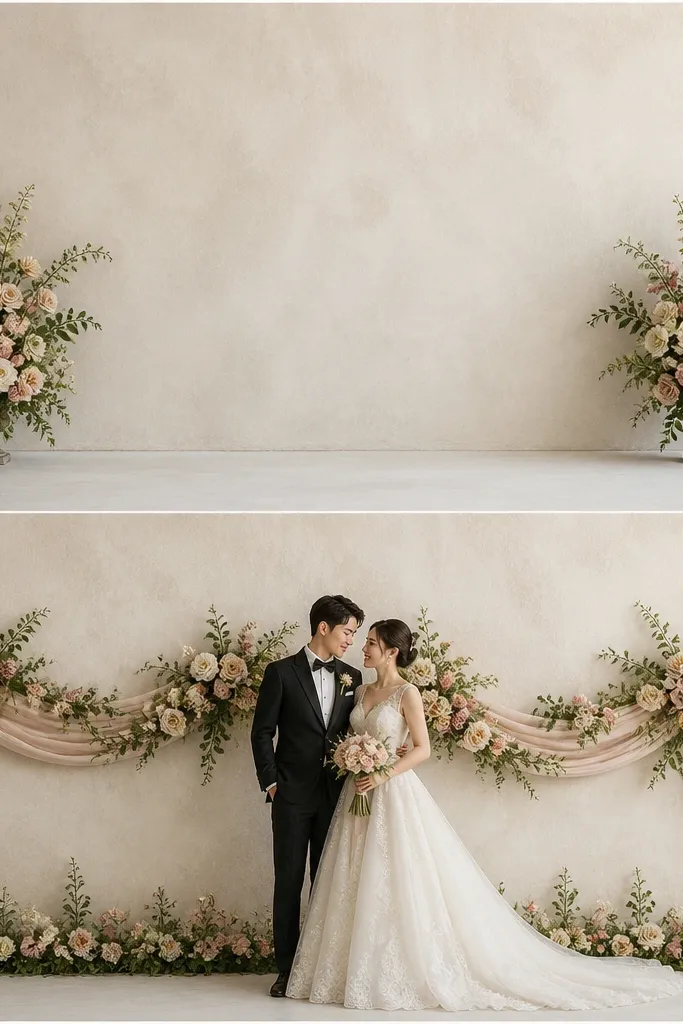
Two side bouquets can look cute, but they read like separate arrangements when there's no connection across the stage. The after version ties everything together with a continuous garland ribbon behind the couple, so the eye travels across the frame. This is perfect for medium-sized stages where you want flowers without building a full arch. It also flatters brides with strapless or off-shoulder dresses because the garland sits at the right visual height around shoulders and neckline. For skin tones, greenery plus creamy blooms creates a flattering contrast that doesn't wash out in flash.
Start by placing your side bouquets first, then measure the gap between them where the couple will stand. Then build a garland ribbon that bridges that gap - roughly 6-10 ft wide - using wired greenery so it holds shape. Finally, anchor the ribbon at three points: center and two ends, then add a thin base line of small buds to connect the backdrop to the floor. Step back and check that the ribbon sits behind shoulders, not behind heads.
Try thisUse a soft measuring tape and keep the ribbon height consistent on both ends. Uneven ends make the stage look crooked in photos.
Common mistakeAvoid placing bouquets too far from the couple; if they sit outside the frame, they look like random props.
11. Balloon clusters behind the stage (before) vs balloon clusters moved to sides + clean center (after)
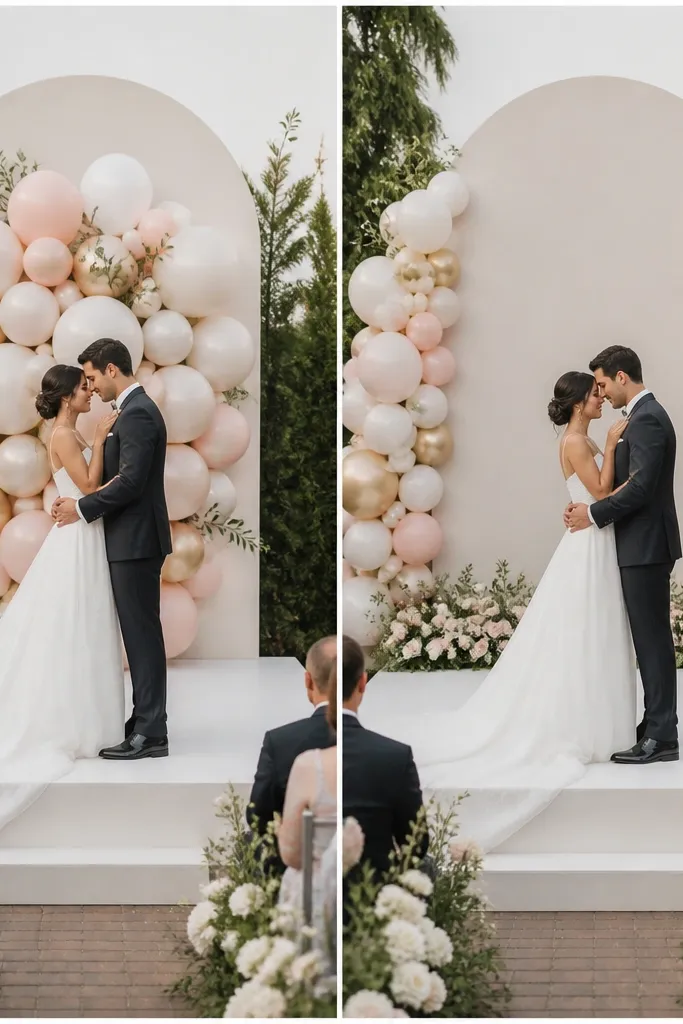
Balloons behind the couple look fun at first, then they steal attention from faces. They also reflect overhead lights and can create a distracting "noise" effect in video. The after approach keeps the playful balloons but moves them to the sides so the center becomes a clear stage zone. I've used this for couples who want a modern party vibe but still want photos that look like a real stage. It works well for both genders because the clean center helps the camera focus on the couple's expressions and outfits.
Start by inflating balloons in one main color family - I like champagne and soft blush with a few clear balloons. Then attach balloon clusters to side stands or weighted bases so the clusters sit at the outer edges of the stage, about 3-4 ft away from the couple's standing spot. Finally, add a small floral line or greenery sprig at the center base to give the stage a grounded look. Keep the center backdrop plain so the balloons don't compete with faces.
Try thisIf you use clear balloons, add a few matte balloons too. Pure clear balloons look shiny and cheap under strong flash.
Common mistakeAvoid balloon clusters centered behind faces; they turn into visual clutter fast.
12. Flower wall with dense foam backing (before) vs foam thinned with airy negative space (after)
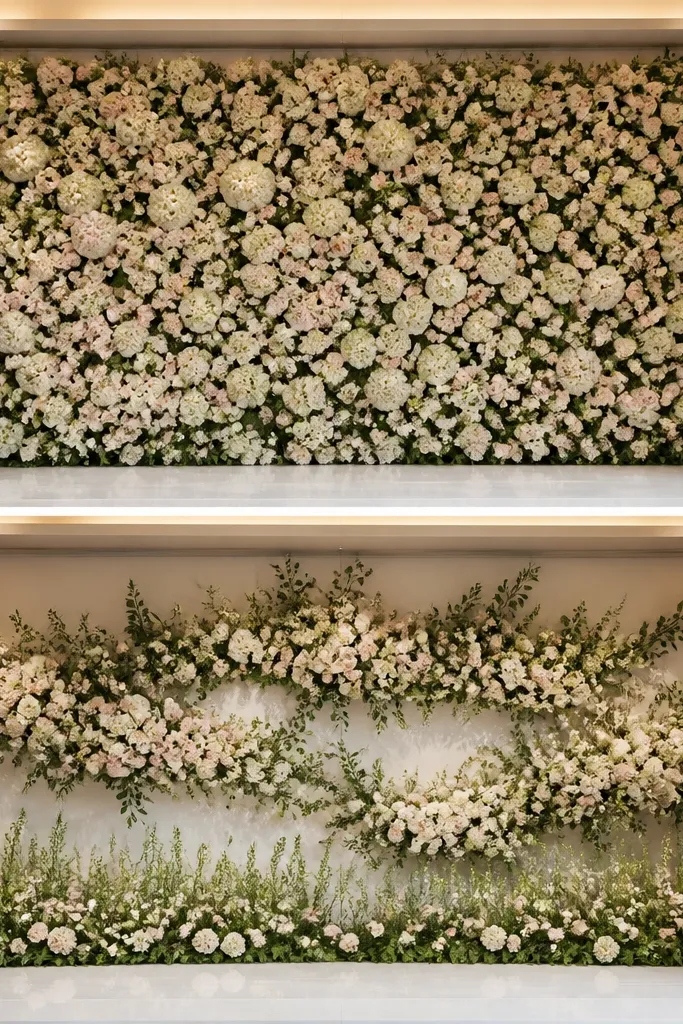
Dense foam flower walls look heavy and can look like a sticker in close-up video. The after version creates negative space so the texture reads intentional instead of crowded. This matters because stage photos are mostly at eye level - and packed walls can hide the couple's silhouette. I like this for both indoor and outdoor ceremonies because airy spacing handles wind and movement better in video. Cream, blush, and sage mixed with visible gaps looks expensive even when you use partial foam.
Start by removing some of the densest foam clusters so you can see the structure behind. Then rebuild in bands: one main floral band at shoulder height and a second smaller band lower near the couple's waistline. Keep gaps between clusters, especially around the center where faces will be framed. Finally, add a base line of greenery on the stage floor so the wall connects to the ground instead of floating.
Try thisStep back 10 ft and squint. If your wall looks like one solid blob, you need more gaps.
Common mistakeAvoid covering every inch of the wall; it turns into a flat wall of color in photos.
13. Hanging macramé fringe (before) vs fringe anchored to a straight top beam (after)
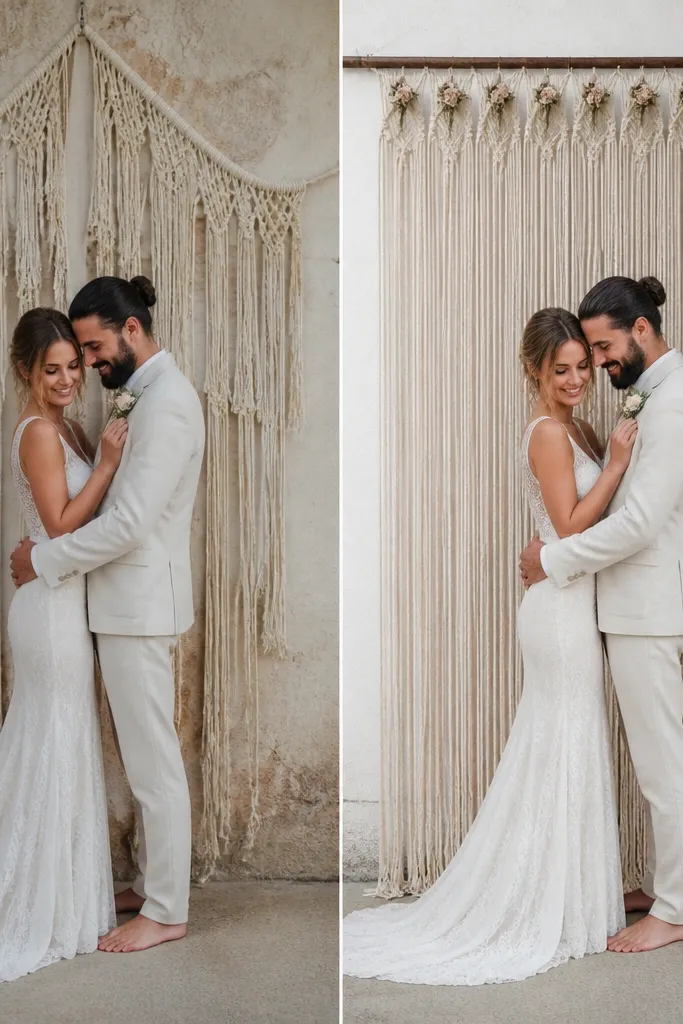
Macramé fringe looks artsy, but if the top attachment is uneven, the strands twist and the stage looks chaotic. The after version anchors the fringe to a straight beam so the strands fall in consistent vertical lines. That consistency makes the stage feel intentional and it frames the couple's upper body instead of wrapping around faces. This works well for boho weddings, but it also looks surprisingly modern with neutral tones. It flatters both men and women because it adds texture without adding loud color.
Start by measuring the width of your stage backdrop and install a straight top beam or rod at the correct height for the couple's head and shoulders. Then attach macramé panels to that beam with equal spacing, using zip ties or strong clips, so the strands hang evenly. Finally, tie a small greenery accent at two points on the beam so the fringe looks connected to the rest of the decor. Let the fringe fall freely, but keep it clear of the couple's face line.
Try thisHang one extra test strand and adjust before you commit - you'll see the fall direction immediately.
Common mistakeAvoid attaching fringe to uneven hooks; twisted macramé looks messy in every camera angle.
14. Large table runner backdrop (before) vs layered fabric bands with height control (after)
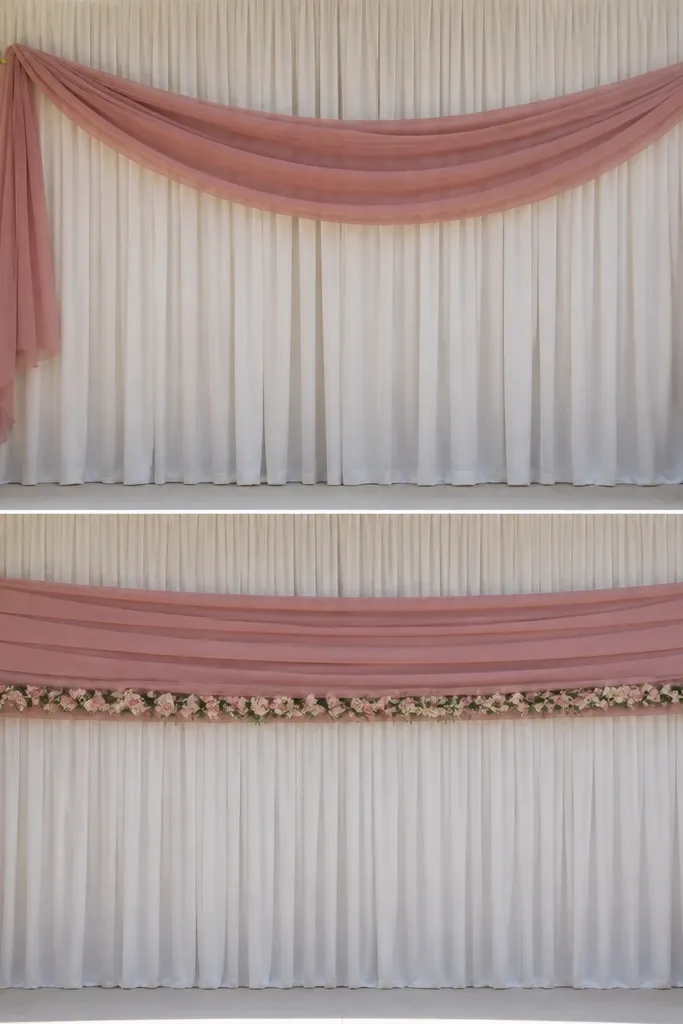
A single table runner can look like you ran out of fabric, because it drapes and bunches in unpredictable places. The after setup uses the same fabric idea but with height control: layered bands create shape and stop the "messy fold" look. I like this for couples who want a soft, tailored look without building a full drape wall. It also works for both indoor and outdoor ceremonies because the bands hide minor stage imperfections. When you match fabric colors to your bouquet wrap, the stage looks cohesive even with minimal flowers.
Start by pressing or steaming your fabric and draping it flat behind the couple's standing spot. Then create two or three horizontal bands by folding and securing at measured heights, usually one band at shoulder height and one at waist height. Finally, trim the look with a thin floral strip or greenery line at the bottom edge of the top band. Keep the ends straight and aligned on both sides so the stage reads symmetrical.
Try thisUse fabric clips along the back seam so the bands don't slide when someone walks behind the stage.
Common mistakeAvoid letting the fabric bunch and pool at random heights; it looks unplanned in photos.
15. Two-tone uplighting (before) vs one-direction uplighting with gel-matched drapes (after)
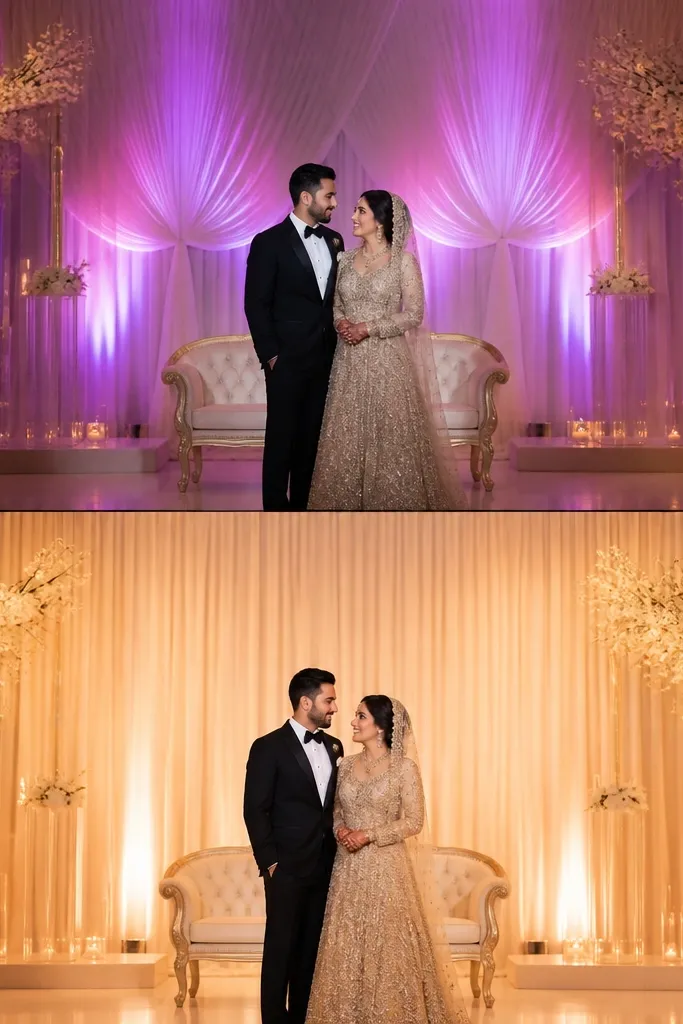
Two-tone uplighting sounds clever, but in real footage it creates patchy color blocks that fight your decor palette. The after version keeps the same general lighting idea, but it makes the light consistent from one direction so the backdrop color stays even. That makes your florals look true and your outfits don't get weird color shifts. I've seen this fix problems where blush flowers looked orange in one photo and pink in another. It's a strong upgrade if your venue controls lighting and you can't fully control it on the day.
Start by turning off any house lights and ask the lighting tech to point the uplights at the backdrop from one side only. Then match your drape color to the light temperature - if the lights are warm, use champagne or cream fabric, not cool white. Finally, do a quick test photo from the front row and check the backdrop for "hot spots." If the center is brighter than the edges, shift the lights 6-12 inches and retest.
Try thisBring a small swatch of your main fabric in your bag. Compare it to the lighting on the stage floor so you don't guess.
Common mistakeAvoid letting uplights hit from multiple directions; patchy glow makes everything look cheaper.



