
1. Smoked-Gray Bottle Votives with Battery Candles
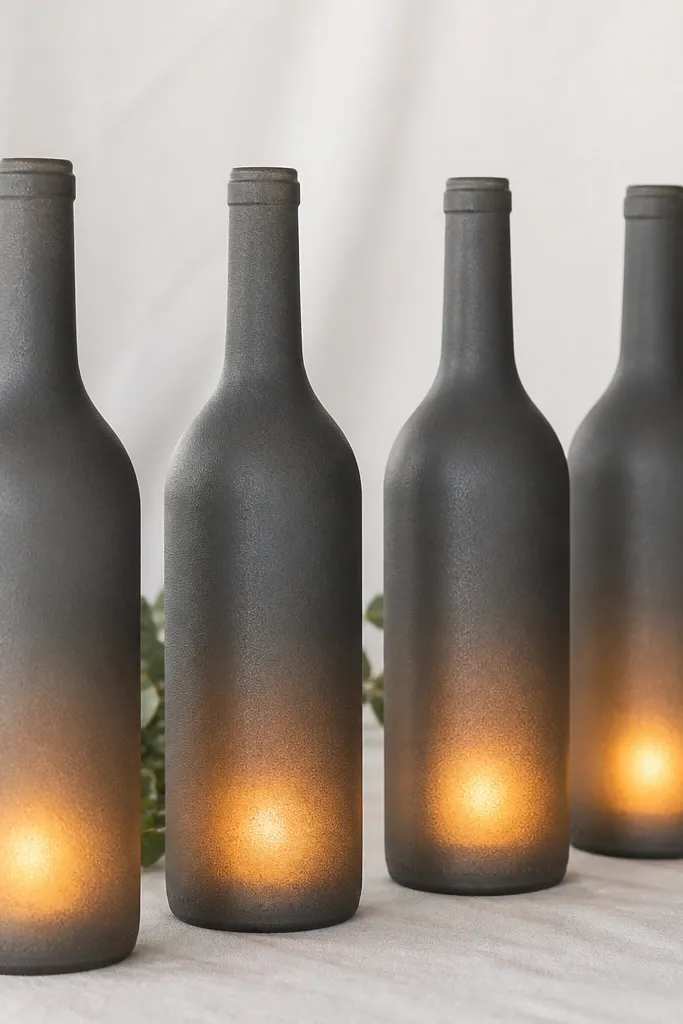
I like smoked-gray because it reads soft in daylight but looks moody at night. Start with clean, label-free bottles, then spray a matte gray so the glass stops reflecting overhead lights. This looks best on venues with warm bulbs or candlelit rooms because the gray makes the candle glow feel intentional. It flatters a range of skin tones in photos because the color sits between cool and warm - it doesn't fight beige walls or dark wood. If you're doing men's style details like black suspenders or charcoal suits, smoked gray matches that whole palette without looking "theme-y."
First, soak bottles in hot water with dish soap for 20-30 minutes, scrape off labels, then wipe with rubbing alcohol and let dry fully. Spray with 2-3 thin coats of matte gray primer-friendly spray, keeping the can 8-10 inches away and rotating the bottle for even coverage. After curing, insert a tea-light style battery LED candle - I use ones that have a removable top so you can swap batteries later. Finally, set bottles on a tray lined with felt or burlap so they don't slide and you don't scuff the finish while arranging.
Try thisUse LED candles with a timer so the glow stays consistent during setup and photos.
Common mistakeDon't use glossy paint - it shows every fingerprint and looks cheap under flash.
2. Champagne-Copper Drip Paint Bottles for Rehearsal Tables
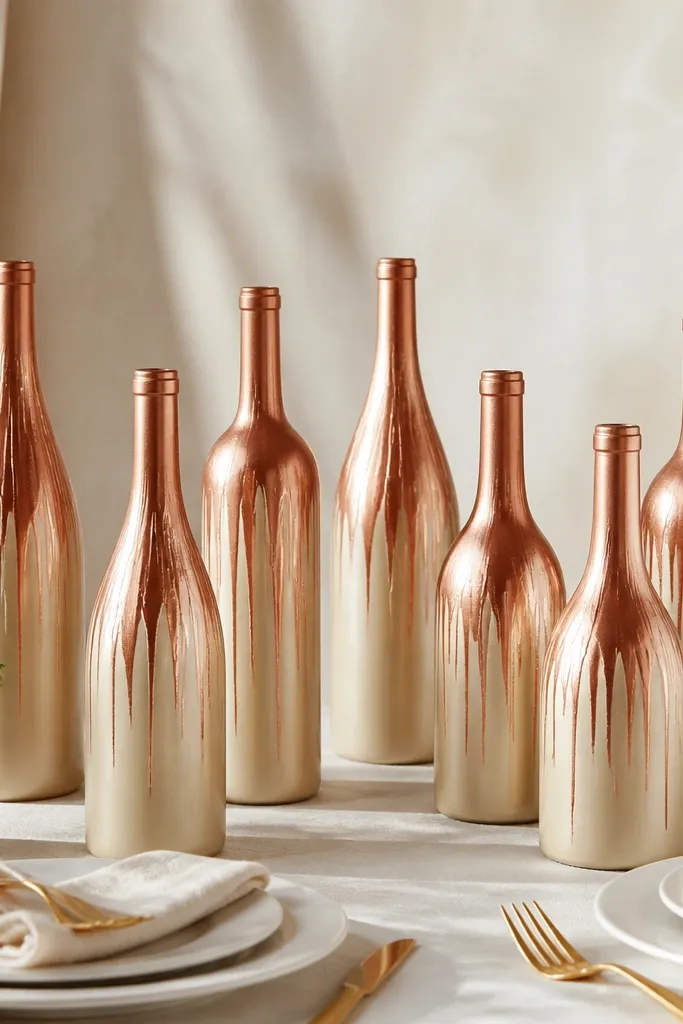
Copper drips look like modern metallics without needing rhinestones. I do a champagne base so the copper reads warm, not orange. This works great for weddings that have gold accents - think champagne bridesmaid dresses or a warm-toned bar setup. It also looks good next to dark florals, because copper creates a bridge between deep greens and lighter petals. In male wedding photos, copper doesn't clash with black suits the way bright red accents can.
Start by painting the whole bottle with a satin champagne craft paint in two thin coats. Let it dry 2 hours between coats so the finish stays smooth. For the drip effect, load copper metallic paint on a small brush, then touch the brush to the inside edge of the bottle near the top and pull down slightly so gravity makes the trail. Move to the next bottle and repeat - keep drips uneven on purpose, but keep them in the same vertical zone. Seal with a clear matte spray if you're handling them often, then place them in a cluster of 3 with one bottle slightly taller for balance.
Try thisPractice the drip on a junk glass jar first so you get the exact length you like.
Common mistakeSkip thick paint on the first drip - it turns into blobs that look messy.
3. Green-Glass Bottle Wraps with Cotton Lace Bands
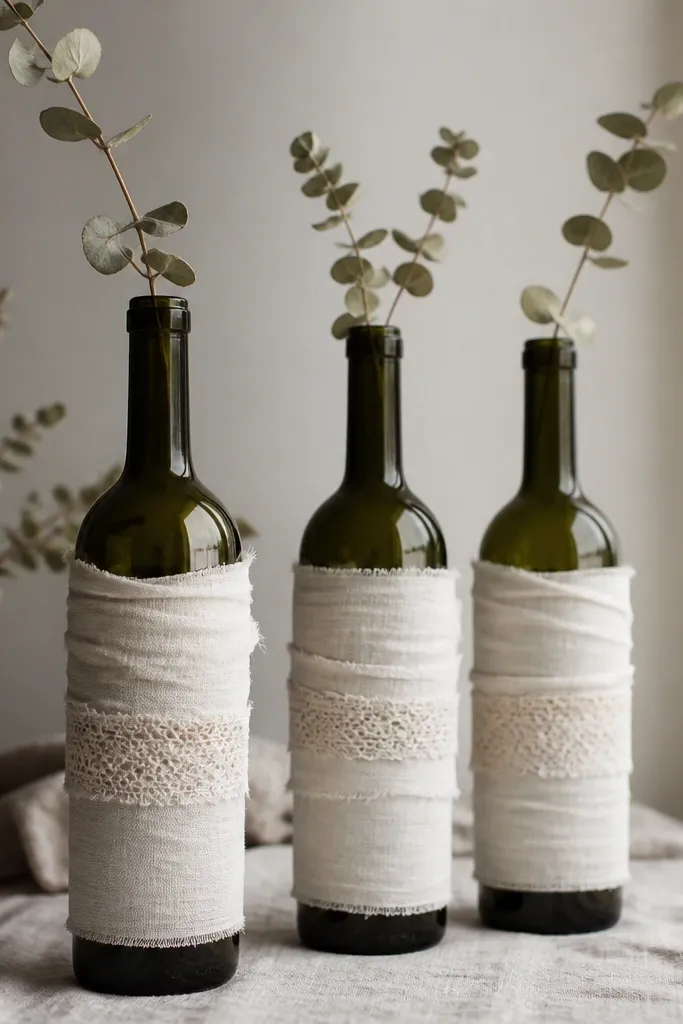
This is my go-to when the venue has neutral decor and you need something soft up close. The green glass gives you depth, and the off-white cotton makes the bottle feel like linen table styling. Cotton lace bands add a delicate line without looking like a costume. It flatters photos because lace texture catches light at a low angle, especially in evening rooms. If you're styling a men's wedding table with gray, navy, or forest-green ties, this wrap keeps the whole scene romantic without turning it into "rustic everywhere."
Soak and dry bottles, then measure a strip of off-white cotton long enough to wrap one full turn with a slight overlap. Glue the fabric to the bottle with a hot glue gun, starting at the back so seams hide from view. Wrap the fabric snug but not stretched - you want gentle wrinkles like cloth. Add a lace band around the center using small dots of glue underneath the lace edge so it doesn't lift. Finish by inserting a small handful of dried eucalyptus or baby's breath stems - keep the stems short so they don't flop.
Try thisUse wide lace with a simple pattern - tiny lace can look fuzzy in flash photos.
Common mistakeDon't glue lace on top of big wrinkles - it lifts and looks uneven fast.
4. Clear Bottle "Snow Globe" Centerpieces with Faux Snow
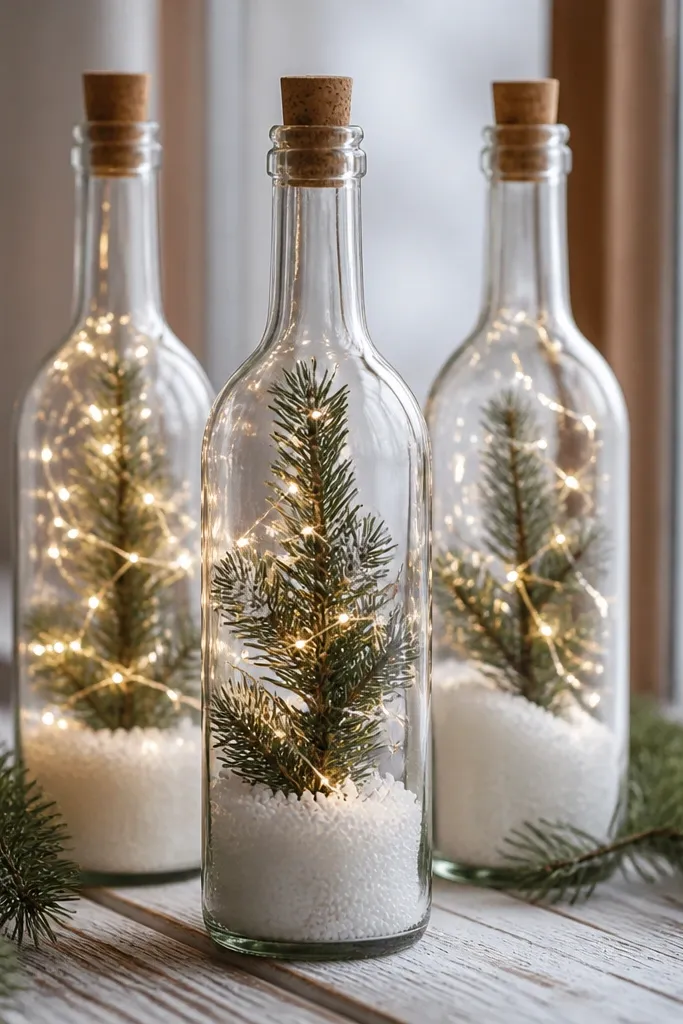
Clear bottles let you build a contained winter scene without needing special glass domes. Faux snow and tiny pine cut the "winter" feeling fast, and warm fairy lights keep it cozy instead of icy. I use this for winter weddings and also for year-round reuse by swapping the insert - it's the same bottle, different decor. This looks best when your table has whites, grays, or pale woods because the snow reads clean. It also photographs well next to dark suits and black attire because the light stays in the bottle, not on people.
Start with a clean, dry clear bottle and remove labels. Pour in a layer of faux snow pellets, then add miniature pine branches or tiny evergreen picks - trim stems so they fit without poking the sides. Add warm fairy lights that are battery operated, then tuck the wires so the light sits behind the snow. Seal the top with a cork or a tight-fit stopper, then wrap a thin ribbon around the neck to hide the seam. Place bottles on a tray so any snow spill stays contained and easy to clean.
Try thisUse warm white lights, not cool white, so the snow doesn't look blue.
Common mistakeSkip real water unless you're making a true sealed globe - open bottles make a mess.
5. Rope-Wrapped Bottles with Sailor-Style Twine Knots
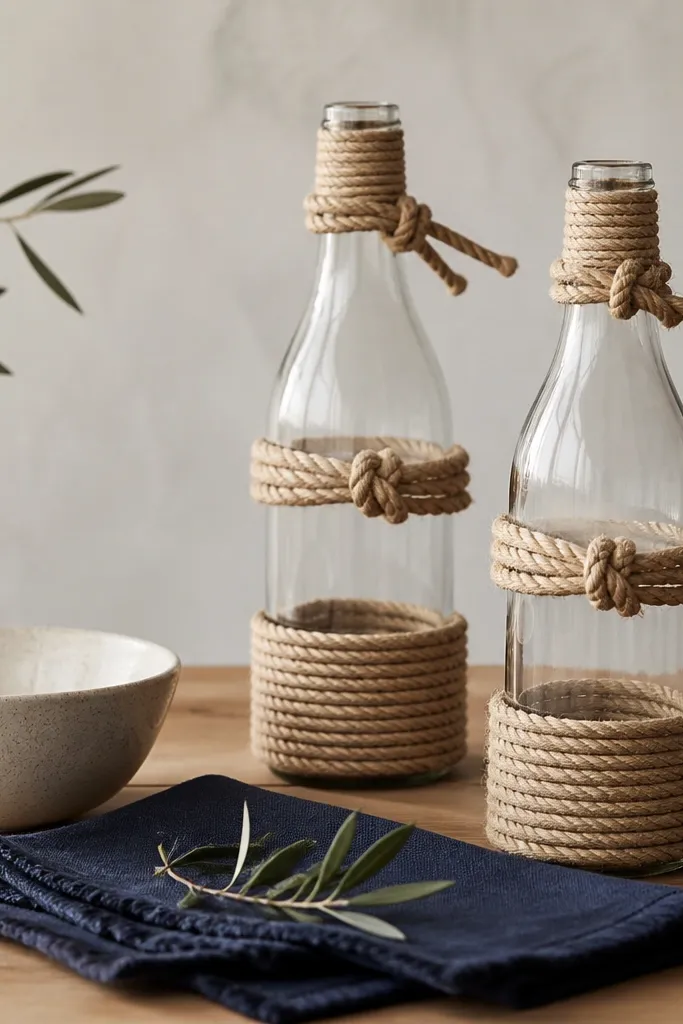
Rope wrapping is one of the fastest ways to make bottles look intentional without paint. Natural rope gives texture that reads expensive in photos, especially when paired with simple tables. I've used this for summer weddings by adding seashell picks, then reused it in fall by swapping to dried wheat. It works for both men and women styling because it's neutral - rope won't fight navy suits or pastel dresses. The knot detail at the neck adds a focal point, so the bottle doesn't look like generic storage glass.
Wrap the bottle starting at the base with hot glue, then spiral upward with tight coils of rope so gaps don't show. Keep the rope angled slightly so it forms a smooth line, not a bumpy stack. When you reach the neck, cut and secure the rope, then tie a sailor-style knot with twine - I use a simple figure-eight loop knot and tighten it against the neck. Add a small dab of glue to lock the knot in place. Finally, place the bottle with a short floral arrangement or a single tall reed for height variation.
Try thisUse thicker rope for the body and thinner twine for the knot so the texture has contrast.
Common mistakeDon't wrap too loose - loose rope shifts and the bottle looks unfinished.
6. Fabric-Strip "Ribbon" Bottles in Navy and Blush
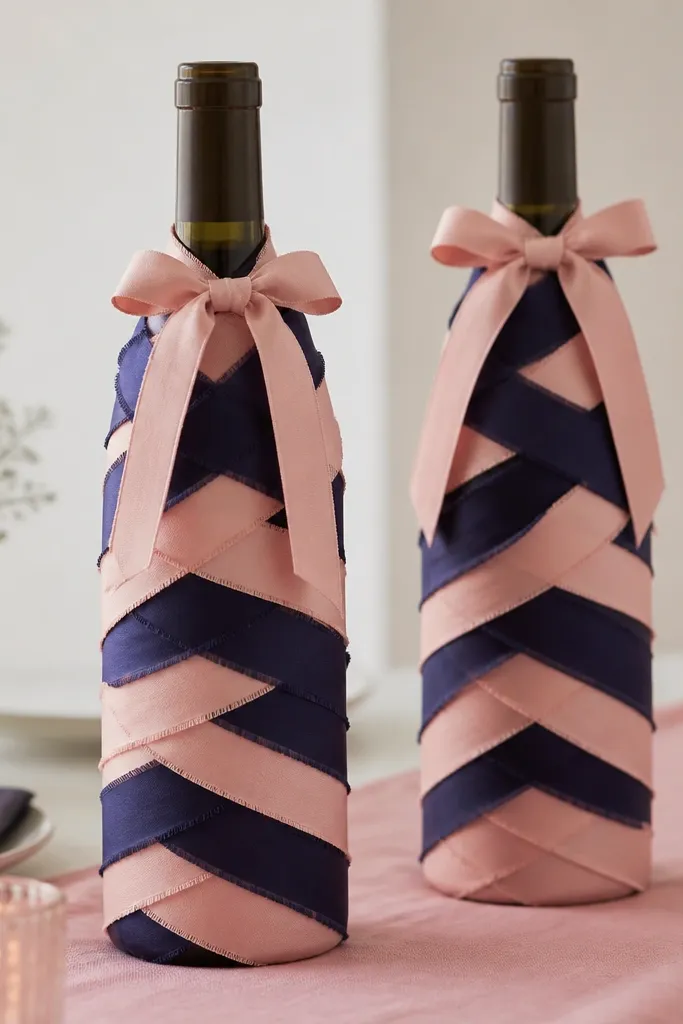
This one looks like you spent more time than you actually did. The layered fabric strips create movement and soften the glass shape, which is great for weddings with mixed styles - modern suits and romantic dresses. Navy and blush is a reliable combo because it reads clean in daylight and still looks pretty under warm venue lighting. It also flatters a wide range of skin tones since the colors are gentle and not overly saturated. If you're doing men's style details like navy vests, this bottle matches without stealing attention from the bridal party.
Cut fabric strips about 1.5-2 inches wide and 18-24 inches long, then pre-wash and iron them so they lay flat. Start gluing the first strip around the bottle at the base, then overlap the next strip by about one third. Alternate navy and blush in a pattern so the bottle has rhythm - I do 3 navy, 2 blush, then repeat. Leave the top neck area slightly bare so you can tie a small bow. Finish by securing the final strip with glue and adding a short bouquet inserted into the opening.
Try thisUse cotton or cotton-blend fabric - it holds folds better than polyester.
Common mistakeDon't use shiny satin - it shows glue lines and looks slippery in photos.
7. Terracotta Ombré Bottles with a Sponge Edge
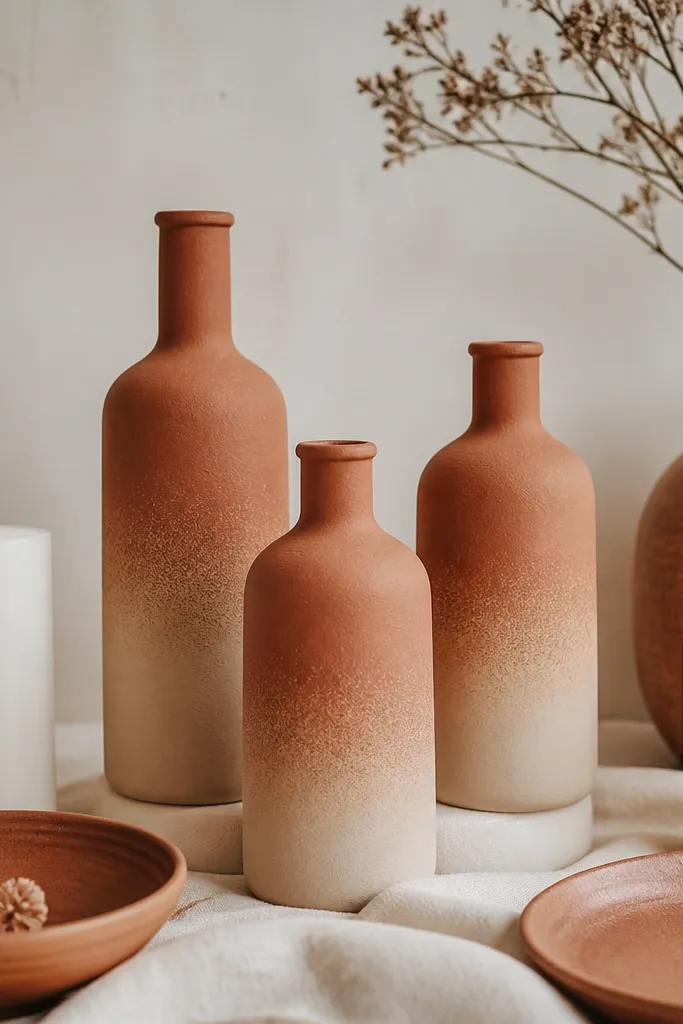
Terracotta ombré looks handmade, not factory-painted, and it fits every season once you pick the right color family. I use a clay-light base at the top and build terracotta lower down, which mimics sun-warmed ceramics. This looks amazing next to cream linens, wood chargers, and dark green foliage. It also works for men's style because terracotta doesn't feel too girly - it reads like craft pottery. If you want year-round reuse, you can swap the florals and keep the bottle finish the same.
Clean and dry bottles, then spray a light clay base or paint it with a matte craft paint. Let it dry fully. For the ombré, load terracotta paint on a sea sponge and dab it around the lower half, working upward in lighter pressure so the fade softens. Keep rotating the bottle so the sponge texture stays even. Add a second pass if the lower color needs more depth, then seal with a matte clear coat. Place bottles with a mix of heights so the ombré reads as a continuous color story.
Try thisDo the sponge edge in one direction around the bottle so it looks intentional, not random.
Common mistakeDon't paint straight stripes - the sponge method is what makes it look expensive.
8. Gold Leaf Accent Bottles with Plain Twine Tie
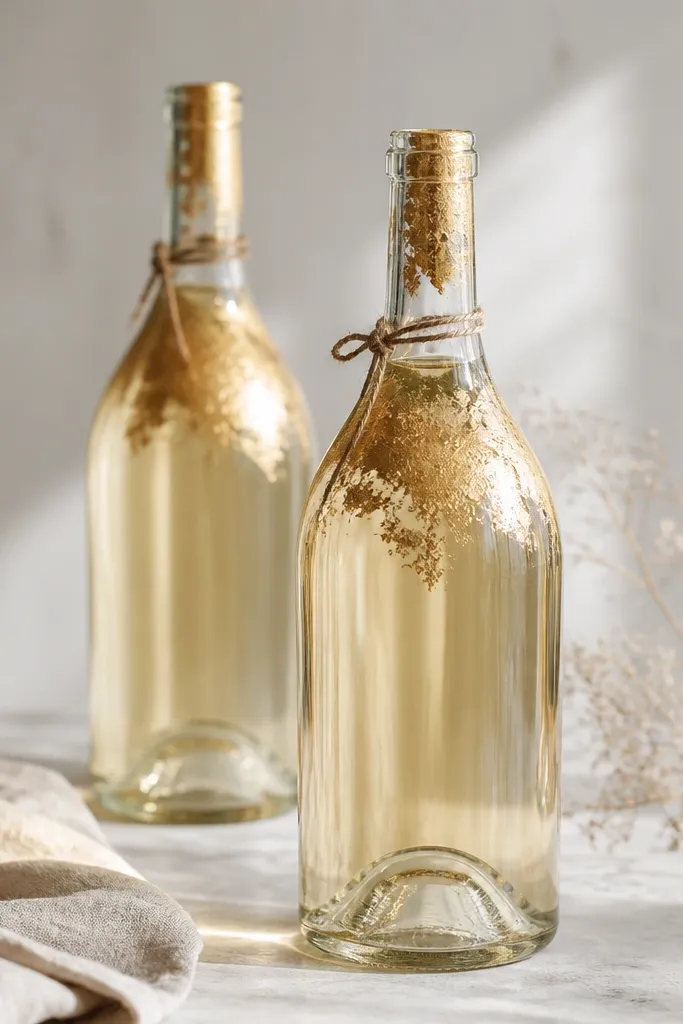
Gold leaf is the fastest way to make a bottle look like it belongs on a styled table. I keep the leaf concentrated on the shoulder and neck because too much gold makes it look like a craft store kit. This works with almost any wedding palette - white, green, navy, even black-and-gold. It flatters men's outfits because gold leaf adds warmth without adding color chaos. For year-round reuse, you can keep the leaf pattern and swap the ribbon color or floral type.
Start with clean, dry bottles. Lightly froth the glass with a glass-safe frost spray if you want a softer background; otherwise leave it clear for maximum shine. Tear small pieces of gold leaf and press them onto the bottle shoulder using leaf adhesive dots or a gold leaf glue pen. Press gently with a soft brush or cotton glove so you don't smear. After the leaf sets, wrap neck with thin twine and tie a tight knot, trimming ends evenly. Add a single filler stem - short greenery or a dried palm - so the gold stays the star.
Try thisUse a cotton glove when pressing leaf so you don't leave fingerprints.
Common mistakeDon't seal over leaf with a wet coat - it can dull the shine.
9. Chalkboard Labels on Bottles for Menu-Style Centerpieces
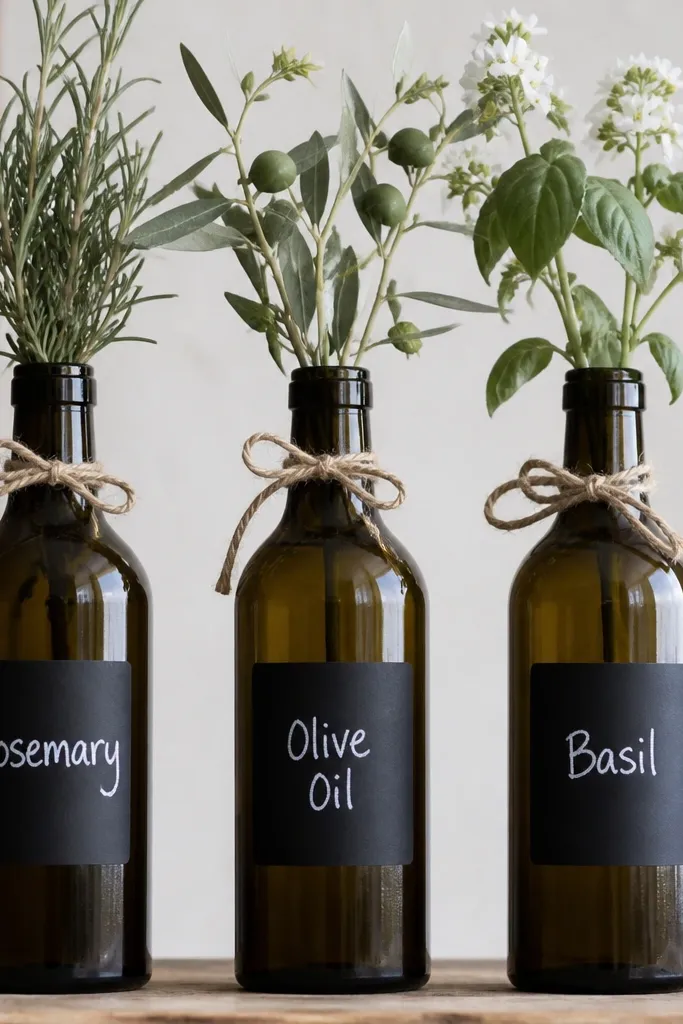
Chalkboard labels make bottles feel like part of the wedding signage system. I use them for centerpieces that also act like place cards for a casual dinner - guests remember what's in each bottle. The matte black also hides small scuffs from transport better than glossy paint. This looks great with rustic venues, but it's clean enough for modern tables if you keep the writing simple. It flatters everyone in photos because the label is on the bottle, not on the people.
Clean bottles and remove labels. Cut chalkboard vinyl or use chalkboard paint on a rectangle about 3 inches wide and 4 inches tall, centered on the front. Let it cure fully if you used paint - at least overnight. Write with white chalk pens or regular chalk right before the event so the text stays crisp. Tie a thin twine bow around the neck and insert a matching stem set - rosemary sprigs for earthy tables, olive branches for Mediterranean setups, or dried wildflowers for fall. Arrange bottles so each label faces the camera.
Try thisUse a ruler to draw a light pencil border on vinyl before you write in chalk.
Common mistakeDon't pre-write weeks ahead - chalk smears and fades when handled.
10. Felt Flower "Bouquet" Bottles with No-Water Stems
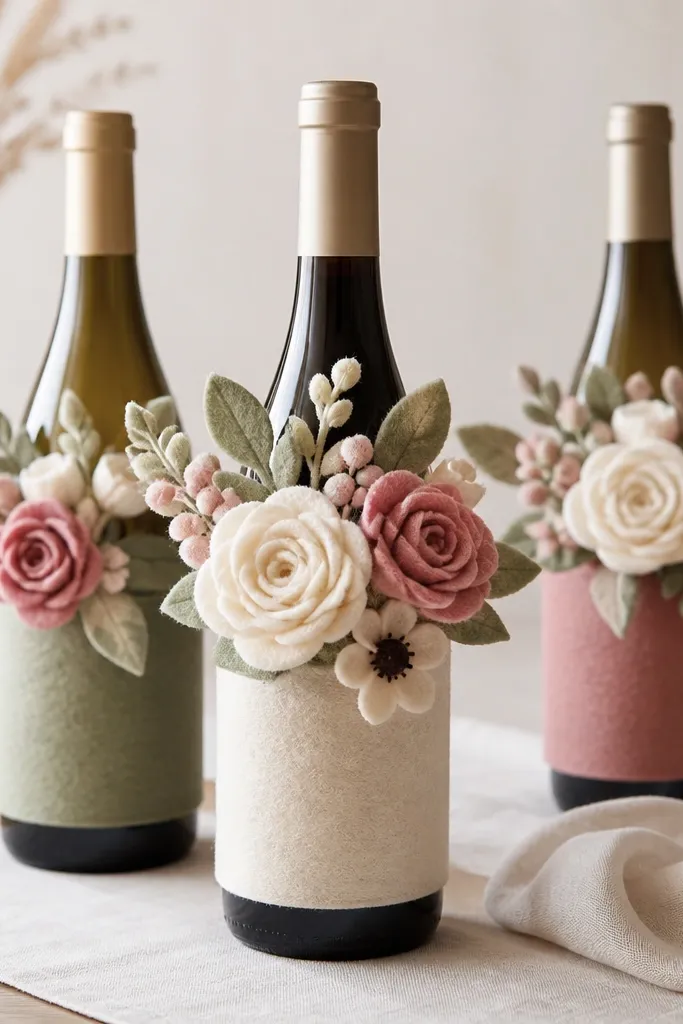
Felt flowers are the easiest year-round reuse craft because they do not wilt and you don't need water. I like this when you're doing a destination wedding or you know your venue has strict rules about open water. The felt wrap also hides bottle dents and uneven paint spots. Dusty rose and sage looks good next to both white dresses and darker suits. For photos, felt has a gentle matte texture that doesn't glare under flash.
Cut felt strips for a wrap band about 4 inches wide. Glue it around the bottle in a smooth layer, then trim edges so they meet cleanly at the back. Make felt flowers using simple circle petals or pre-cut felt flower shapes, then hot glue them to a short felt stem bundle. Insert the felt bouquet into the bottle opening and secure with a small wad of felt at the bottom. Add a small leaf felt piece behind the main flowers so it reads like a real arrangement. Place on a table with a textured runner so the felt doesn't look flat.
Try thisMake one color batch at a time and label the pieces - you'll reuse them faster later.
Common mistakeDon't use thin felt that stretches - it makes petals droop.
11. Mini Terrarium Bottles with Moss and Air Plants
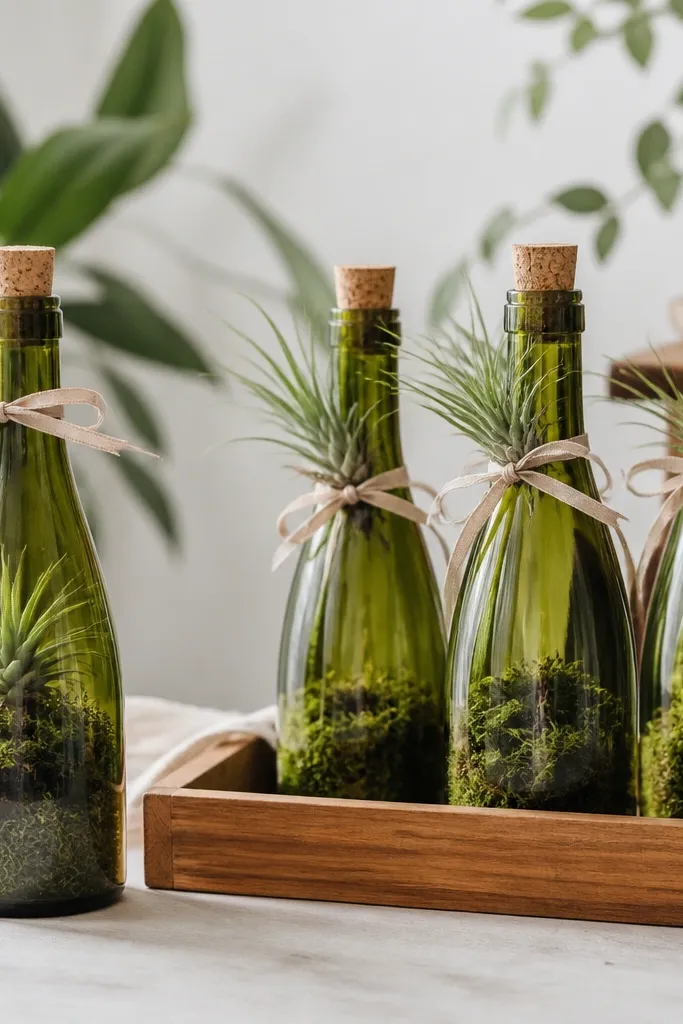
Air plants and moss make these bottles look alive without needing watering systems. It's a calm green look that fits spring, summer, and fall - you just change the tiny accents on top. I use mini terrarium bottles for rehearsal tables because they sit low and don't block conversations. The green reads flattering in every photo setting, especially next to warm skin tones and cream linens. If you want men's style to look polished, this craft has a clean, modern vibe.
Clean bottles thoroughly and dry completely. Add a thin layer of dry moss to the bottom - not wet, or it can smell. Create a small support using floral foam or a bit of wire mesh so the air plant sits at a slight angle. Secure the air plant with a dab of hot glue on the base only, then cover the glue spot with a tiny pinch of moss. Add a cork and tie ribbon around the neck. Arrange bottles in a cluster of 5 on a tray with pebbles so spills don't ruin the table.
Try thisMist air plants lightly once a week after the wedding, then let them dry upside down.
Common mistakeSkip wet moss - it turns the bottle bottom into a soggy mess.
12. White Wash Bottles with Burlap and Jute Twine
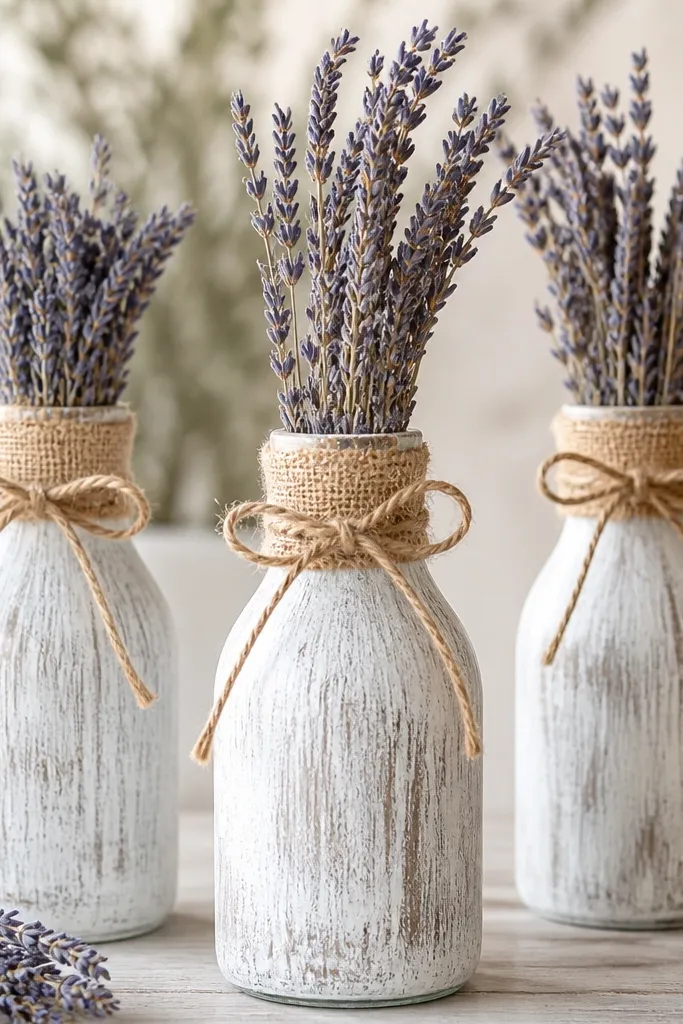
White-wash bottles look airy and they photograph well because the finish diffuses light. Burlap and jute add texture without going full country. I use this for rustic weddings that still want a clean, neutral look - it matches both ivory dresses and dark suit colors. The white wash also hides minor scuffs, which matters when you reuse the pieces all year. It's one of the easiest ways to make bottles feel like decor rather than random glass.
Mix craft paint and water to create a thin white wash consistency. Brush it onto the bottle in uneven strokes, then wipe some off with a rag so the glass shows through. Let it dry, then add a second light coat only where you want more opacity. Wrap the neck with burlap and secure with twine - keep the wrap tight so it doesn't look floppy. Tie a jute bow at the front and trim ends evenly. Insert dried lavender or wheat stalks - keep stems short so the bottle looks styled, not overfilled.
Try thisUse a rag for the wipe-off step - it makes the finish look natural.
Common mistakeDon't seal with glossy varnish - it makes burlap look shiny and cheap.
13. Colored Tissue Paper Ombre Bottles with Mod Podge
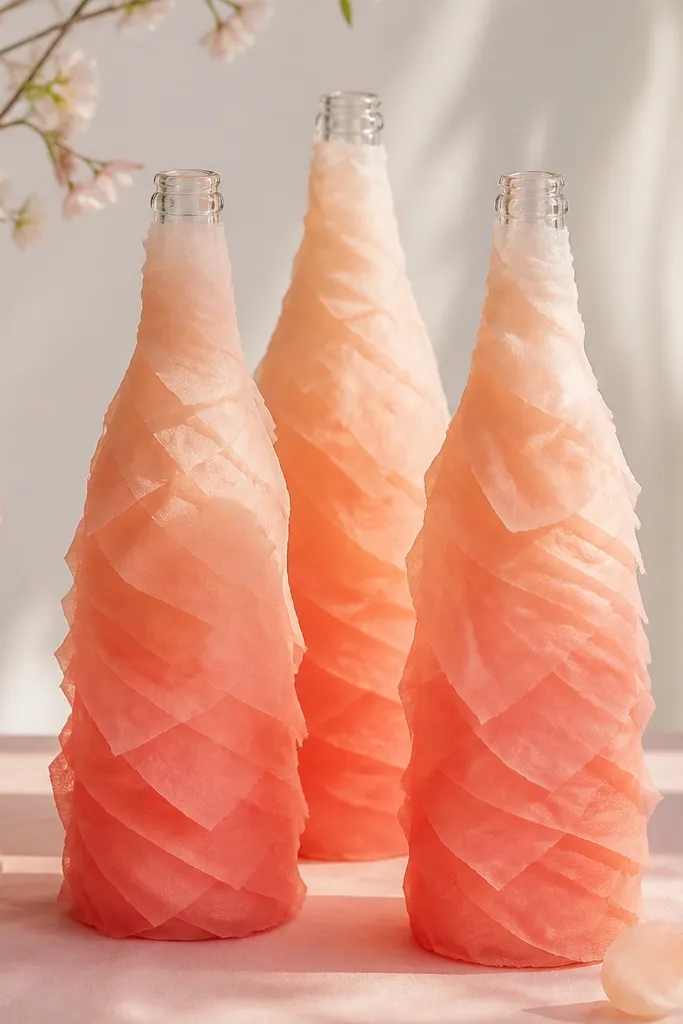
Tissue paper ombré gives you color that looks soft, not painted. I like it for weddings where you want gentle color in photos without bright, harsh stripes. Coral to peach works especially well with warm skin tones and cream tableware. The finish also hides bottle imperfections because the tissue layers cover uneven glass. For men's style, this is perfect when you have neutral suits and you want the decor to add warmth without adding loud patterns.
Clean and dry bottles, then tear tissue paper into small pieces instead of cutting - tearing creates better edges. Mix Mod Podge with a tiny splash of water so it spreads smoothly. Paint a thin layer onto the bottle and press tissue pieces onto it, working from the top lighter color downward. Build layers until the bottle looks evenly covered, then add a final thin Mod Podge coat over the whole surface. Let dry overnight before moving. Display bottles in a row so the ombré lines up across the set.
Try thisUse a foam brush - it prevents streaks and keeps tissue edges smooth.
Common mistakeDon't soak the tissue with thick glue - it turns translucent in weird patches.
14. Black Matte Bottles with White Dotted Decals
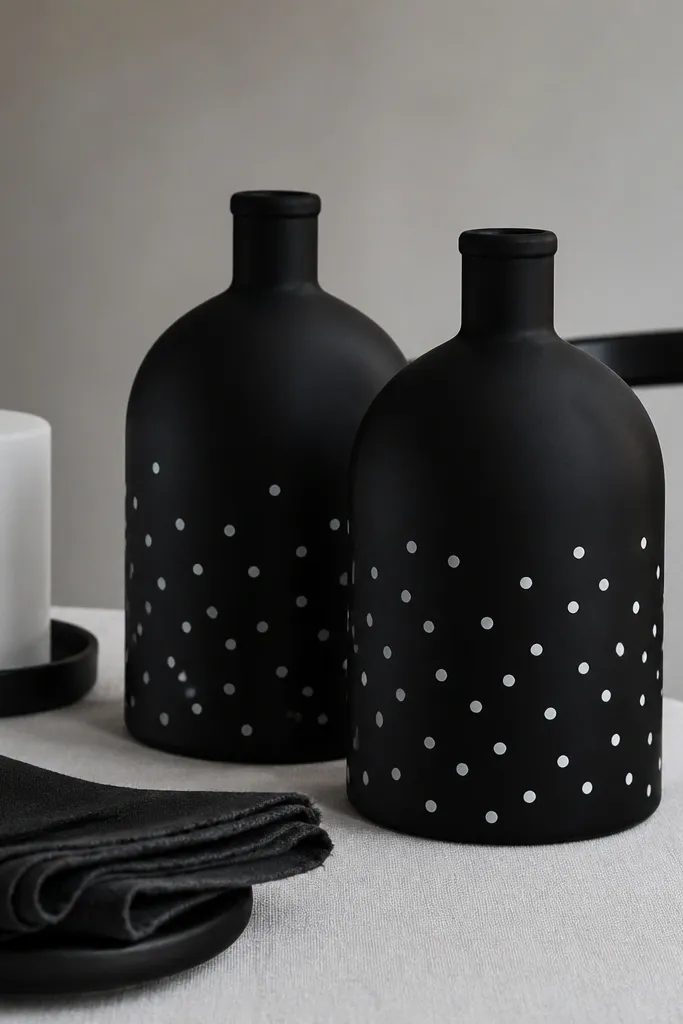
Graphic dot patterns make bottles feel like modern table design. I use a matte black base because it looks clean and doesn't glare under overhead lights. White dots add a playful contrast that still feels classy, especially if your wedding has black-and-white elements or a minimal color palette. This is a great year-round craft because you can swap the dot density - keep the black base and change the accents. It also flatters men's outfits because it doesn't compete with suit colors; it frames them.
Clean and dry bottles, then spray with matte black in two thin coats. Let cure fully so it doesn't scuff. Apply white vinyl dot decals in a pattern you like - start with larger dots on the bottom and smaller ones as you go up. Press each dot firmly with a plastic card so edges stick. If you don't want vinyl, you can use a white acrylic paint marker and make consistent dots with a light hand. Seal carefully with a matte sealer if using paint, then place bottles in a black tray or on dark wood so the contrast pops.
Try thisKeep dots spaced - touching dots look like accidental paint splatter.
Common mistakeDon't use glossy black - it shows every smudge and looks messy fast.
15. Marbleized Bottles with Acrylic Pour in Soft Neutrals
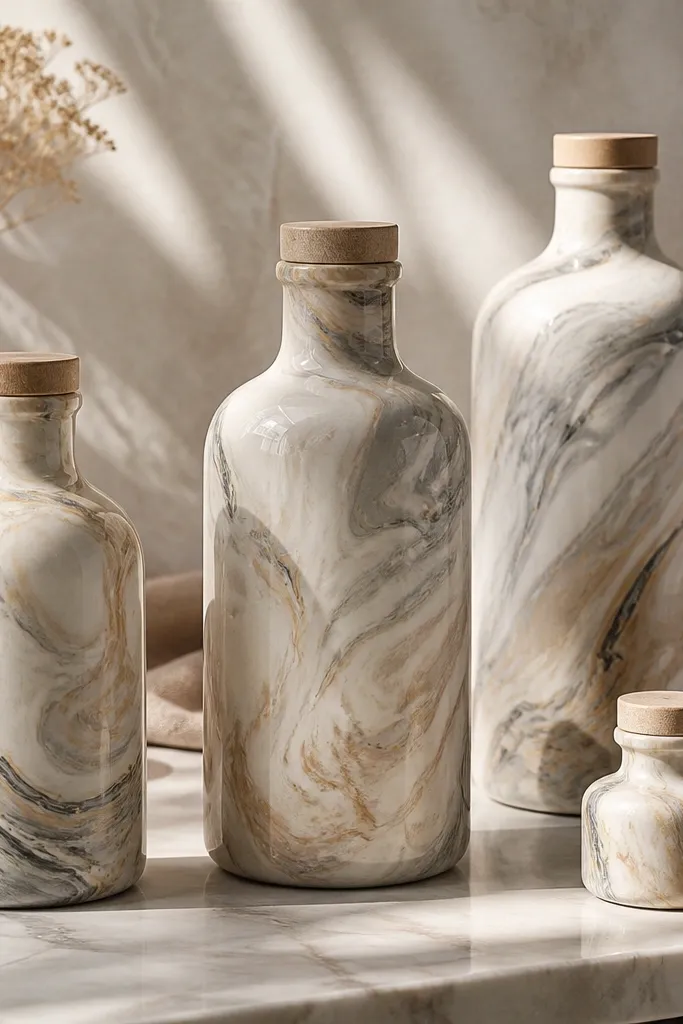
Marbleized bottles look expensive even when you're using basic craft materials. I stick to soft neutrals because they work in every season and don't force a specific wedding theme. The glossy depth makes the swirls catch light, which looks great in centerpieces where people move around. This style flatters all skin tones in photos because it's not a strong color - it's a texture story. It also pairs well with both classic and modern men's style since neutral marble works with navy, gray, and even tan suits.
Clean and dry bottles, then protect your work surface. Mix acrylic pour paints in cream, light gray, and a touch of beige with a pour medium so it flows smoothly. Pour a base layer onto the bottle and tilt slowly to let the paint run down - rotate the bottle so the swirls spread evenly. Pop any bubbles with a toothpick and torch or heat gun lightly if you use that setup. Let cure for 24-48 hours, then touch up any thin spots with a small brush. Place bottles on stands or trays so they cure without sticking to the surface.
Try thisUse a slow tilt - quick tilting makes streaks instead of swirls.
Common mistakeSkip thick paint - it won't level and the marble turns patchy.
16. Paper Flower Bottles with Vintage Book Pages
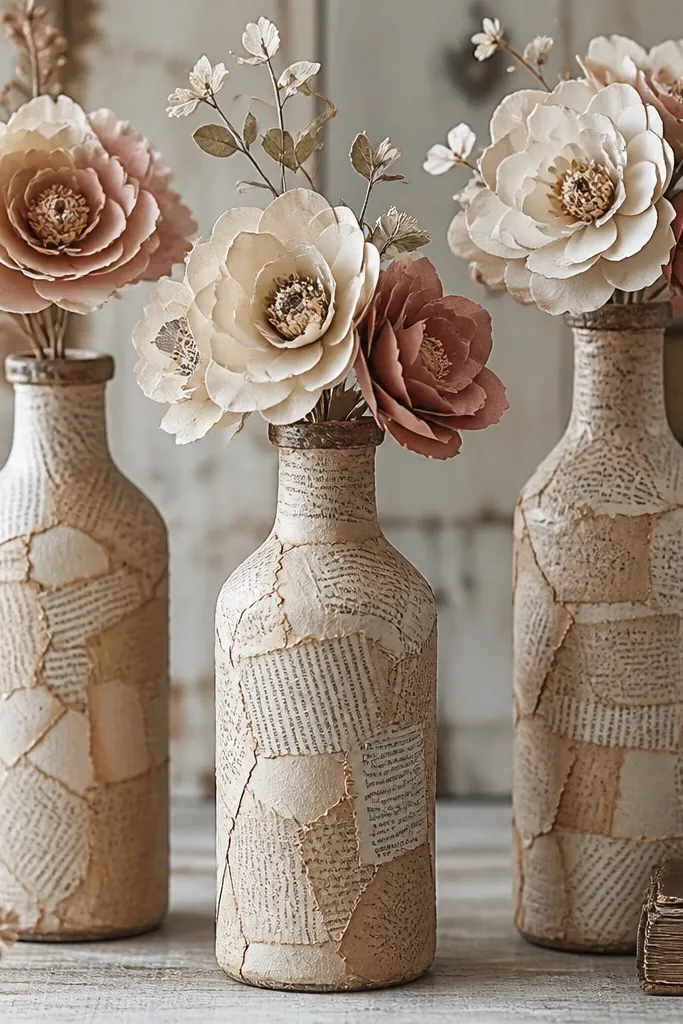
Paper flower bottles are a smart reuse craft because you can swap the flower colors without repainting the bottle. Vintage book pages add texture and a soft aged look that fits rustic and modern weddings at the same time. I've used this in fall with dried oranges, then reused the same bottles in spring by switching to white and blush paper blooms. It flatters photos because the paper is matte, so it doesn't glare. And it's great for men's style tables because the decor looks like art, not a loud theme.
Cut book pages into thin strips and small squares. Brush Mod Podge onto the bottle and layer strips in a vertical pattern, overlapping slightly. For paper flowers, roll small page squares into petals and glue them into a layered rosette - make 3 sizes per bottle for depth. Attach a small paper leaf behind the top petals so the flower doesn't look flat. Seal the paper with a final Mod Podge coat so it resists smudges. Add a simple ribbon around the neck to tie the bottle into your color scheme.
Try thisUse pages with smaller printed text - they look cleaner in close-ups.
Common mistakeDon't skip sealing - unsealed paper gets scuffed during setup.
17. Ribbon-Wrapped Neck Bottles with One Statement Stem
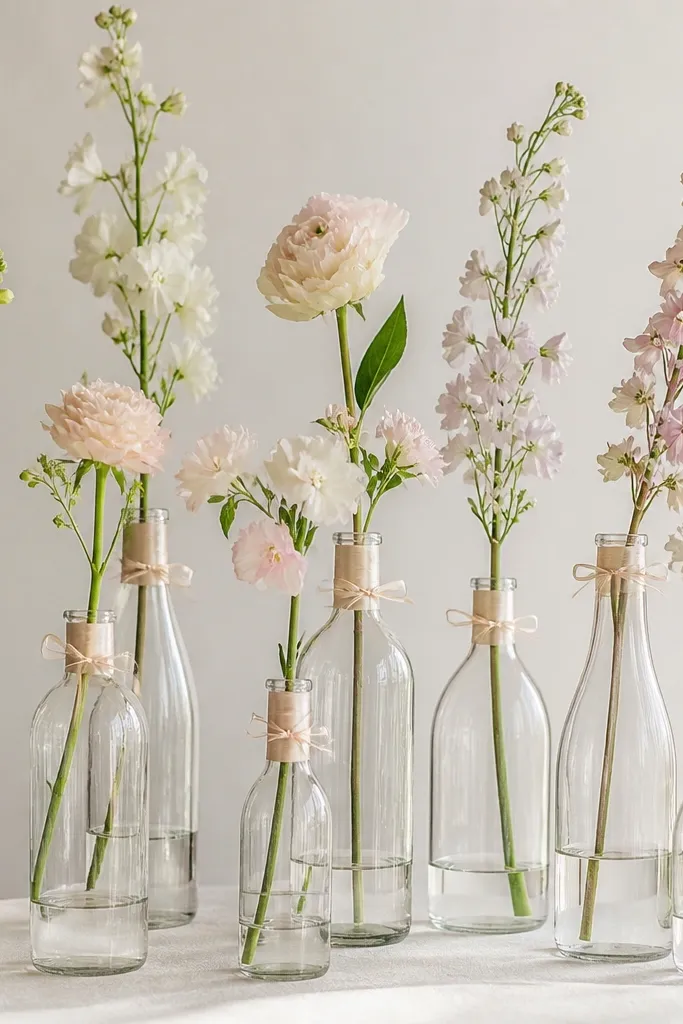
This is the "minimal but expensive" approach I use when the venue already has decor and you just need a clean accent. Wrapping only the neck keeps the bottle from looking crowded, and it makes it easier to reuse later because the ribbon is the part you swap. I like satin ribbon in deep green or burgundy because it photographs like jewelry. It flatters men's style because it doesn't add visual noise - it frames the table like a simple accessory. If you want year-round wedding crafts diy ideas that don't demand tons of time, this one is fast and repeatable.
Clean bottles and keep them clear or do a light frosted spray if you want soft light diffusion. Wrap satin ribbon around the neck - one full loop, then cross the ribbon and loop again for a thicker band. Tie a bow on the front and trim tails at an angle so they hang neatly. Insert one tall statement stem - a single calla lily, a long eucalyptus branch, or a dried pampas feather (trim if needed). Keep the stem centered so the bottle reads balanced. Place bottles in pairs or a set of 3 with matching ribbon color for consistency.
Try thisChoose ribbon width around 3/8 to 1/2 inch for a clean neck band.
Common mistakeDon't use too much ribbon on the body - it starts looking like costume craft.
18. Sea Glass Look Bottles with Spray Frost and Color Tint
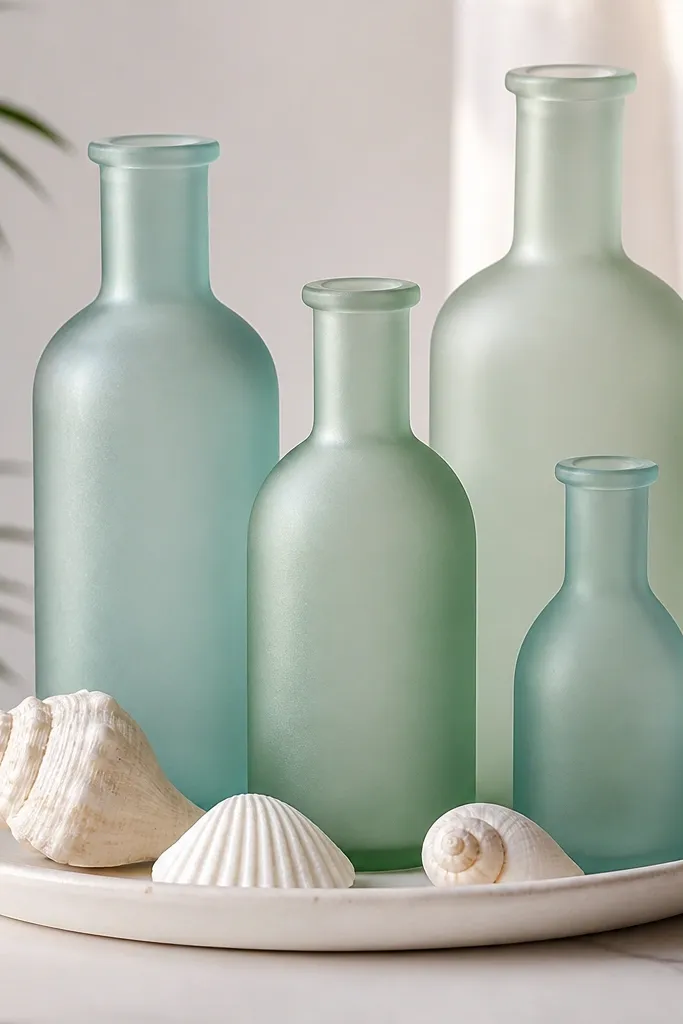
Sea glass bottles make the table look calm and expensive without needing real sea glass. The frosted finish diffuses light so you get a gentle glow that doesn't glare. I use aqua and pale green because those colors are flattering with both spring florals and summer greenery, and they still look good with winter whites. For year-round reuse, keep the sea-glass finish and swap the topping accent - shells, dried citrus, or evergreen picks. It also pairs perfectly with men's outfits because it's soft and not too saturated.
Clean bottles and remove labels completely. Spray with a glass frost spray in light, even passes so you don't get drips. For color tint, lightly mist with a translucent craft spray in aqua or pale green - hold the can farther away and apply in thin layers. Let cure fully, then handle with gloves to avoid smudges. Insert LED fairy lights inside for evening glow or add a short stem arrangement. Set on a tray with white pebbles or shells so the sea-glass effect reads clearly.
Try thisDo a test spray on one bottle first - frost thickness changes the final color.
Common mistakeDon't apply color tint too heavy - it turns into streaky paint instead of sea-glass.
19. Herb-Cut Centerpieces in Bottles with Copper Wire Holders
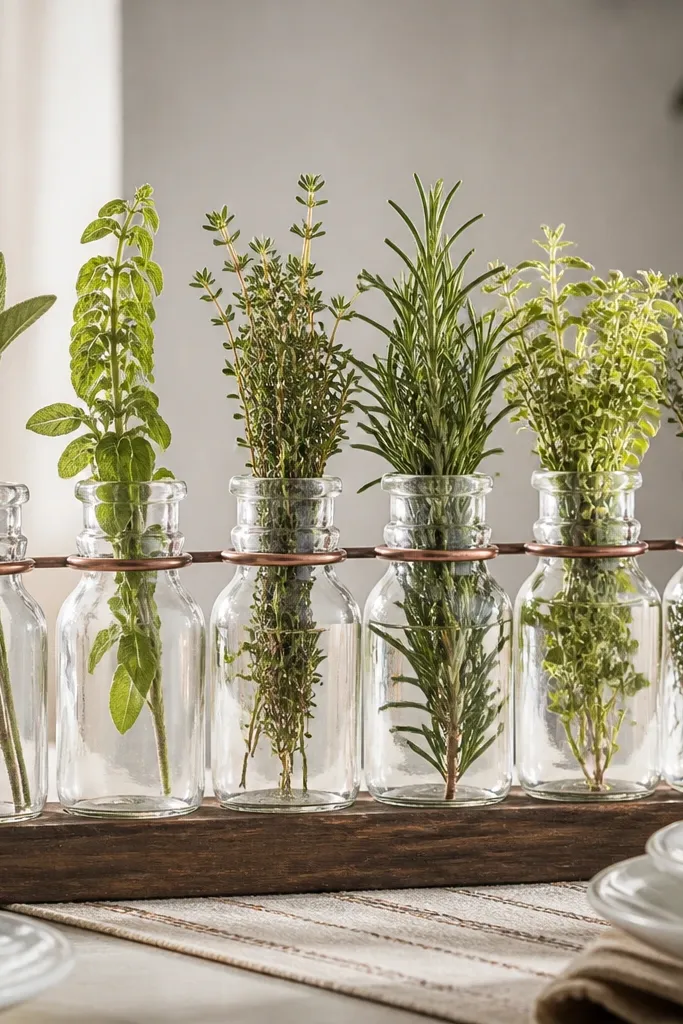
If you want year-round wedding crafts diy ideas that also smell amazing, herb bottles are the answer. Copper wire holders keep herbs standing straight without needing complex mechanics, and copper looks great with warm wood venues. Rosemary and thyme add a natural texture that photographs well next to both casual and formal styling. This works across seasons because you can swap herb types: basil in summer, sage in fall, and evergreen sprigs in winter. It flatters men's style tables too because it feels like real decor, not a glitter project.
Remove labels and wash bottles well, then dry fully. Twist copper wire into a simple ring that fits around the neck, leaving three small vertical loops to hold stems upright. Bend the loops slightly so rosemary stems don't slip. Add a small amount of water if you're using fresh herbs and insert trimmed stems, then cover the top with a thin layer of plastic wrap under the wire ring if you need extra leak protection. Arrange bottles in a line with one bottle slightly taller and add a small tag for each herb if you want it to double as a favor note. Wipe bottle exteriors so water spots don't show.
Try thisTrim stems at an angle right before the event so they drink water fast.
Common mistakeDon't skip wiping - water spots and herb drips look messy in flash photos.
20. Monogram Bottle Neck Wraps with Heat-Transfer Vinyl
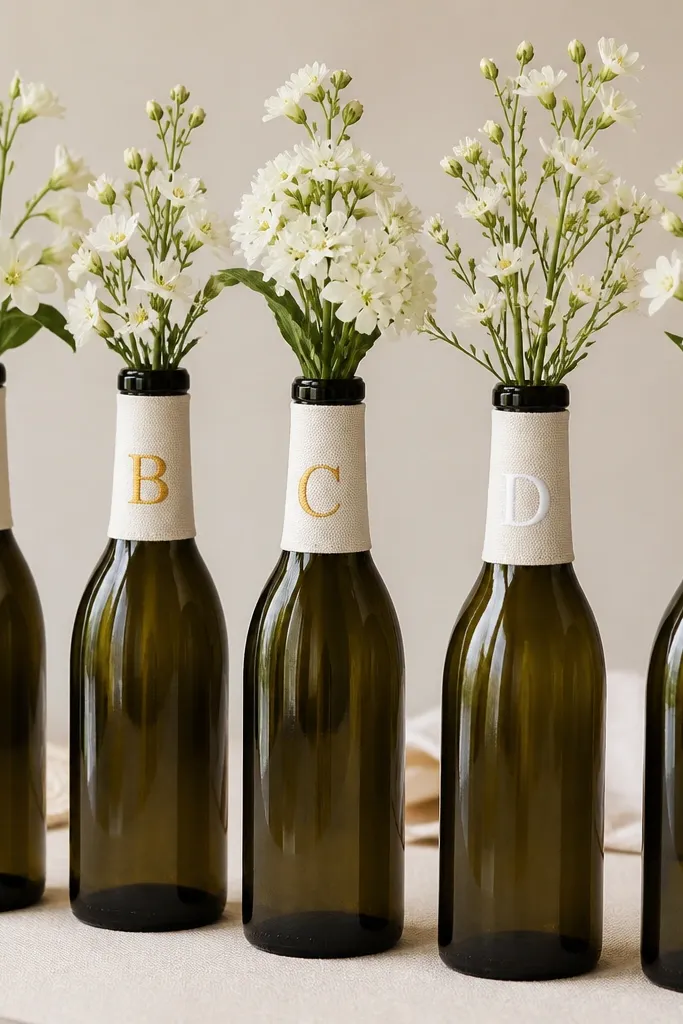
Monograms make bottles feel personal without going full DIY chaos. I use heat-transfer vinyl on fabric because it stays crisp after handling, and it looks sharp next to clean table linens. This works for any season because the bottle finish is neutral and the monogram stays the same while the flowers change. It flatters photos because the letter is a strong visual anchor that doesn't compete with face features. For men's style weddings, keep the monogram color in gold foil, white, or deep green so it matches suits and ties.
Cut fabric strips for neck bands - about 2 inches wide and long enough to wrap with overlap. Iron the fabric flat so vinyl bonds cleanly. Use a heat press or household iron with parchment paper to apply heat-transfer vinyl monograms to the fabric band, then let it cool. Wrap the fabric band around the bottle neck and glue the ends at the back. Insert small blooms like white babies breath or short greenery so the monogram stays visible. Repeat with 3-5 bottles and keep the letter placement consistent so the set looks coordinated.
Try thisChoose a monogram font with thick strokes so it doesn't look thin after pressing.
Common mistakeDon't use stretchy fabric - vinyl can peel at the edges.
21. Hemp Rope and Dried Citrus Bottle Decor
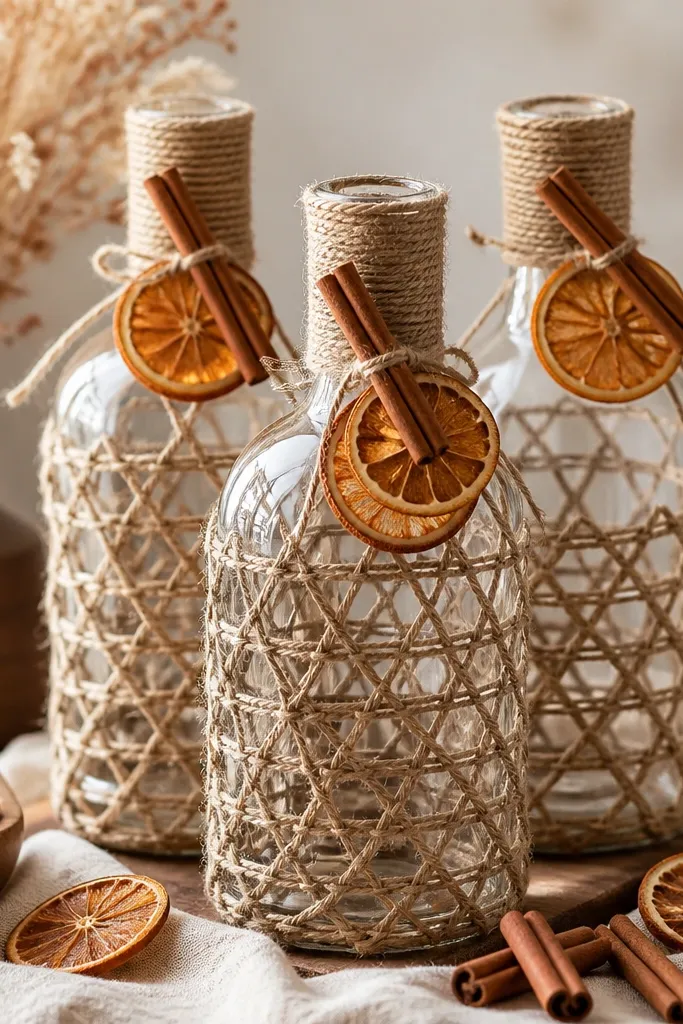
Dried citrus makes bottles smell good and look seasonal without needing heavy color changes. I wrap bottles with hemp rope to keep the base neutral, then tuck in dried orange slices and cinnamon sticks for warmth. This looks especially good for fall weddings and winter holiday dinners, and it still fits spring because the rope is the constant. It flatters men's style because the palette is warm and natural, not bright or sugary. In photos, the citrus texture adds detail without overwhelming the table.
Clean bottles and remove labels, then wrap hemp rope from the base up in tight spirals with hot glue. Leave a small gap near the neck so you can tuck dried citrus. Tie a small rope knot around the neck for a finished look. Insert dried orange slices and a cinnamon stick into the opening, securing with a tiny piece of floral wire if the sticks slide. Add a small sprig of rosemary to keep the look fresh and green. Place bottles on a tray and scatter a few citrus pieces around the base so it reads intentional.
Try thisUse oranges cut thin and dried until leathery - thick slices look puffy and cheap.
Common mistakeDon't overfill the opening - crowded decor blocks the bottle shape.
22. Glitter-Free Faux Glass Gem Bottles with Clear Resin Dots
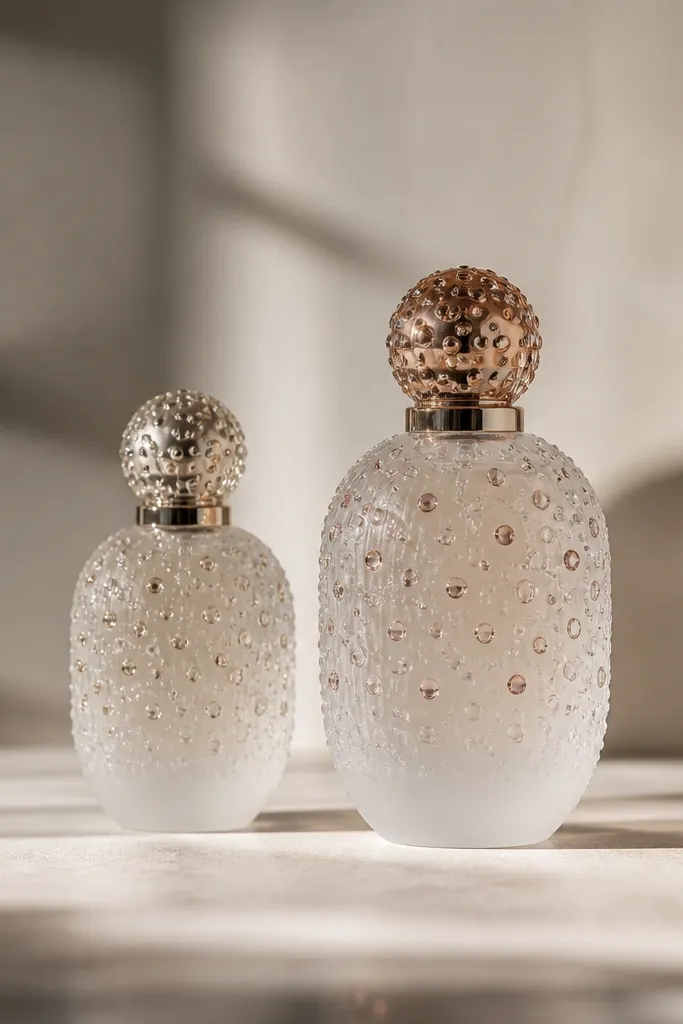
If you want sparkle without glitter fallout, resin dots give you that gem look that feels more grown-up. I do a frosted white base on the bottle, then add clear resin dots with a hint of silver or pale gold tint. It looks gorgeous in evening photos because the light bounces in tiny points. This is a year-round craft because you can keep the resin pattern and change the tint. It also works well with men's wedding style because the sparkle is controlled - it doesn't look like a craft fair project.
Clean bottles and dry completely, then frost with a light glass frost spray if you want the dots to pop. Mix clear resin and add a tiny amount of metallic powder or mica for a subtle tint. Use a silicone mold or a toothpick to place small resin dots on the bottle - I do 10-15 dots spaced around the shoulder area. Let cure fully according to your resin instructions. After curing, wipe the bottle and check for any rough edges, then add a simple ribbon around the neck. Place on a reflective tray so the dots catch light during photos.
Try thisKeep dots clustered near the top so they read as intentional accents, not random blobs.
Common mistakeDon't put dots too close together - it turns into a thick glossy patch.
23. Vintage Label Collage Bottles with Mod Podge Seal
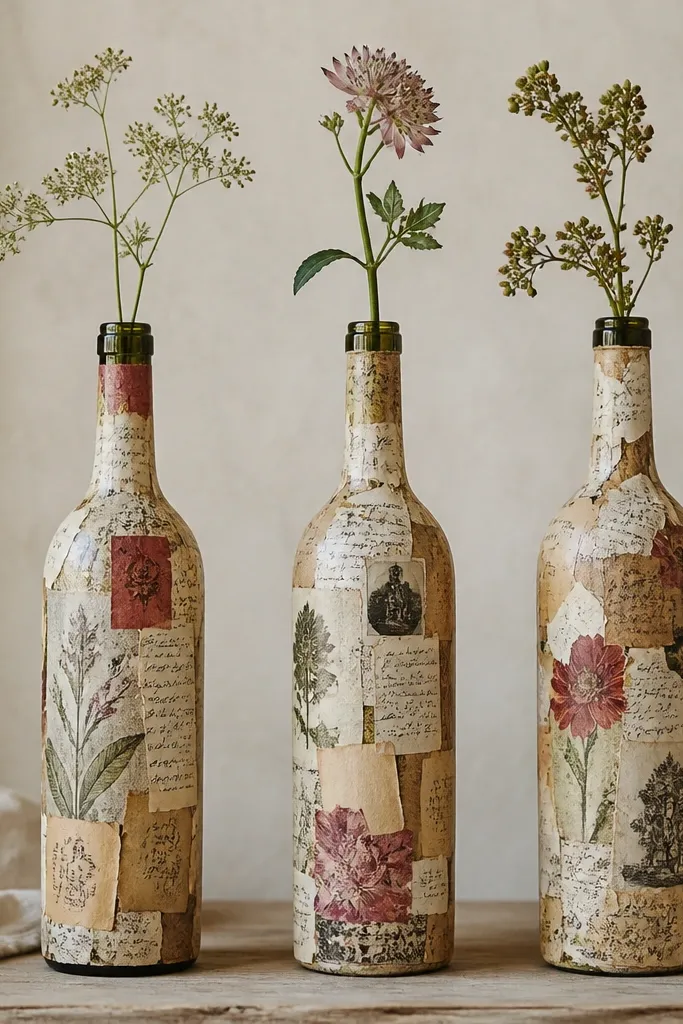
Label collage is one of the best "use what you already have" crafts, and it makes reuse feel personal instead of repetitive. I collect old wine labels, cafe menu scraps, and paper ephemera, then collage them into a controlled pattern so the bottle looks designed. The muted colors read warm in photos, and the matte paper texture hides small scuffs. This works for year-round wedding crafts diy ideas because you can match any palette by choosing the paper tones. It also flatters men's style because vintage paper feels classic and doesn't clash with suit colors.
Remove original labels and clean the bottle thoroughly, then let dry. Cut your ephemera into small pieces - rectangles and irregular scraps both work. Brush Mod Podge onto the bottle and layer pieces with overlap, smoothing with your fingers or a brayer so there are no big bubbles. Build coverage up to the shoulder, then stop so the neck still looks clean. Seal with 2-3 Mod Podge coats, letting each coat dry before the next. Insert a single stem - dried lavender, small greenery, or a pale wildflower - so the bottle opening doesn't look cluttered.
Try thisUse a small foam brush for sealing so the paper edges don't lift.
Common mistakeDon't collage right over oily fingerprints - the paper won't adhere cleanly.
24. Clear Bottle with Floating Rose Petals and Warm Lights
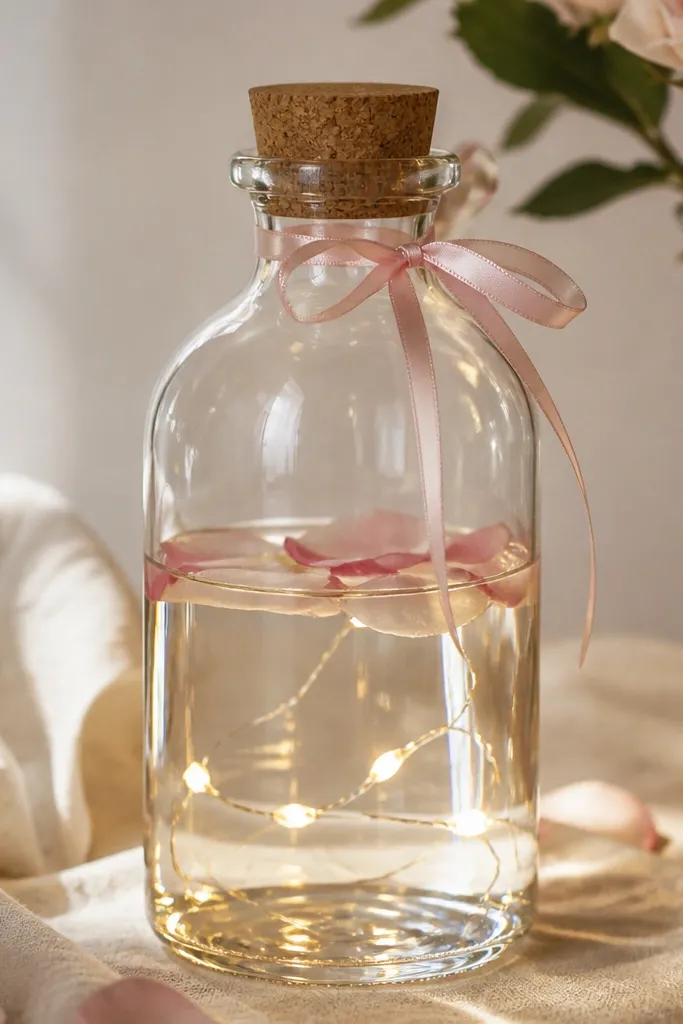
Floating petals look romantic in a way that still feels tasteful. I keep the petal quantity small so the bottle stays elegant and doesn't turn into a messy "bath" look. Warm fairy lights make petals glow softly, and clear bottles reflect less than colored glass, so the effect stays controlled. This works for spring and summer, and you can reuse the same bottle for winter by swapping petals for dried citrus or evergreen sprigs. It flatters both men and women in photos because the light is inside the bottle, not blasting outward.
Clean and dry the bottle, then add a thin layer of clean water if you're using real petals. Add warm fairy lights and arrange them so the light sits low and doesn't tangle. Place a small handful of rose petals on top, then check from the side - you want petals clustered, not spread flat. Cork the bottle or use a stopper that fits snugly, then wrap a thin ribbon around the neck to hide the seal. Set bottles on a tray lined with paper towels or a waterproof liner so any condensation stays contained. For reuse, keep the lights and stopper and just change the floating insert.
Try thisUse petals from a packet made for crafts or dried petals - they hold shape longer.
Common mistakeDon't use too much water - it sloshes during transport and makes stains.
25. Fabric Rosette Bottles with Button Centers
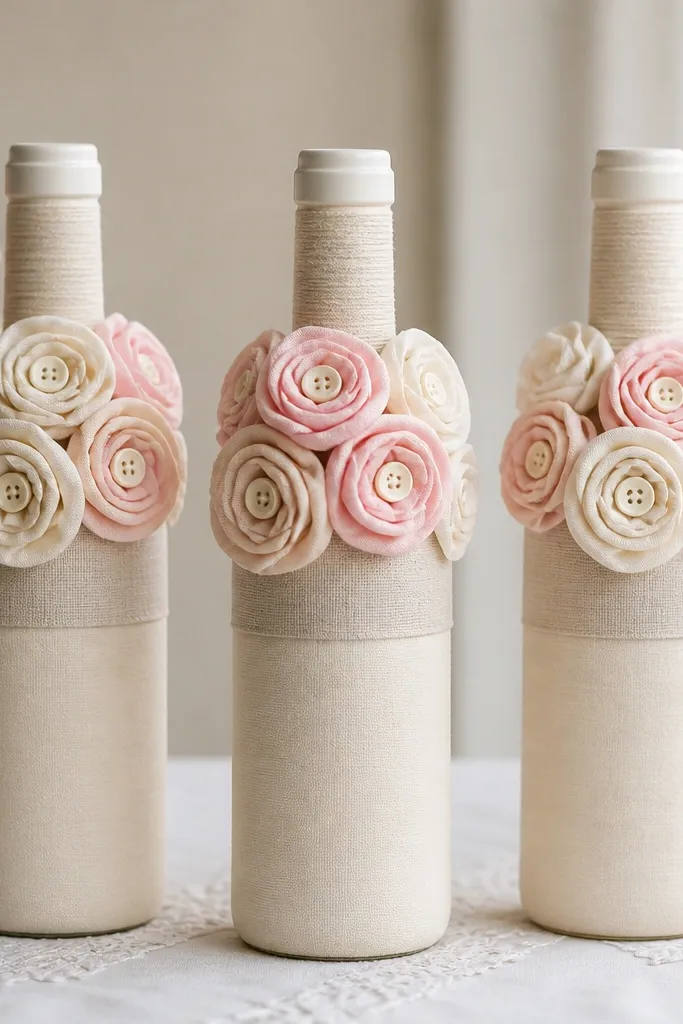
Rosettes add a handmade, couture feel without needing lace everywhere. I use fabric rosettes around the neck because it keeps the bottle looking tidy and gives a clear focal point. Button centers make it look finished and slightly vintage, which works with both modern and rustic weddings. This is a great year-round craft because you can keep the rosette method and change fabric colors: deep green for winter, blush for spring, burgundy for fall. It also photographs nicely next to dark suits because the rosettes sit above the table line and don't compete with faces.
Wrap the bottle neck with a neutral fabric band about 2 inches wide, glue the ends at the back, and trim cleanly. Make rosettes by folding fabric into tight circles and pinching the base, then stitch or hot glue the base so it holds shape. Glue or pin rosettes around the neck area, spacing them so you see each one. Add a small button center to each rosette for a crisp finish. Insert a short stem or greenery into the opening so the bottle stays functional as a centerpiece. Keep the total rosette count to 3-4 per bottle so it doesn't look crowded.
Try thisUse fabric with structure like cotton poplin so rosettes hold their shape.
Common mistakeDon't use slippery satin for rosettes - they collapse under glue.



