
1. 58-inch slim wall mirror with warm LED candle rails
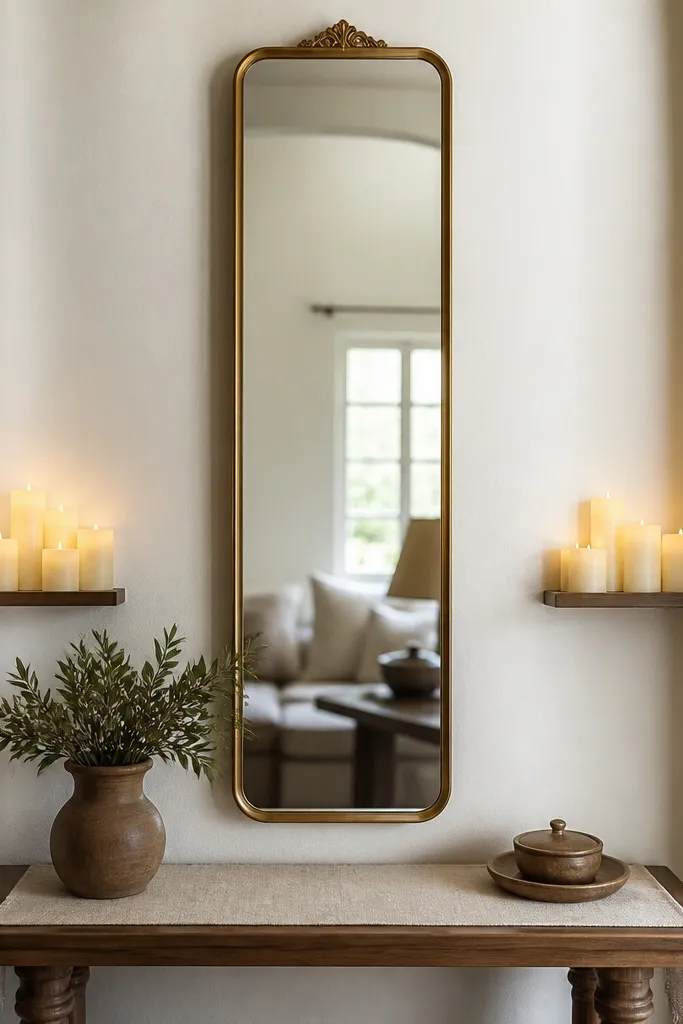
This setup works because a slim wall mirror gives you vertical height without eating floor space, and candle-style LEDs create a soft glow that flatters skin tones. I used this in a venue where the "photo corner" was a 3-foot strip between a buffet and the dance floor, and people still looked composed. The gold frame adds warmth against cool walls, especially for fair skin and neutral undertones. If you're styling for darker skin, the warm LEDs help definition around cheekbones instead of washing faces out. The mirror's height puts heads in the top half of the reflection so the photos don't crop foreheads.
Start by mounting a slim mirror with the center at 58 inches from the floor. Place a narrow console table directly under the mirror, then lay a 12- to 14-inch-wide linen runner centered so it shows in the reflection. Add battery LED candles in two side clusters, keeping them 8 to 10 inches away from the mirror edge so the light reads as coming from the sides. Turn the LEDs to warm mode, then do one test photo from the spot where you want people to stand. Finally, keep décor minimal - one small vase or bud stems max - so the reflection doesn't look busy.
Try thisUse painter's tape to mark the exact stand spot on the floor before guests arrive. The photos will look consistent even if people shift.
Common mistakeAvoid bright white LEDs - they make the mirror look like a bathroom and flatten faces.
2. Round mirror with a ribboned arch frame on a narrow console
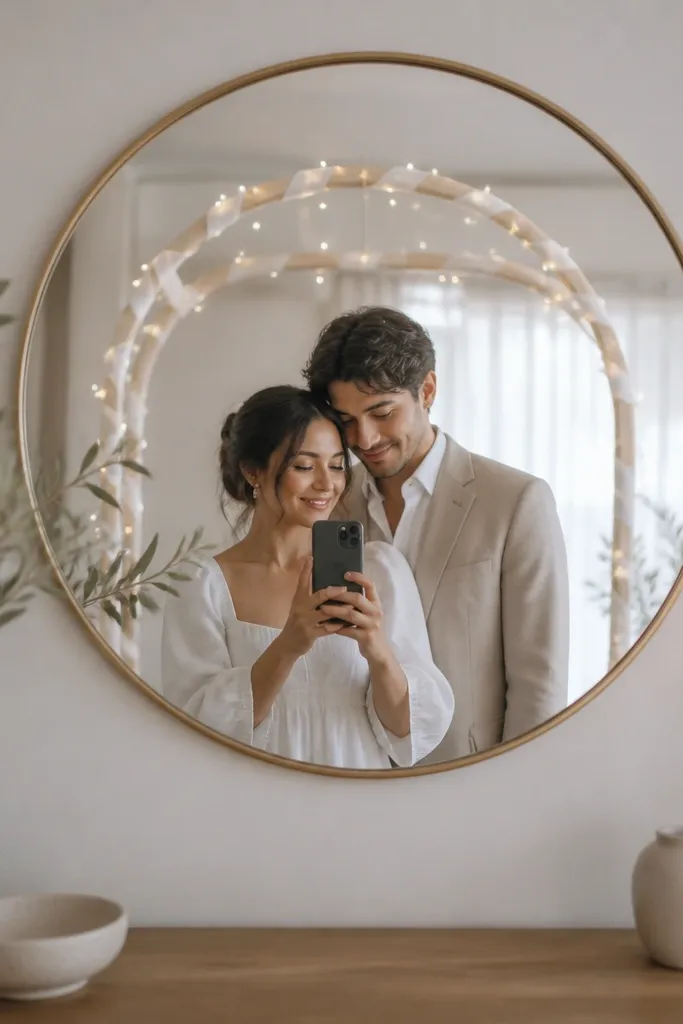
A round mirror is forgiving in tight spaces because it keeps the background cohesive and reduces the "boxy" look you get from rectangular frames. The ribbon arch gives you a defined shape inside the mirror reflection, so even a plain wall turns into a photo moment. Satin ribbon catches warm light and gives a gentle highlight along folds, which looks great on both men's and women's outfits. For men in crisp shirts, the arch adds texture without competing with tailoring lines. For women, it creates a flattering glow behind hair and shoulders.
Start with a 24- to 28-inch round mirror and mount it so the top edge sits around 74 inches high. Put a narrow console table under it and center the mirror with the console width, not the wall width. Build a small arch using two dowels that meet at the top, then wrap with white satin ribbon, tightening the wrap so it looks smooth from 6 feet away. Add warm fairy lights inside the arch, keeping the wires hidden behind ribbon folds. Place one low bouquet or greenery at the base of the console to anchor the bottom of the reflection.
Try thisTie ribbon ends with small hidden knots and trim them straight, not frayed - frayed ends show up clearly in mirror photos.
Common mistakeSkip bulky flowers behind the arch. They block the mirror reflection and make the space feel crowded.
3. Framed mirror leaning on a vintage ladder with linen drape
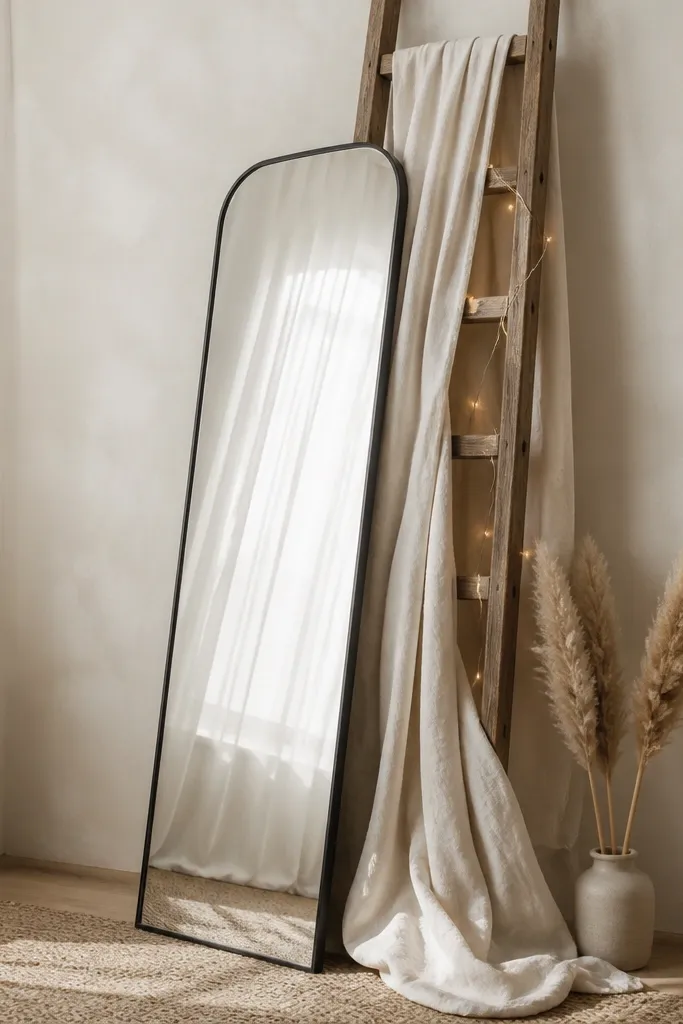
Leaning a mirror on a ladder is one of my favorite tricks for small spaces because it creates height without a wall mount and gives you instant structure for a photo. The ladder silhouette reads like a frame within the mirror image, which makes the background look styled even when the room layout is awkward. Linen drape smooths out the look - it hides table clutter and adds movement when people shift stance. This works for weddings where outfits are neutral: ivory, cream, light gray, and soft navy. It also flatters wide shoulders because the drape pulls the eye down and keeps the reflection balanced.
Start by placing the ladder at the end of your photo area, leaving at least 24 inches of clear space in front. Lean a tall framed mirror against the ladder, then secure the bottom with removable mounting putty or anti-slip pads so it won't slide. Drape off-white linen from one rung down the ladder sides so it forms two vertical "columns" in the reflection. Add warm string lights along the ladder rungs, then tuck the battery pack out of sight behind the linen fold. Finish with one small base cluster at the ladder feet - keep it low so it doesn't climb into the mirror frame.
Try thisUse a long lint roller on the linen right before photos. Mirror shots show every fiber and wrinkle.
Common mistakeDon't use shiny satin drape here. It reflects overhead lights and creates glare spots on the mirror.
4. Tripod mini-mirror station with a black acrylic backdrop strip
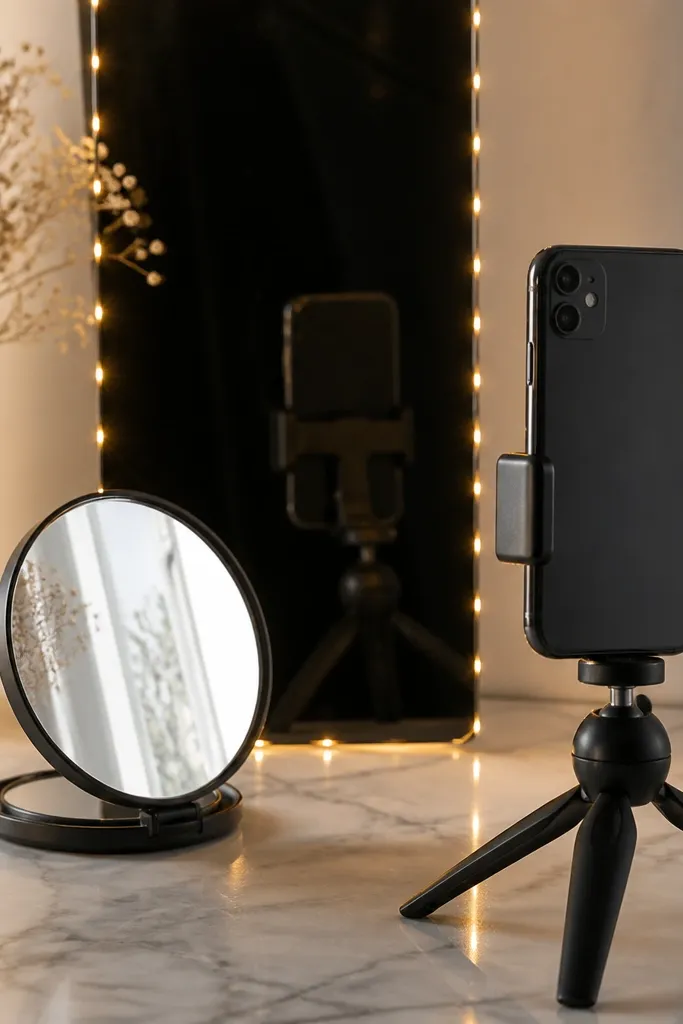
If you want mirror selfies that look intentional, this is the layout I use when space is tight and walls are busy. A small tabletop mirror gives you control over framing, and the black acrylic strip creates a smooth backdrop that hides messy venue details. The contrast makes skin tones look more defined, especially for people with warm undertones and deeper hair colors. For women in satin dresses, the acrylic background stops the reflection from turning into a washed-out blur. For men, it gives a crisp look that works well with navy suits and white shirts.
Start with a tabletop mirror about 8 to 10 inches wide, mounted on a stable stand. Place it on a small side table, then prop a vertical strip of black acrylic behind it so it fills the mirror background area. Add warm fairy lights along the side edges of the acrylic, keeping them 2 to 3 inches away to prevent hotspots. Position your phone on a mini tripod about 16 to 20 inches from the mirror, then test a selfie to confirm the face sits near center. Finally, cover the table surface with a dark cloth so the reflection doesn't show table legs or cables.
Try thisSet your phone to 2x zoom for mirror selfies - it reduces distortion and keeps faces proportionate.
Common mistakeAvoid silver metallic backdrops. They produce flickering light patterns in the mirror.
5. Sliding-door mirror panel with greenery side rails
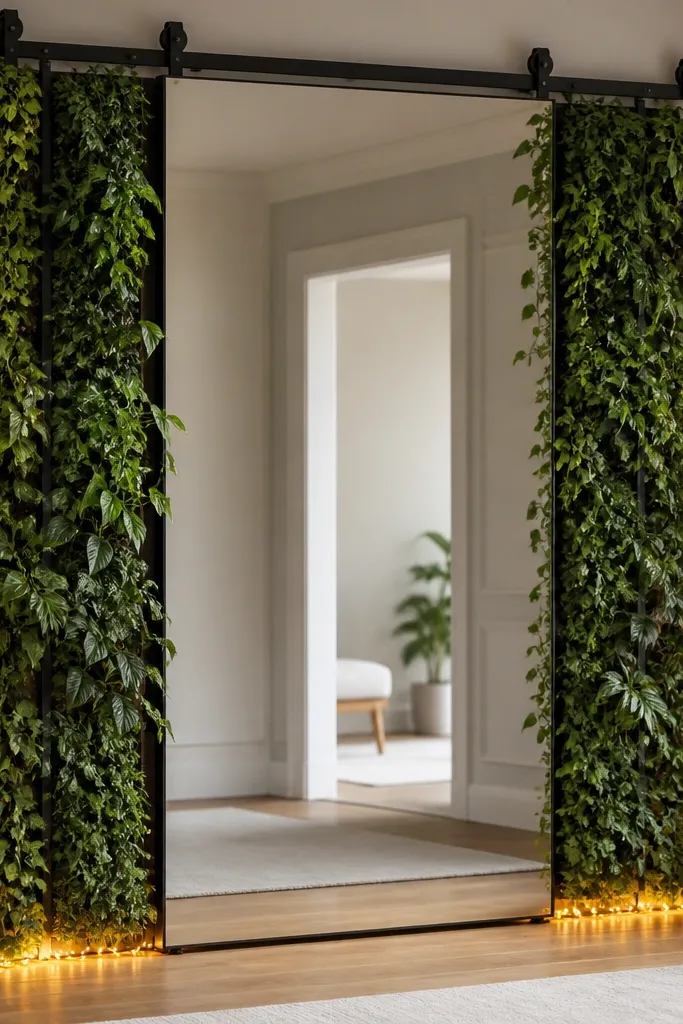
A mirror panel mounted like a sliding door is a smart move when your venue has a doorway or alcove you don't want to block. The panel creates a "set" that looks designed, and the narrow greenery rails keep the background inside the mirror frame. I've used this in hallways where you can't place a full-length freestanding mirror without blocking traffic. The greenery rails add texture that looks good for both men and women, because it doesn't fight with clothing colors - it sits behind you. Warm lighting at the base also helps avoid harsh overhead reflections.
Start by hanging or installing a mirror panel so it's flush and stable, then position it at the far end of your available space. Build two vertical greenery rails using faux boxwood or eucalyptus garlands - aim for 12 to 16 inches wide on each side. Place the rails so there's 6 to 8 inches of open space between them and the mirror edge. Add warm string lights at the base, hidden behind the greenery so the glow comes upward. Put a small low arrangement at the bottom center, then do a test shot to ensure the doorway shape shows cleanly in the reflection.
Try thisIf the track rattles, tape it to the floor with gaffer tape before the ceremony - vibrations show up as blurry photos.
Common mistakeDon't overload the rails. Too much greenery makes the mirror look cluttered and hides faces.
6. IKEA-style white wall mirror with sage napkin garland
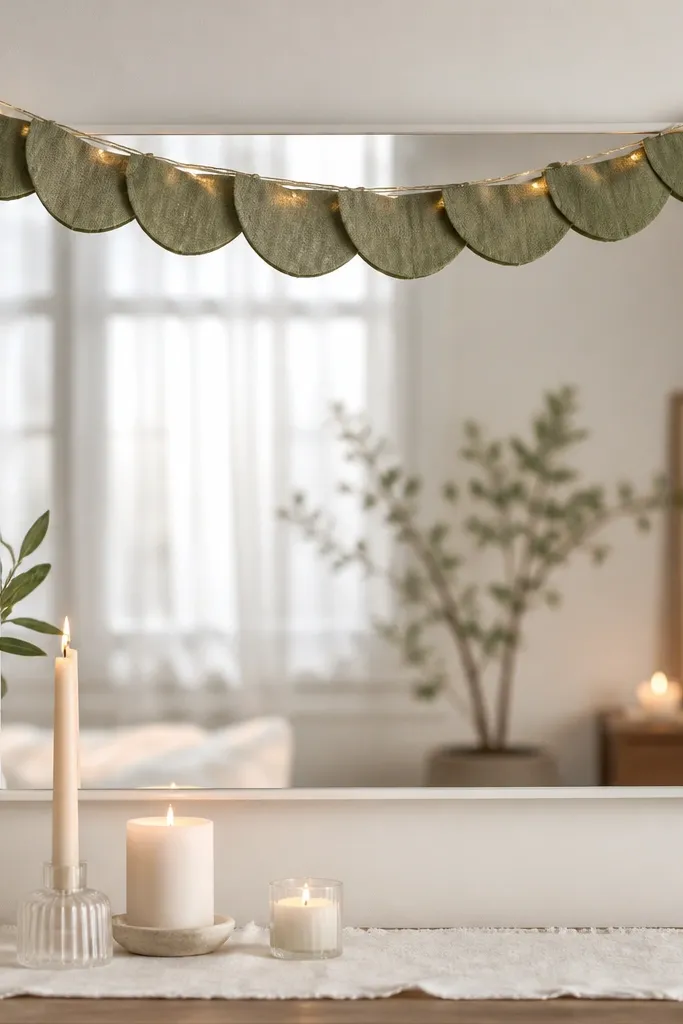
This idea is for venues that already have a lot going on visually. A plain white mirror keeps the reflection clean, while a sage napkin garland adds a soft, wedding-y color without taking over the scene. The scalloped napkin shape creates a gentle rhythm behind hair and shoulders, which flatters both structured suits and flowing gowns. The sage tone looks especially good with blush, champagne, and ivory fabrics. It also makes skin look warmer under indoor lighting, which matters when your ceremony runs in the afternoon.
Start with a slim white-framed mirror, mounted so the center hits about 59 inches. Lay a white runner on the console beneath, then add 2 to 3 tapered candles at equal spacing. Create a napkin garland by folding sage napkins into triangles and tying each fold to twine with small knots. Drape the garland behind the top of the mirror so it shows as a banner, not as messy strings across faces. Add warm micro LEDs behind the napkin folds, then take a test photo to check for glare.
Try thisUse matte napkins, not shiny ones. Matte fabric diffuses the light and looks better in mirror reflections.
Common mistakeAvoid placing the garland too low - it crowds the forehead and makes photos look top-heavy.
7. Black-framed mirror with gold confetti balloon cluster
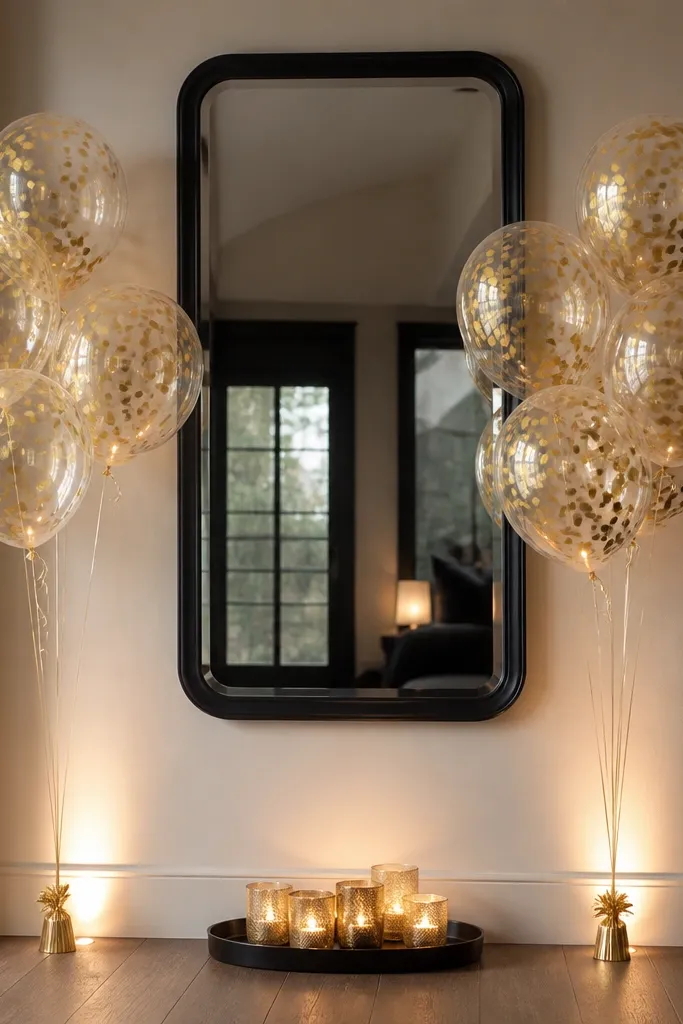
This is the mirror setup I use when the wedding palette includes black accents and gold details. The black frame anchors the background and makes the reflection feel graphic, not chaotic. Confetti balloons add sparkle that shows up in mirror selfies, especially when you stand at a slight angle to catch the light. For men in black or charcoal suits, it makes the outfit look intentional instead of plain. For women, the gold highlights move across the reflection and flatter hair shine. Keep the cluster compact so it doesn't dominate the mirror width.
Start by mounting a black-framed mirror with the center around 60 inches high. Place a slim console beneath and cover it with a black cloth so the reflection doesn't show table hardware. Inflate 6 to 8 confetti balloons (gold confetti on clear or pale gold), then tie them into two mini clusters about 10 inches apart from the mirror sides. Use thin fishing line or ribbon to secure balloon weight so they sit at shoulder height in the reflection. Add warm LED votive lights at the base, then test a selfie at arm's length to confirm the balloons don't block faces.
Try thisIf balloons wobble, use a small weight inside the ribbon loop at the base and hide it under the console.
Common mistakeDon't add silver balloons next to gold accents. The mixed metals look messy in mirror glare.
8. Cane-back mirror with dried palm fronds for tropical corners
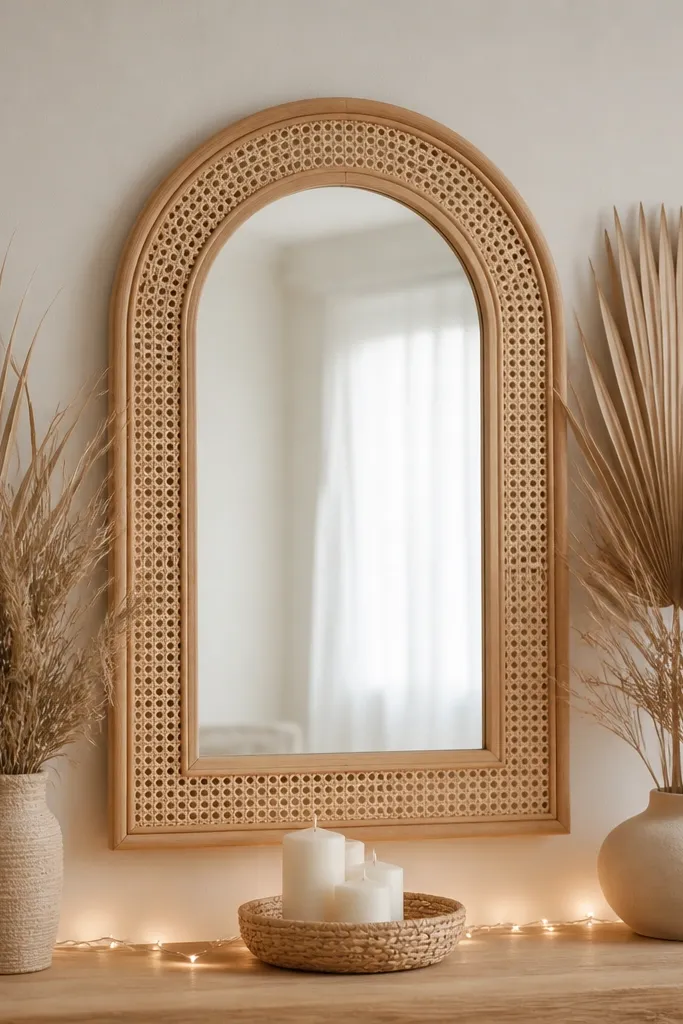
Cane-back mirrors look handmade, and in a small space they add texture without adding bulk. The rattan frame creates a warm border around the reflection, so even a plain wall turns into a styled backdrop. Dried palm fronds bring height and movement, which matters when people pose close to the mirror. This is a strong choice for beachy weddings, but it also works with linen suits and cream slip dresses. The warm lighting keeps the natural tones from turning dull or gray in photos.
Start by placing the mirror on a wall or sturdy stand so the center is about 58 inches high. Put a woven basket or small tray directly under the mirror and line it with 3 to 5 short candles. Arrange dried palm fronds in two clusters, each cluster about the same width as your mirror's sides, so the reflection stays balanced. Add warm string lights along the base behind the fronds, then tuck the battery pack behind the basket. Keep the color palette tight: cream, sand, and light tan - no bright greens.
Try thisMist the fronds lightly with water right before the shoot. It darkens them for a richer look in photos.
Common mistakeAvoid neon-colored florals next to rattan. They read harsh and cheap in reflections.
9. Tall mirror with sheer curtain strip as a soft veil backdrop
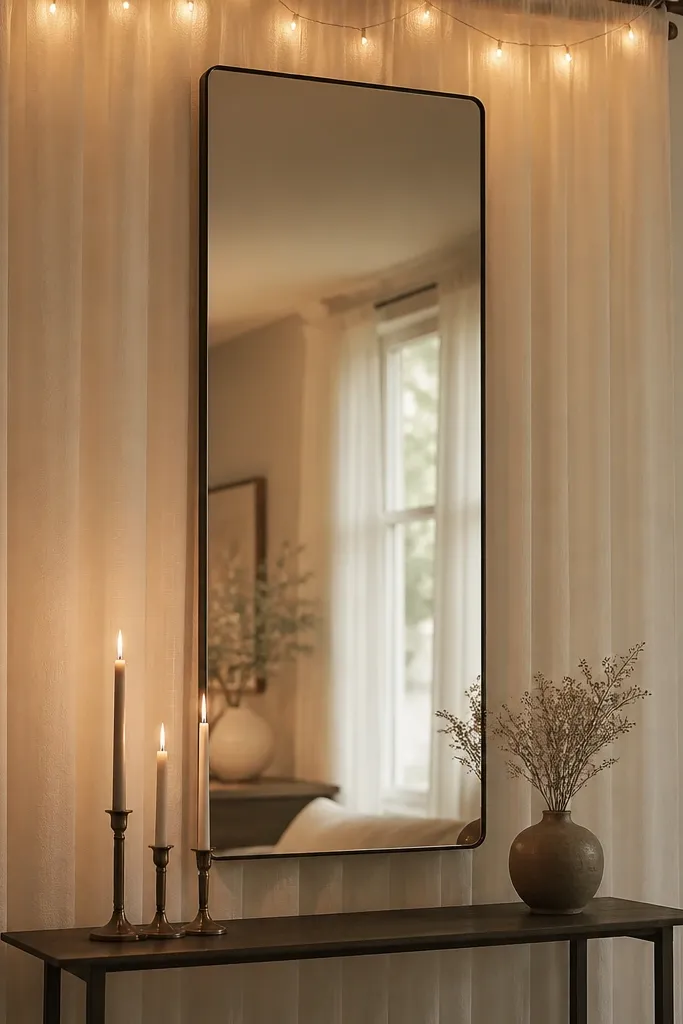
A sheer curtain strip gives you that "soft focus" look without needing a big backdrop wall. The fabric diffuses light and hides clutter behind it, which is exactly what you want in a small space wedding mirror setup. Sheer ivory looks flattering on everyone because it doesn't add competing color; it just makes the background glow. I've used this when the ceremony space has visible signage or a side door - the sheer hides it while keeping the mirror reflection bright. It also makes hair and veils look airy in photos.
Start by hanging the mirror so its center hits 59 inches. Place a curtain rod or tension rod behind the mirror, then hang a sheer ivory panel that extends 6 to 8 inches beyond each side of the mirror frame. Tuck warm fairy lights behind the sheer, keeping the bulbs small and the spacing even. Add a narrow table beneath with a runner in the same tone as the curtain, plus 2 taper candles on either side. Take one test photo from your intended selfie spot and adjust the curtain height so it doesn't show knots or hardware.
Try thisUse a steamer on the sheer. Wrinkles show up fast in mirror shots.
Common mistakeDon't use thick blackout curtains. They create heavy shadows and kill the airy look.
10. Corner mirror setup with two-way lighting and a framed photo strip
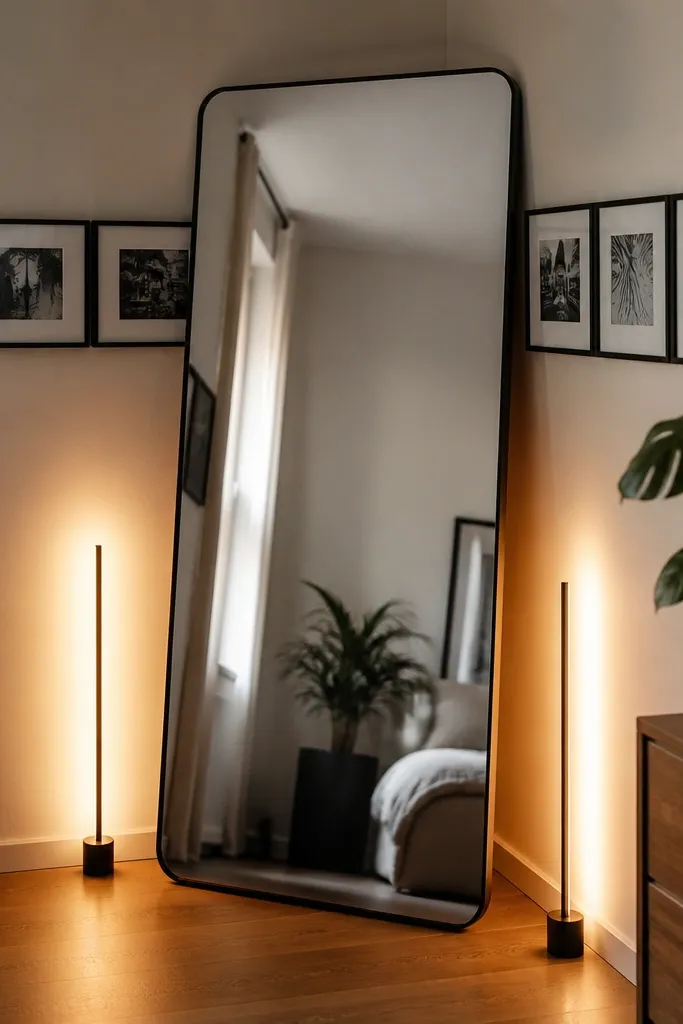
Corners are tricky, but they're also where mirror photos look most intentional. By placing the mirror at a slight angle, you pull background elements into the reflection in a controlled way instead of showing random room clutter. Two-way lighting helps because one light source can create a shadow across one side of the face. This works well for couples who want a "story" vibe, because the framed photo strip adds personality without taking over the mirror. It's also a solid choice for men's photos - the lighting keeps jawlines defined.
Start by measuring the corner so the mirror stands with at least 2 feet of clearance from the nearest traffic path. Place the mirror slightly angled toward where people stand, so their faces reflect clearly and the corner walls frame them. Set two warm LED light bars or battery uplights on the floor at each side, aiming upward toward the mirror center. Add a thin strip of small frames on the wall behind the mirror, keeping frames aligned and centered so the reflection looks tidy. Put a single low bouquet at the corner base and avoid adding more items that will appear twice in the mirror.
Try thisUse a matte black tape line on the floor where people should stand. In mirror setups, tiny stance changes matter a lot.
Common mistakeAvoid glossy photo backdrops behind the mirror. They reflect light spots and turn the background into glare.
11. Slim mirror on a rolling cart with a flower foam strip
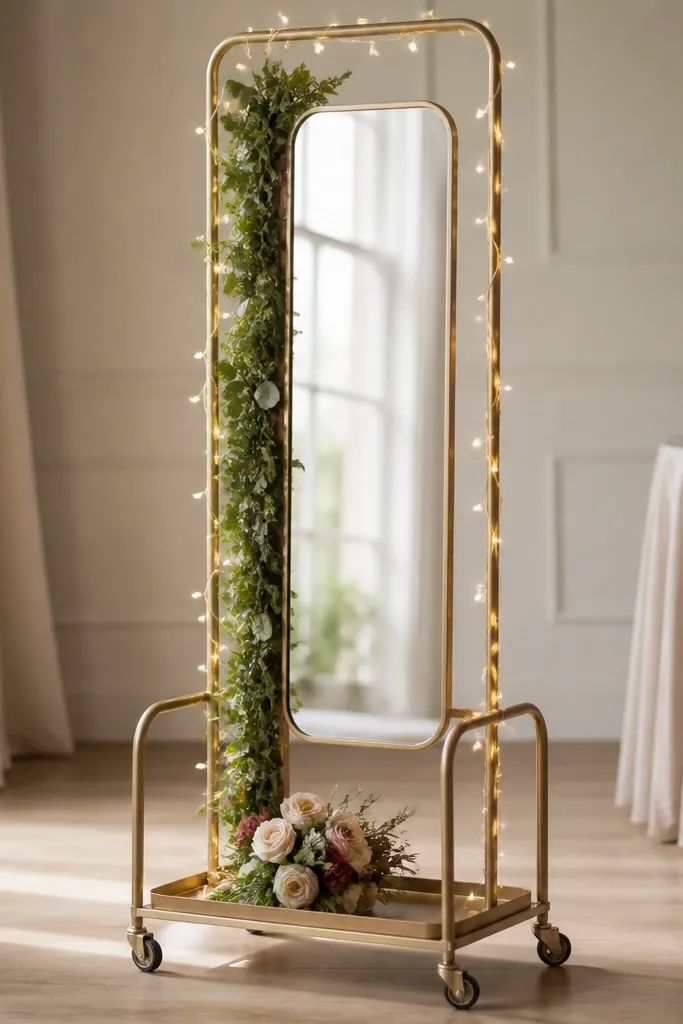
A rolling cart mirror is the most practical option I've tried for venues that rearrange tables during the day. You can move the station from cocktail hour to the reception wall without carrying heavy décor. The flower foam strip gives you a consistent background texture in the reflection, even if the wall behind you is blank. This setup flatters everyone because the mirror stays stable, and the greenery sits behind shoulders rather than behind heads. It also works for men's outfits because the background texture doesn't compete with suit lines.
Start with a slim mirror mounted securely to a rolling cart shelf, then set the cart so the mirror center lands at 58 to 60 inches while guests stand in front. Cover a narrow flower foam strip with greenery and tuck in a few small white buds, keeping the total width under the mirror frame width. Wrap warm string lights around the cart frame and hide the battery pack under the lower shelf. Use a runner or cloth on the top shelf so the reflection doesn't show metal clutter. Roll the cart into place and do a quick test photo to confirm the background texture reads cleanly.
Try thisIf your cart wobbles, add non-slip pads under the wheels. Wobble shows up as blurry mirror selfies.
Common mistakeDon't hang décor that swings from the cart. Moving shadows look messy in reflections.
12. White-lacquer mirror with pearl garland and a single tulip stem
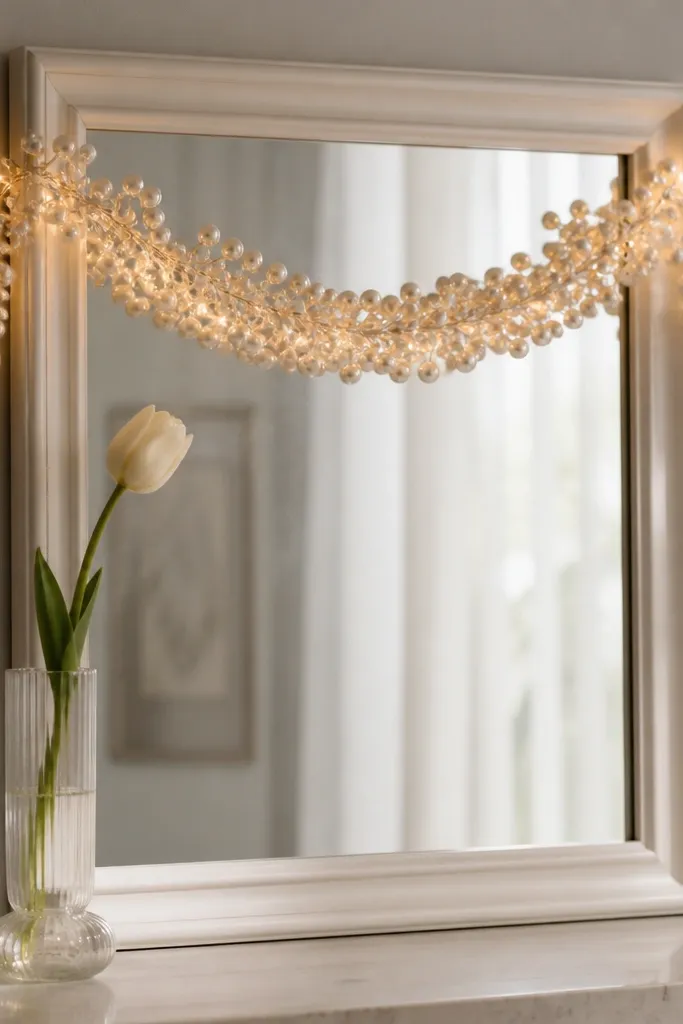
This is a clean, feminine setup that still looks good in small spaces because it uses negative space on purpose. The pearl garland sits high in the reflection and frames hair and veil edges without covering faces. A single tulip stem keeps the color story tight and prevents the mirror from turning into a cluttered wall of flowers. It flatters fair skin because pearls reflect warm light softly instead of creating harsh shine. For deeper skin tones, the white lacquer and warm LEDs make the contrast look crisp rather than washed out. If you're doing a minimalist wedding, this is the mirror moment that doesn't feel overdone.
Start by hanging a white-lacquer mirror so the center is 59 inches from the floor. Drape a pearl garland across the top third of the mirror, then secure it with small clear hooks so it stays straight. Place a glass vase under the mirror and add one tall tulip stem, trimming it so it reaches about 10 to 12 inches above the runner. Add warm micro LEDs behind the garland so the pearls glow gently. Use a white runner on the console and keep the base décor to one item only.
Try thisLay the pearl garland on a flat surface first and straighten it. Knots show up fast in mirror photos.
Common mistakeAvoid mixing pearls with shiny rhinestone garlands. The sparkle style clashes in reflections.
13. Gold round mirror with macaron-colored mini bouquets
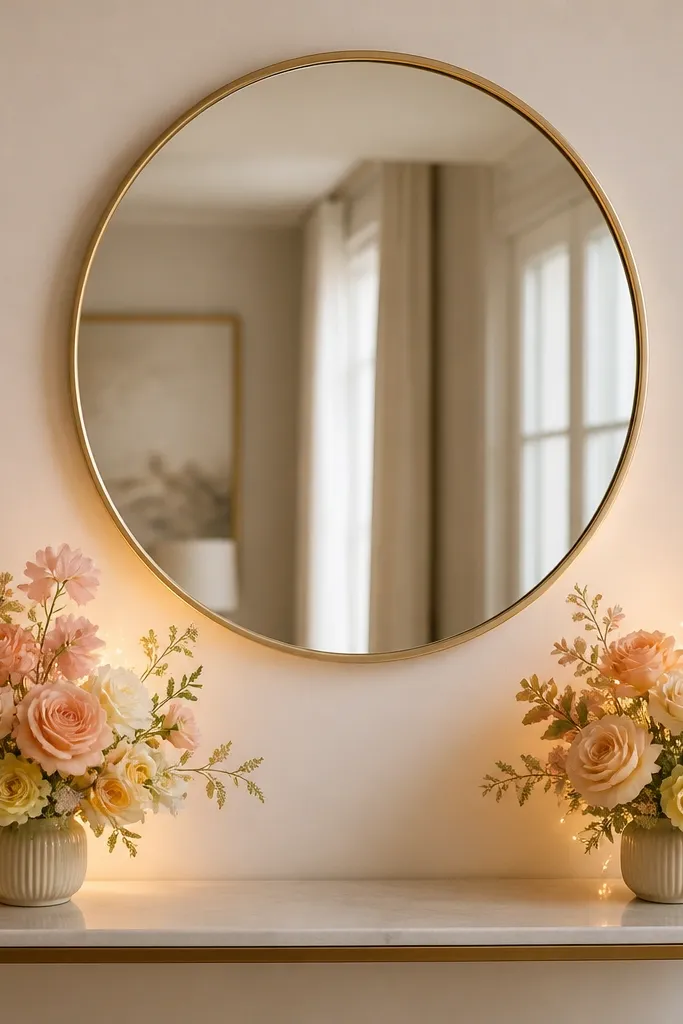
Pastel mini bouquets look playful, and a round gold mirror makes the colors feel like a set rather than random centerpieces. In a small space, you don't want big bouquets that block the mirror - mini bouquets keep the reflection open and let faces stay the focus. Peach and blush work especially well with warm lighting, and pale yellow adds a bright accent without looking neon. This setup flatters both men and women because the pastel colors sit at shoulder height rather than crowding the top of the frame. It's a strong choice for outdoor receptions that move indoors for photos.
Start with a 26- to 30-inch round gold mirror and mount it so its center is 60 inches. Place a narrow table beneath and use a neutral runner in cream or warm white. Build two mini bouquets using 3 to 5 stems each in macaron tones - peach, blush, and pale yellow - and add greenery as a thin base layer. Position bouquets on the table so they sit just outside the mirror's center line, then tuck warm fairy lights behind them so light comes from the sides. Take a test photo to check that bouquet colors don't blend into the background wall color.
Try thisWrap stems with thin satin ribbon in matching pastel shades so the wrapping looks clean in close mirror selfies.
Common mistakeDon't put dark flowers too close to skin tones. They can make warm lighting look muddy.
14. Mirror with a thin bamboo frame and hanging paper lanterns
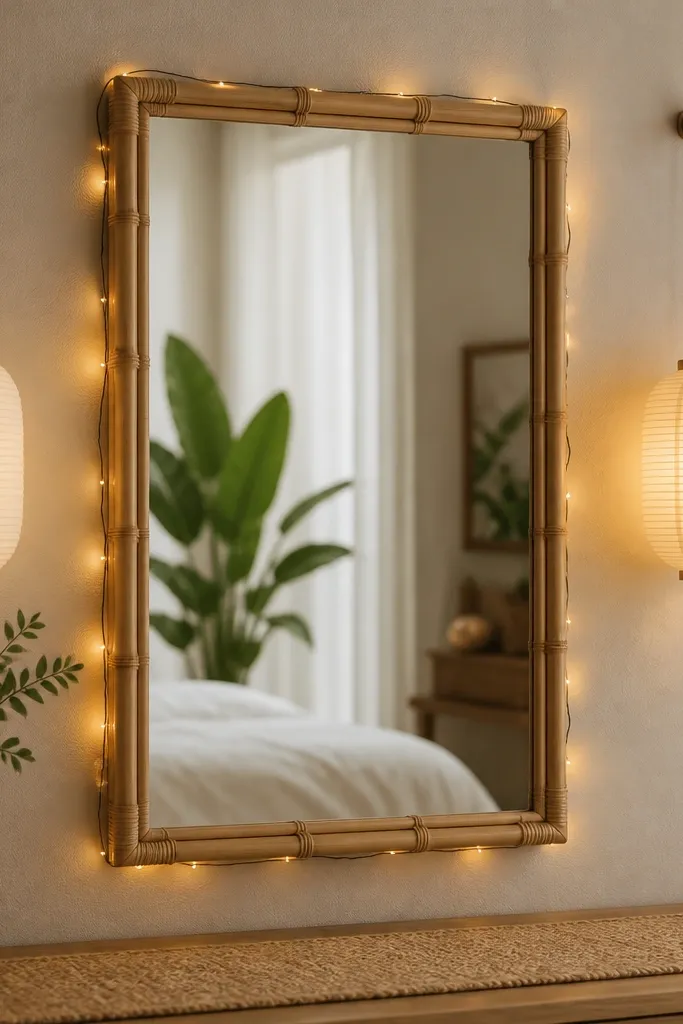
Bamboo frames give you texture that reads well even when the background is plain, and hanging paper lanterns add soft, face-friendly light. The lanterns create a gentle glow that wraps around cheeks and reduces harsh shadows under chins. This setup is great for small spaces because lanterns hang above the traffic path while the mirror stays wall-mounted. It's also flattering for both men in linen shirts and women in satin dresses because the light is diffused and warm. I used a version of this for a micro wedding where the wall was a light gray - the bamboo and lanterns made it look intentional instantly.
Start by mounting the mirror with the center at 58 to 59 inches. Attach thin bamboo trim or use a bamboo-framed mirror, then wrap warm string lights around the mirror edges, hiding the battery pack behind the frame. Hang two paper lanterns from ceiling hooks or a light stand at about head height in the reflection, keeping them 10 to 14 inches from the mirror sides. Place a woven mat or light runner under the mirror and set one small candle or lantern base as an anchor. Test a selfie from 6 feet away and adjust lantern height so the glow hits faces, not foreheads.
Try thisUse warm-white lantern bulbs or LED lantern inserts. Paper lanterns with cool light look flat in mirror photos.
Common mistakeAvoid lanterns that are too large. They crowd the mirror frame and block the background.
15. Two-panel mirror trick with a narrow runner and side-spark candles
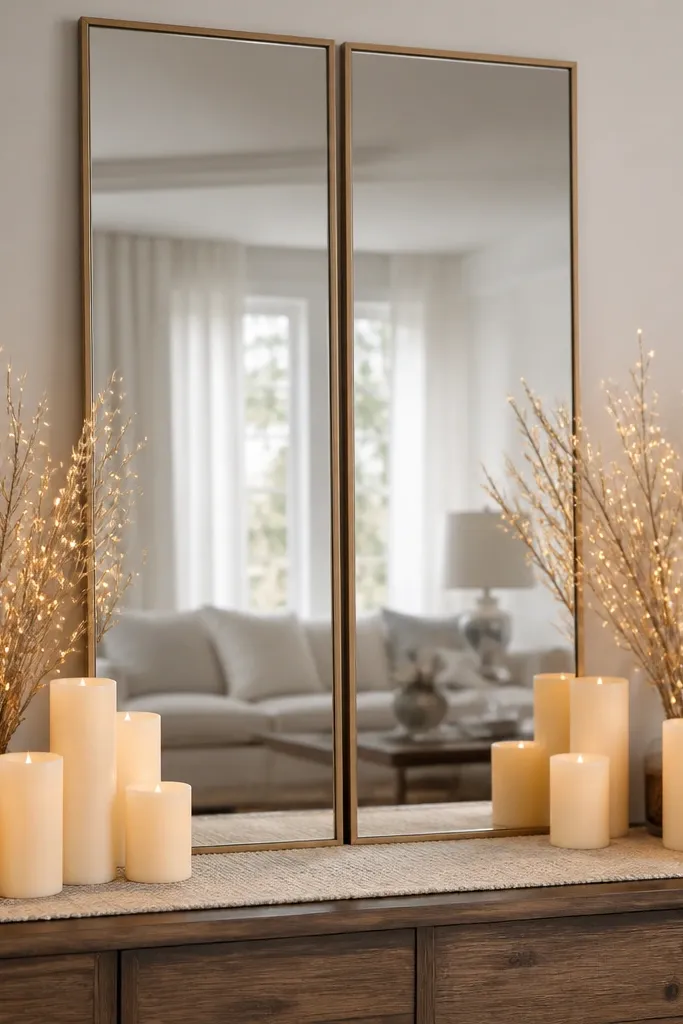
When you want a fuller reflection in a tiny space, two narrow mirrors solve the problem without building a big set. The combined width makes it easier to fit couples and groups, and the mirrors create a layered, editorial look. Side-spark candles add a bit of shimmer that shows up in the reflection without needing confetti. This setup flatters everyone because it spreads the background, so faces don't look squeezed into one small frame. It's especially helpful for men taking photos with their hands at their sides - the wider reflection gives them more natural posture space.
Start with two narrow mirrors, each about 16 to 20 inches wide, placed with a small 2- to 3-inch gap. Mount them or secure them to a shared stand so their centers land between 58 and 60 inches. Place a narrow table beneath and use a runner that matches the wedding palette in a matte fabric. Line battery LED candles along both sides of the runner, then tuck faux spark sticks behind the candles so the shimmer stays in the reflection background. Do one test photo with the couple standing centered between the two mirror panels, then adjust the spacing if any edges cut off shoulders.
Try thisIf the two mirrors create confusing double images, cover the gap with a thin strip of greenery or fabric so the reflection reads as one unit.
Common mistakeDon't set the mirrors too close. Overlapping edges look accidental and cheap in photos.


