1. Dining Table Candle Glow (Before vs After)
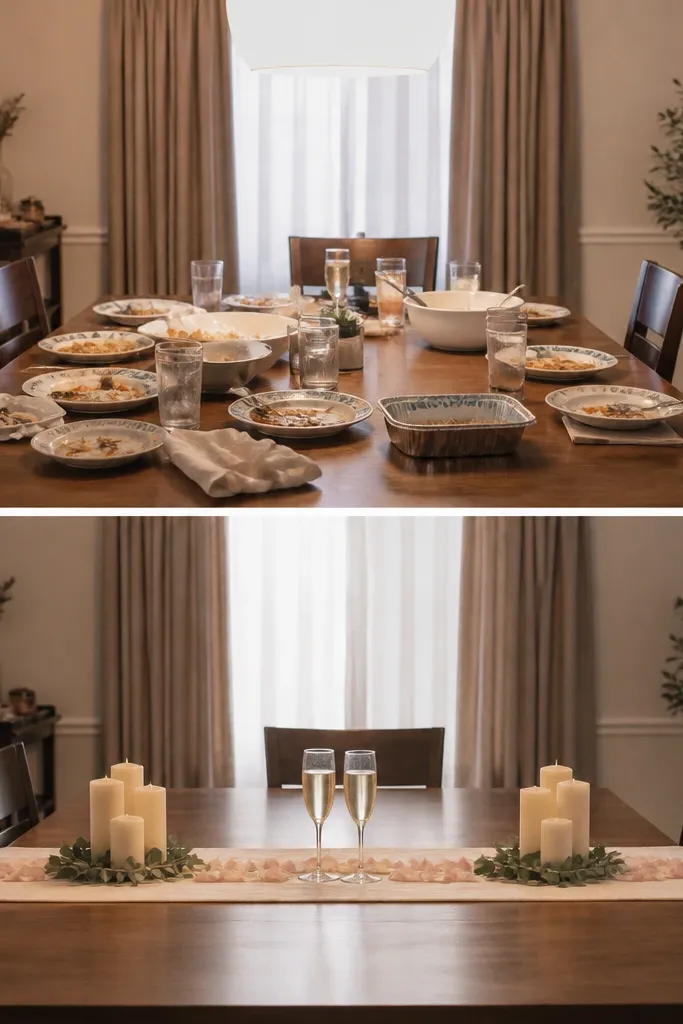
This setup works because it turns a normal dining table into a photo-friendly stage. I like ivory candles and a thin runner in oat or light beige because they don't steal attention from the ring hand. The after version uses low, clustered candles so the light sits near face height and creates gentle shadows instead of glowing from above. It flatters most skin tones because the warm candle color adds a healthy warmth without turning anyone orange like some scented candles do. The styling principle is height control: keep everything low and centered so the background stays calm.
Start by clearing the table completely and wiping it so the surface catches light instead of showing crumbs. Lay a runner that's about 12-14 inches wide and runs the table's length, then place two candle clusters along the runner edges, not in the middle. Add a narrow petal line that stops 6-8 inches before the center so your hands have space. Finish with two glasses placed slightly forward of where the proposal moment will happen, so the couple faces the candles and not the camera. If you have overhead lights, turn them off and use only candles or a warm lamp behind the camera side.
Try thisUse flameless LED candles if you need indoor safety - the photo effect is almost identical and you can leave them on for longer takes.
Common mistakeAvoid tall candle holders. They look gorgeous in real life but block faces in phone photos.
2. Window Ledge Proposal with One Flower Anchor
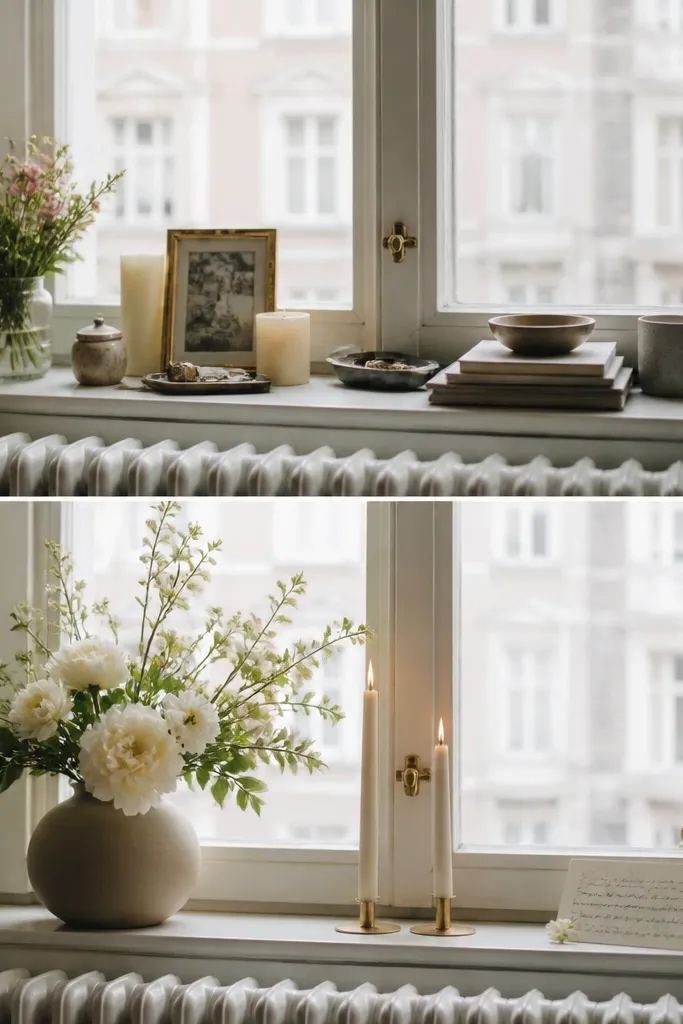
A window-ledge setup is the easiest home win because daylight is already built in. The after version uses a single large bouquet in a matte vase (ceramic in cream or stone gray) so the composition looks intentional, not like you grabbed whatever was on sale. I stick to flowers with a mix of textures - think white roses or ranunculus plus a little greenery - because the window light makes petals look dimensional. This flatters people with cool undertones and warm undertones alike since daylight is neutral and doesn't cast a strong color tint. The principle is "one anchor, clean edges": one main arrangement and tidy negative space.
Start by wiping the window ledge and removing anything that shows in the background of your camera shot. Place the vase so it sits about 8-10 inches from the window edge and roughly aligns with where your face will be when you stand. Add two slim candles on the far left and far right of the vase, leaving the center open for the ring hand. Keep the bouquet height around 10-12 inches above the ledge so it doesn't cut across faces. Then take a 10-second test photo from your intended angle and adjust the vase position until the bouquet frames the proposal moment.
Try thisChoose a vase finish that's matte. Glossy glass reflects your phone flashlight and makes the image look harsh.
Common mistakeAvoid multiple small bouquets. They create a clutter look that reads "last-minute" on camera.
3. Hallway Runner + Balloon Pair (Fast Setup, Clean Photos)
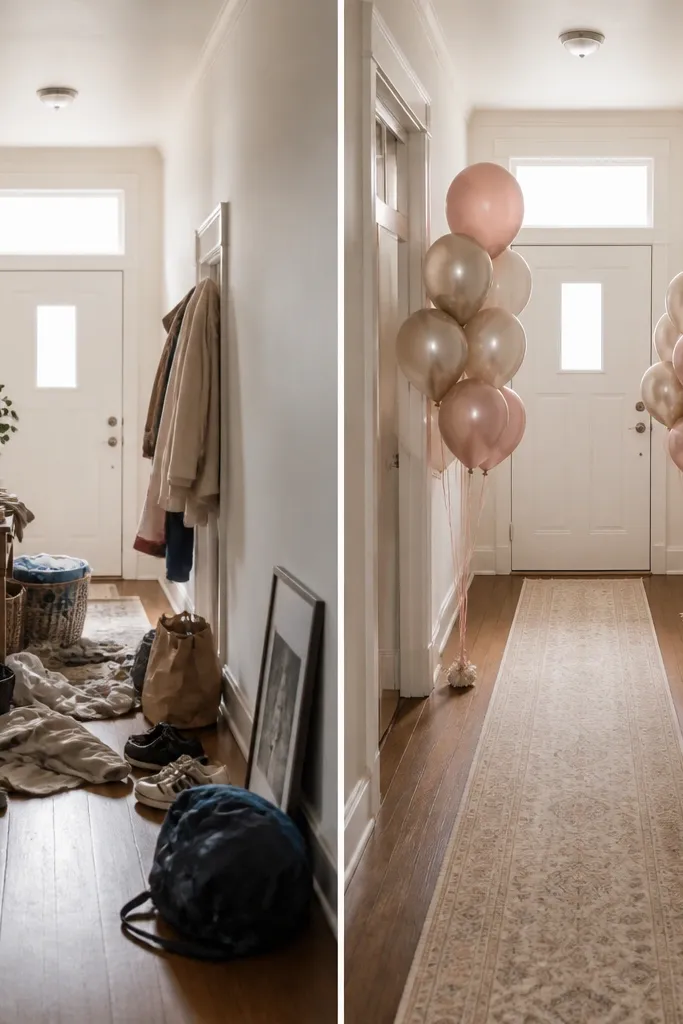
Hallways are narrow, which is why this works: a runner gives you a straight line that makes the photos feel composed. I use two balloon clusters only - one on each side - in muted blush and champagne so the color stays soft and not party-like. The after version includes a small framed photo or a simple sign at the end of the runner to give the background a story. This setup looks great for couples of any height range because the line leads the eye to your faces. The principle is guiding lines: you're using the hallway geometry to make the frame feel deliberate.
Start by sweeping the runner path and removing anything that blocks the camera's view, like coats on hooks directly behind where you'll stand. Tape the runner in place with double-sided removable tape so it doesn't shift when you walk. Place the balloon clusters near the doorway, not in the middle of the runner, so they don't tangle with your steps. Add the framed photo at the end of the runner, angled slightly toward the camera so it's readable but not distracting. Take one test shot while standing where you'll propose and check that the runner line runs through the center of the frame.
Try thisUse balloon weight bags or tape the strings down to the wall. Balloons drifting in wind ruin the "clean" look in seconds.
Common mistakeAvoid bright primary colors. They make the hallway look like a kid's event in photos.
4. Couch Corner Draped Throw + Two Pillows
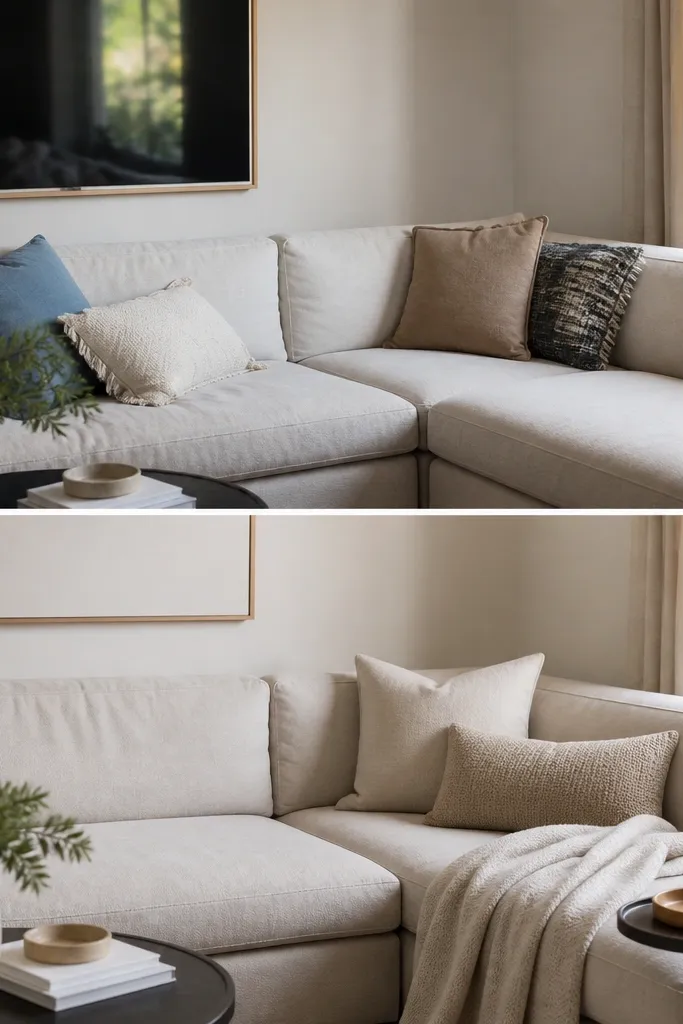
This is my go-to when you want a home proposal that feels intimate, not staged. The after version uses one draped throw in oatmeal or warm gray and two pillows that match it, so the corner looks styled even if the rest of the room isn't perfect. I place a small tray with the ring box on a side table at an angle so it shows in photos without cluttering the couple space. This flatters most body types because the couch corner creates a natural "V" shape that keeps shoulders and hands in frame. The principle is visual restraint: fewer items, placed with intention, beat a full décor moment.
Start by moving loose pillows off the couch and leaving only two you can coordinate by color and texture. Drape the throw over one arm so it hangs down about 10-12 inches, then adjust the fold so it creates a soft line toward the center. Place the tray on the side table about 6-8 inches from the couch edge and keep the ring box centered on the tray. Turn off overhead lights and use a lamp behind the camera side so the corner glows. Finally, stand where your knees will be when you propose and shoot a quick photo - the corner should frame your faces, not hide them.
Try thisIf your TV reflects the room lights, cover it with a light blanket for the proposal window. It cleans the background fast.
Common mistakeAvoid throwing down a dozen random cushions. The couch looks like a clutter pile, not a designed moment.
5. Kitchen Counter Setup with One Color-Clean Surface
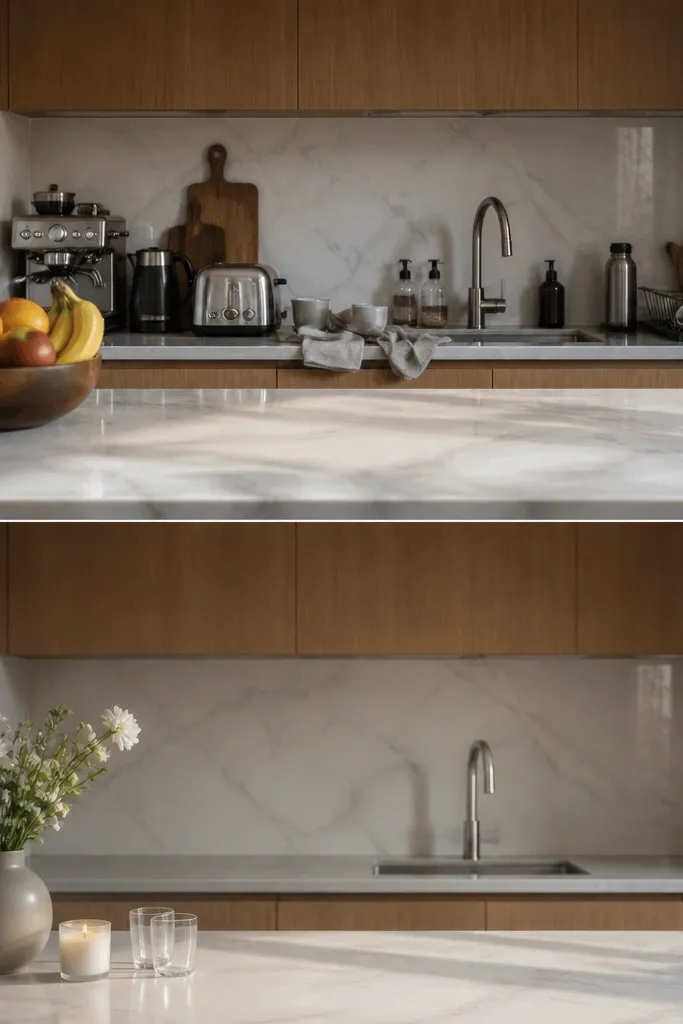
Yes, kitchen proposals can look good, but only if you control the visual noise. The after version uses a matte vase with white flowers and one small candle, then clears everything else so the ring moment reads clearly. I keep the counter color story to one neutral - usually white flowers with green stems and a stone-gray or cream vase - because kitchens already have busy patterns. This setup flatters deeper skin tones by keeping the background light and not casting harsh shadows from under-cabinet lighting. The principle is negative space: a clean counter makes your hands and faces look sharp.
Start by pushing appliances and dish items out of the camera frame, even if they stay in another room. Wipe the counter so it looks even and set down a small tray or cutting board in a single tone, like light wood or white ceramic. Place the vase centered on the tray and add one candle beside it, leaving at least 10 inches of empty space for your hands. If you have under-cabinet lights, turn them off and use a warm lamp instead. Do a test photo from where your phone will be - if the sink shows behind you, reposition or close the blind.
Try thisPut the ring box on the tray first before you start moving props. You'll stop fumbling during the moment.
Common mistakeAvoid placing candles near the edge where you might bump them while kneeling.
6. Balcony or Patio Table with Linen Runner + Ice Bucket
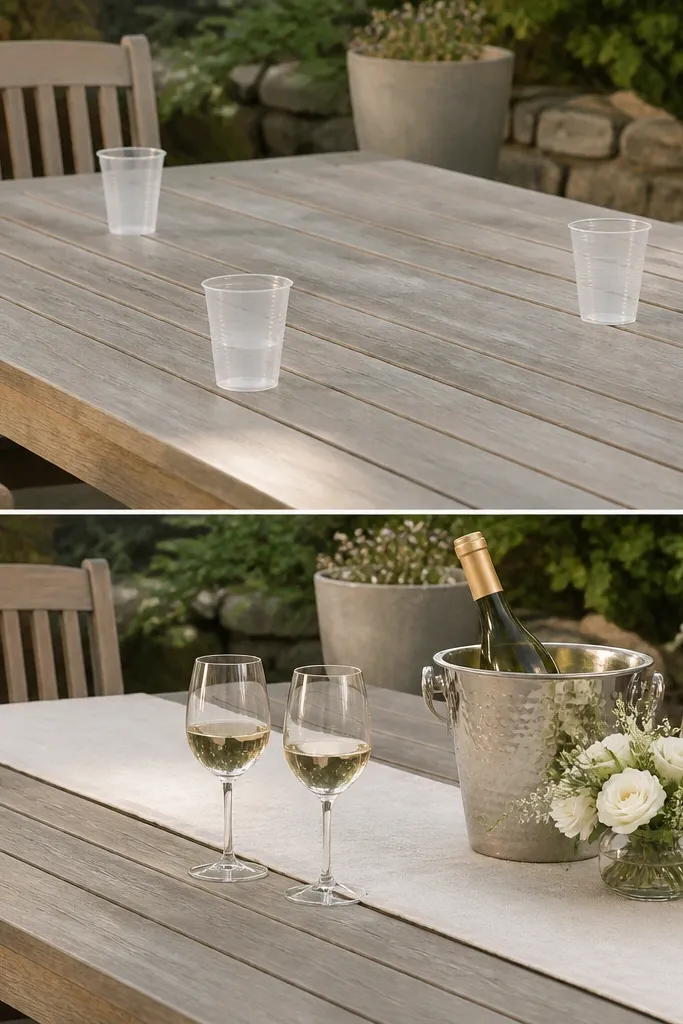
Outdoor proposals look expensive when the materials look intentional. The after version uses a linen runner in natural beige and a low bouquet in a short vase, so the scene looks romantic without feeling like a full wedding table. I add one "party-proof" prop - an ice bucket with a bottle - because it gives you a natural reason to talk, laugh, and stay in the moment. This setup flatters people with lighter hair because linen and greenery add contrast; it also looks good on darker hair because the warm tones don't wash out features. The principle is one functional prop that also looks good in photos.
Start by shaking out the linen runner and placing it centered on the table. Set wine glasses 8-10 inches apart so they frame the couple's hands, not the camera. Put the ice bucket at one end of the runner and keep the bottle label turned away from the camera so it doesn't distract. Place the bouquet in a low vase near the opposite end, keeping it under knee height when you stand. Then take a photo in shade and in direct sun - if it's harsh, move the setup a few feet to catch softer light.
Try thisBring a small cloth to wipe condensation on the ice bucket. Smudges show up in close-up photos.
Common mistakeAvoid matching everything with plastic. Even one clear acrylic piece can cheapen the scene.
7. Bedroom Bedside Proposal with Sheet Tuck Frame
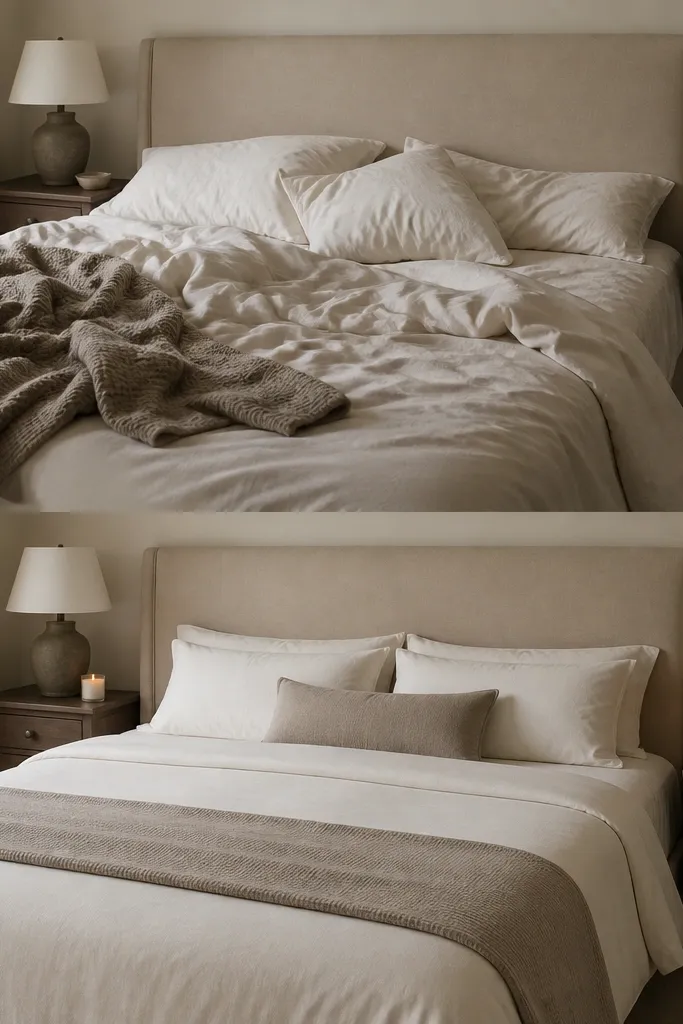
A bedroom proposal can look clean and romantic if you treat the bed like a staged photo backdrop. The after version uses a sheet tuck at the foot so the bed looks pulled together, and it places one bouquet near the headboard so the background has depth. I like candles on the nightstand because they add warm tone without needing heavy décor. This setup flatters body proportions because you can kneel slightly to the side and keep faces angled toward the bouquet light. The principle is "frame the background," not "decorate everything."
Start by making the bed properly: smooth the top sheet, then tuck it at the foot so it creates a straight line in the camera frame. Place a low bouquet in a vase on the nightstand closest to where you'll propose from. Add two small candles, spaced so they don't cast strong shadows across your faces. Keep the ring box on the bed near the edge of the blanket fold, not on a bare sheet where it looks like it's floating. Take one test shot from your phone position - the bed should look crisp, not messy behind your heads.
Try thisUse a lint roller on the sheets. Tiny fuzz shows up under flash and makes the scene look less intentional.
Common mistakeAvoid stepping into the frame with bare clutter. A single laundry basket behind you reads as "home chaos."
8. Staircase Landing with Garland + Small Photo Strip
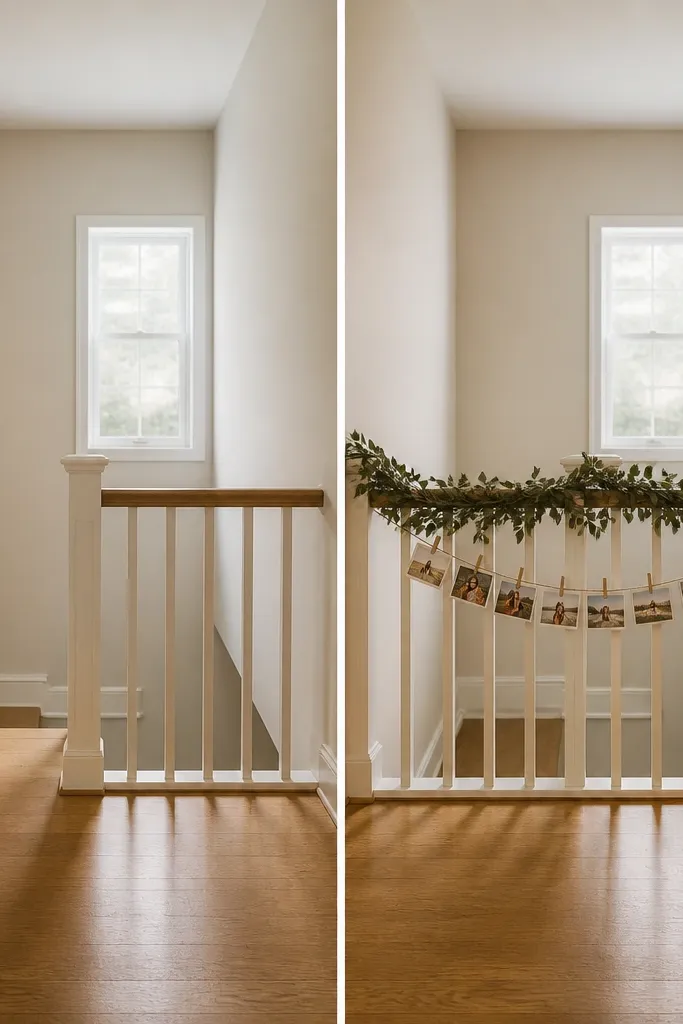
Staircases photograph like event spaces because the lines pull the eye upward. The after version uses one garland across the railing and a small photo strip that adds personal meaning without looking like a full scrapbook. I keep the color neutral - green garland and cream photos - so it doesn't clash with your clothing. This setup flatters all heights because you can kneel on the landing and still have a clean background behind you. The principle is vertical composition: you're giving the camera a "story" from bottom to top.
Start by cleaning the staircase landing and sweeping the floor where you'll place the lantern. Drape a garland along the railing so it sits 4-6 inches from the inner edge, then secure it with clear hooks. Create a photo strip with 5-7 prints clipped to twine, spacing them about 2 inches apart, and hang it centered where your faces will align. Place one lantern or small light at floor level near the base of the railing so it glows upward. Take a test photo from the bottom step - the landing should look symmetrical, not lopsided.
Try thisUse clothing clips instead of clothespins. They leave cleaner marks and look neater in close shots.
Common mistakeAvoid heavy tinsel or glitter garlands. They catch phone light and create messy specks.
9. Living Room Floor Proposal with Rug + Low Bouquet Line
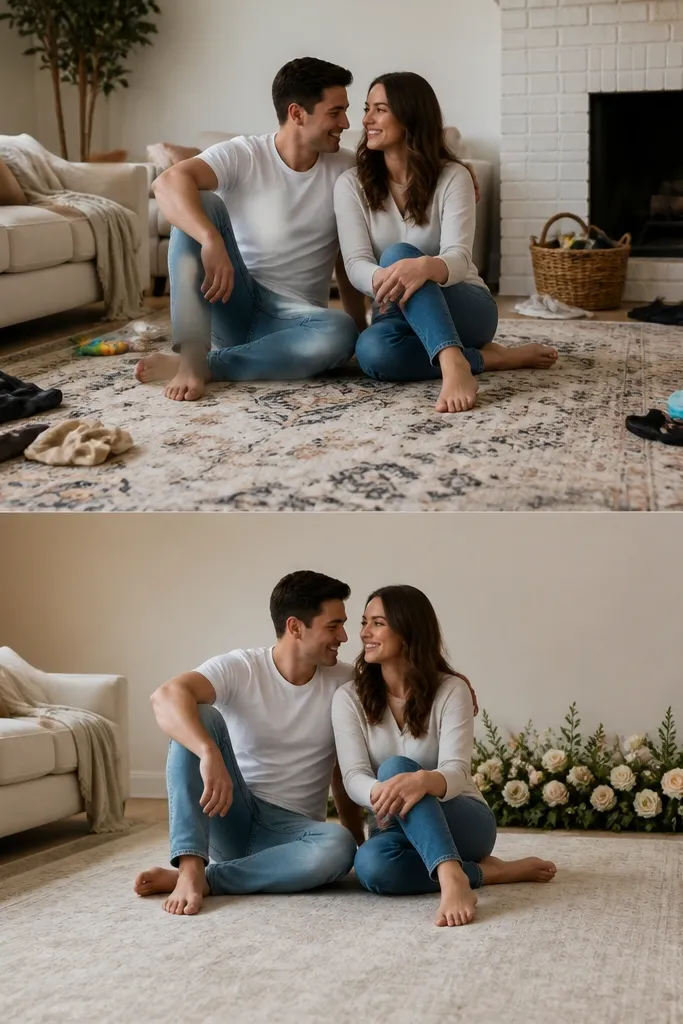
If you want a proposal that feels relaxed but still looks styled, the floor setup is your friend. The after version clears the rug area and uses a low bouquet line so flowers don't block faces when you kneel. I choose a bouquet palette that matches the room's undertones - warm beige rug with cream and blush flowers, cool gray room with white and soft blue accents. This flatters people with shorter frames too because the camera sees a stable horizon and your faces don't get swallowed by high décor. The principle is keeping the "busy" part low and the background simple.
Start by moving small décor off the rug until the area looks like a clean stage. Choose one wall behind you and remove anything that would sit directly above your heads in the frame, like a TV screen glare or wall art reflections. Place a low vase or bundle on one side of the proposal spot, aligned to the edge of the rug, so it creates a diagonal line. Use one extra element - a single candle or a slim lantern - but keep it off the center so your hands stay the focus. Take a test photo at floor level if you can; it shows you immediately if the background is too busy.
Try thisUse removable painter's tape to mark the exact kneeling spot on the floor. Your body will land in the same place every time.
Common mistakeAvoid placing flowers directly behind your head. The camera turns it into a halo of clutter.
10. Car Proposal at Home Driveway with Headlight-Free Lighting
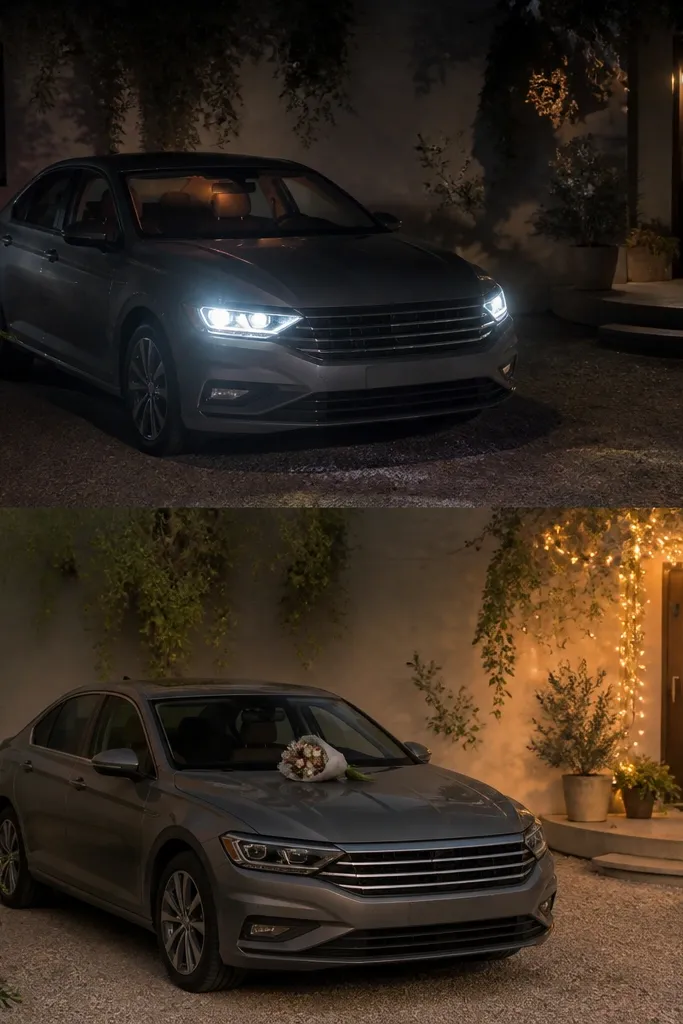
This is the one car proposal setup that doesn't look like a movie extra. The after version avoids headlights in the camera direction and uses warm string lights or a porch lamp instead, so faces look natural. I place the bouquet low near the windshield and keep the background clean - ideally a plain wall or dark hedge - so the ring moment stands out. This flatters everyone because the warm light is even and doesn't blow out skin like headlights do. The principle is controlling exposure: you want warm, low contrast lighting, not bright beams.
Start by parking with the passenger side facing your camera position, then turn car lights fully off. Add warm light from a fixed source - a porch lamp or battery string lights - and place them so they illuminate the couple's faces, not the car hood. Put the bouquet in a simple vase or stable container at the base of the windshield area, keeping it under dashboard height. If you're using a phone tripod, set it about 6-8 feet away so you can kneel without the lens warping. Take a test photo with the camera - if the car dashboard glows, cover it with a dark cloth for the moment.
Try thisIf it's windy, skip loose petals. Use a small bouquet and keep everything tied down.
Common mistakeAvoid using headlights to light the proposal. They create harsh shadows under eyes.
11. Backyard Fire Pit Moment with Blanket Ring Spot
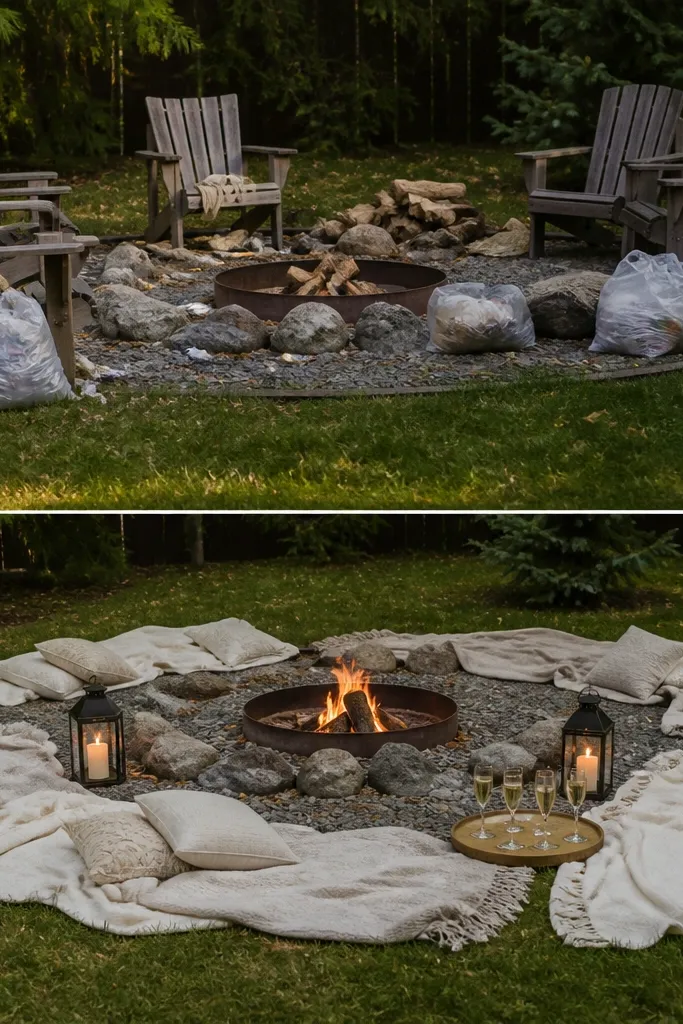
A fire pit setup looks cozy and real, not overdone, when you clean up the edges. The after version creates a blanket circle that frames the proposal spot, and it adds two lanterns for light that doesn't flicker across faces as much as open flames do. I place champagne glasses on a low tray so you can grab them without wandering around. This flatters people with glasses because the lantern glow is soft and doesn't cause heavy glare. The principle is a defined "landing zone" for your body so you don't stumble while you're nervous.
Start by clearing the grass around the fire pit and removing any bags or extra chairs from the camera frame. Lay a blanket circle with two or three blankets overlapping, aiming for a 4-5 foot diameter. Place lanterns on opposite sides of the blanket circle, about 2-3 feet from the proposal kneeling spot. Set a low tray near the fire pit edge with two glasses and a small bouquet in a low vase. Take a photo at standing height and kneeling height - adjust lantern distance so faces look bright but not blown out.
Try thisUse a small battery lantern with a warm filter if you want steadier light than flame.
Common mistakeAvoid placing the ring box on bare ground. It looks accidental and it's hard to find in low light.
12. Proposal Photo Booth Corner with Plain Wall + Fringe Backdrop
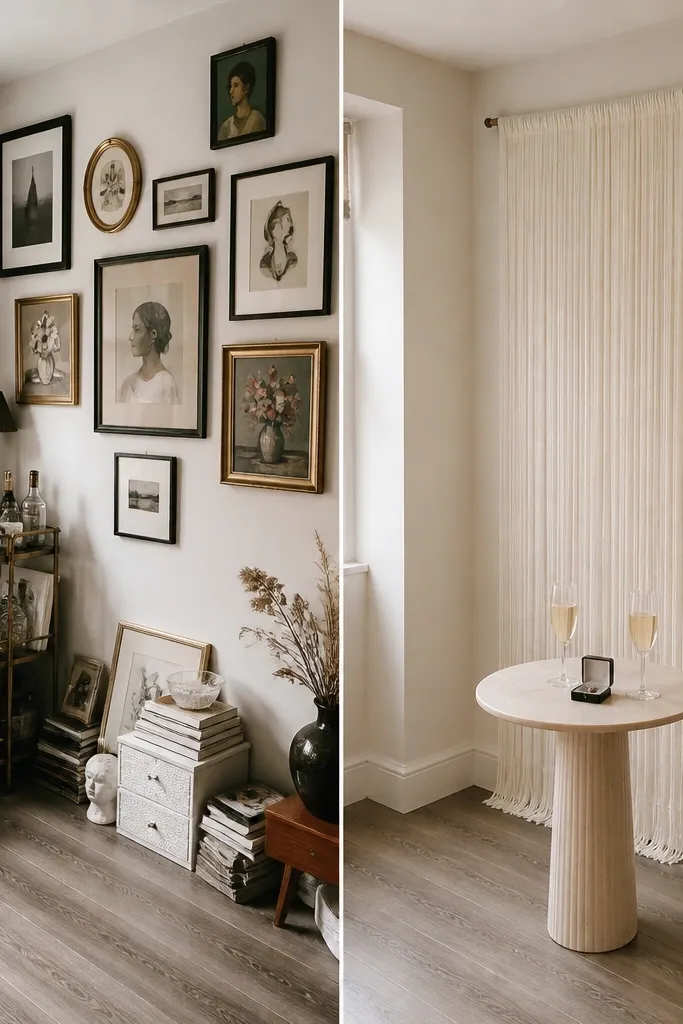
This setup is simple but it looks intentional because the background is controlled. I use a fringe curtain in cream or warm white because it adds texture without looking busy, and it catches light in a flattering way. The after version uses a plain wall so the fringe becomes the only "pattern" behind you. This flatters everyone because the texture draws attention to faces and hands rather than competing with a cluttered room. The principle is background discipline: one clean wall plus one statement texture.
Start by choosing a wall with no busy shelves or framed photos behind where your heads will be. Hang the fringe curtain straight using removable hooks, leaving about 6-8 inches between the curtain and any furniture behind it. Place a small table or ottoman in front of the curtain at a consistent distance so the ring moment stays framed. Put the ring box on the table along with two glasses so you have a ready "prop moment" if you want to toast. Take a test photo from your intended camera height and check that the fringe falls behind your shoulders, not across your faces.
Try thisIron or steam the curtain. Wrinkles show up as messy lines in close-up shots.
Common mistakeAvoid hanging the fringe off-center. Your photos will look subtly crooked even if you don't notice at first.
13. Museum-Style Tabletop at Home with Monochrome Flowers
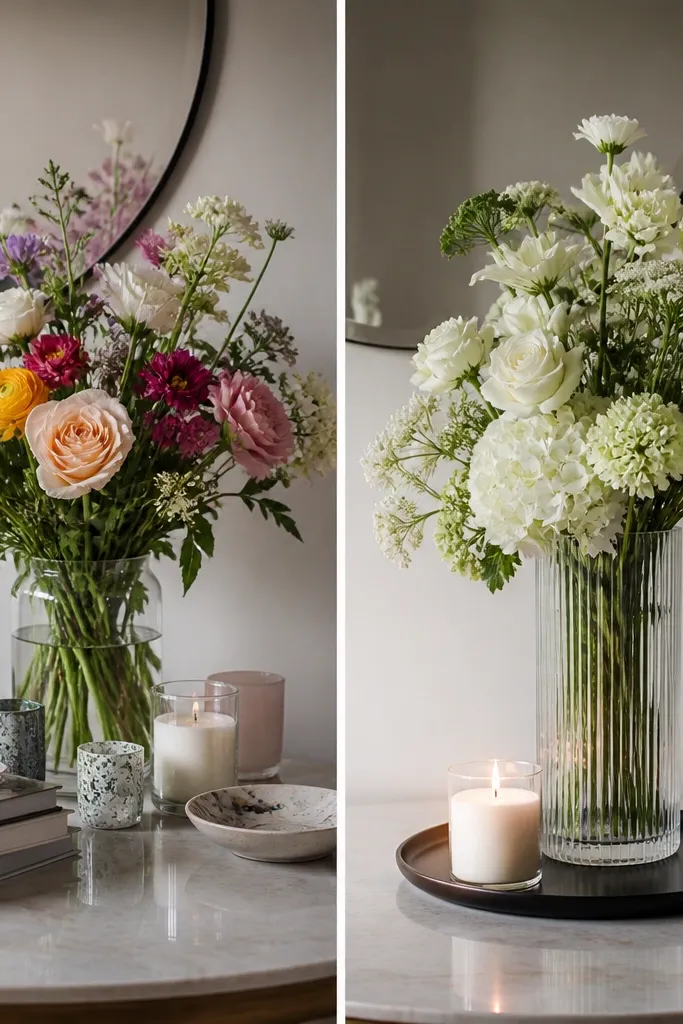
When you want the proposal to look like a magazine photo without spending wedding money, monochrome works. The after version uses white and pale green flowers in a tall vase, plus a black tray under the candle and ring box so the whole scene looks styled. I like this for people who wear black, navy, or cool-toned outfits because the palette stays cohesive. It also flatters warm skin tones by keeping contrast clean and avoiding the orange cast that mixed-color bouquets can cause under warm lamps. The principle is monochrome restraint: one color family across flowers and props.
Start by choosing one flower color family. For this look, use whites and pale greens and remove any flowers that look yellowed. Place the tall vase so it sits slightly behind where your hands will be, not right in front. Set a black tray on the table and place the candle on the tray first, then set the ring box centered next. Keep the table items minimal - two glasses max - and hide any extra packaging or bags. Do a test photo from the camera angle you'll use during the proposal and check for color cast on skin.
Try thisTrim greenery so it doesn't spill over the tray edge. Overhang makes the scene look messy fast.
Common mistakeAvoid mixing bright pink or saturated red flowers into this setup. The monochrome effect collapses in photos.
14. Proposal in the Entryway with Oversized Photo Frame
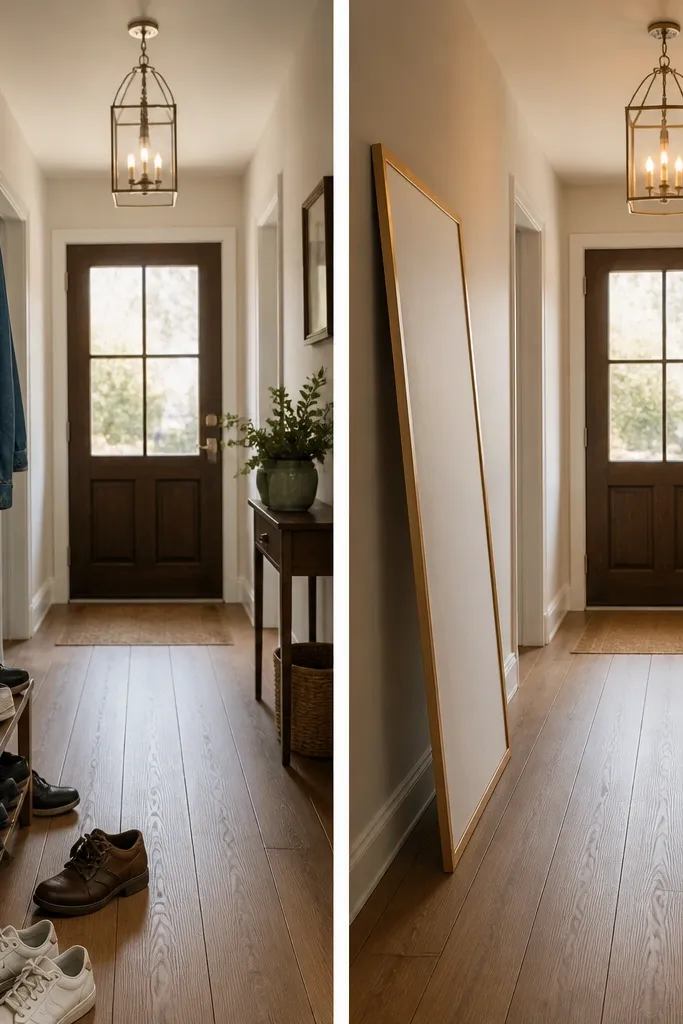
Entryways are great because they're usually the first space you see when you arrive home, so the moment feels grounded. The after version uses an oversized empty frame leaning against the wall, which gives you a clear "picture within a picture" effect. I pair it with one console bouquet in soft whites and greens, plus a warm lamp so the light doesn't come from above. This flatters smaller rooms because the frame creates a focal point without needing lots of décor. The principle is creating a visual border around the proposal moment.
Start by clearing the floor in the camera frame: shoes, bags, and coats have to go. Place the oversized frame about 1-2 inches from the wall and angle it slightly toward the camera so it doesn't look flat. Set a console table or small surface under the frame and keep it mostly empty aside from a bouquet and a candle. Put the ring box on the console near the frame side, not at the front edge where it might slide. Turn on the warm lamp behind the proposal spot and do a test shot - you want the frame to sit behind your heads, not behind the ring hand.
Try thisChoose a frame color that matches your home - black for modern, white for bright, natural wood for warm interiors.
Common mistakeAvoid busy doormats or patterned runners in the entryway. They compete with the frame.
15. Coffee Table Proposal with Tray Layers and One Statement Candle
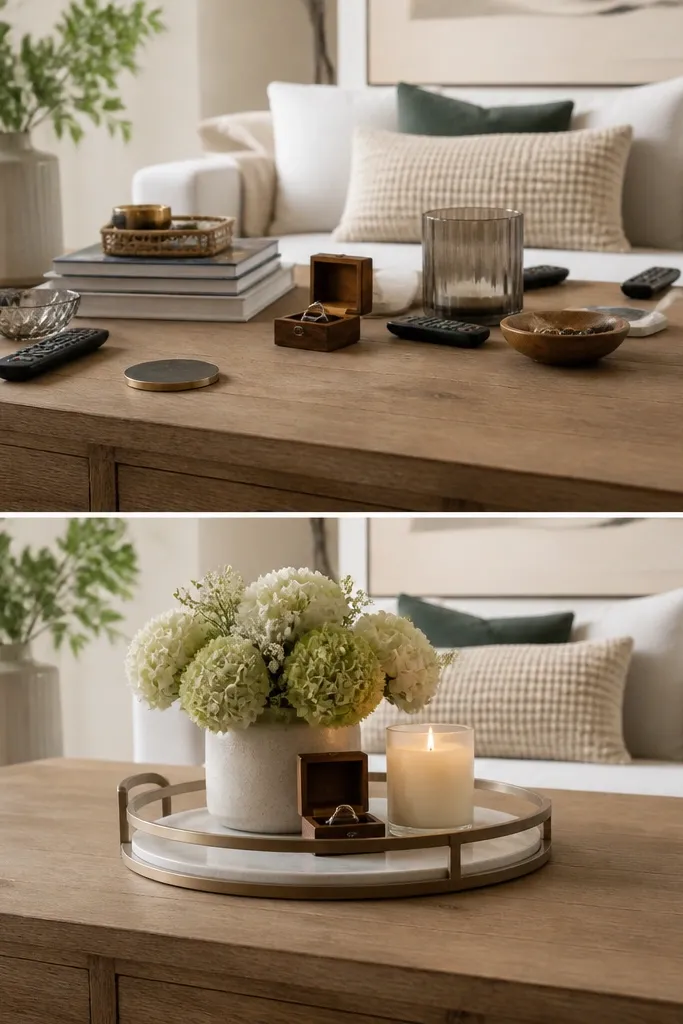
A coffee table proposal can look polished fast if you treat it like a styling set. The after version uses one layered tray (wood or black) and keeps everything on the tray so the background stays clean. I use one statement candle - not three small ones - so light and focus are controlled. This flatters people who sit close to the table because the ring hand stays centered and the candle doesn't block faces. The principle is stacking in one place: gather props into one tidy zone instead of scattering them across the room.
Start by removing everything from the coffee table except the one tray you're using. Place the tray centered where you'll be sitting or where the phone will frame the moment. Add the statement candle first, then place a small bouquet in a compact vase beside it, leaving space for the ring box in the middle. Put coasters under drinks only if they're going to stay - otherwise, skip drinks for the proposal moment. Take a test photo and check that the ring box is visible and not hidden behind the candle flame or glass glare.
Try thisWipe the tray and candle glass with a microfiber cloth. Smudges show as streaks on phone cameras.
Common mistakeAvoid leaving remotes, chargers, or mail on the table. They read as everyday clutter, not intention.